Blueprints vs. C++
How They Fit Together and Why You Should Use Both
Watch the video: https://youtu.be/VMZftEVDuCE (47 minutes)
It's not an either/or decision. Learn what makes C++ and Blueprints different, what they have in common, and how to use them together effectively. We'll also learn a thing or two about performance optimization and some basic software design concepts.
Table of Contents
- Introduction
- Common Ground
- Design Concepts: High-Level vs. Low-Level
- Design Example: Weapon System
- Design Concepts: Scripting vs. Programming
- C++ and BP as Programming and Scripting Languages
- Scope of this Discussion: Where C++ and BP Overlap
- Performance: Comparing Compiled C++ and BP
- Performance: Conclusions and Profiling
- Project Organization: Class Design
- Design Concepts: Types and Dependencies
- Project Organization: C++ Modules
- Project Organization: BP-to-C++ Dependencies
- Design Example: Refactoring from BP to C++
- Design Example: Doing Everything in C++
- Design Example: Basic C++ / BP Interop
- The Traditional Programming / Scripting Split
- Design Example: Blueprint Function Libraries in C++
- The Main Event: C++ vs. Blueprints
- BP Advantages: Assets, Visuals, Scripted Events
- BP Advantages: Ease of Use
- C++ Advantages: Performance, Fundamental Code
- C++ Advantages: Engine Functionality Not Exposed to BP
- C++ Advantages: External Libraries
- C++ Advantages: Diffing and Merging
- Personal Preferences
- Conclusion
Introduction
Unreal Engine gives you multiple options for programming games: you can use C++, and you can also use Unreal's Blueprint system.
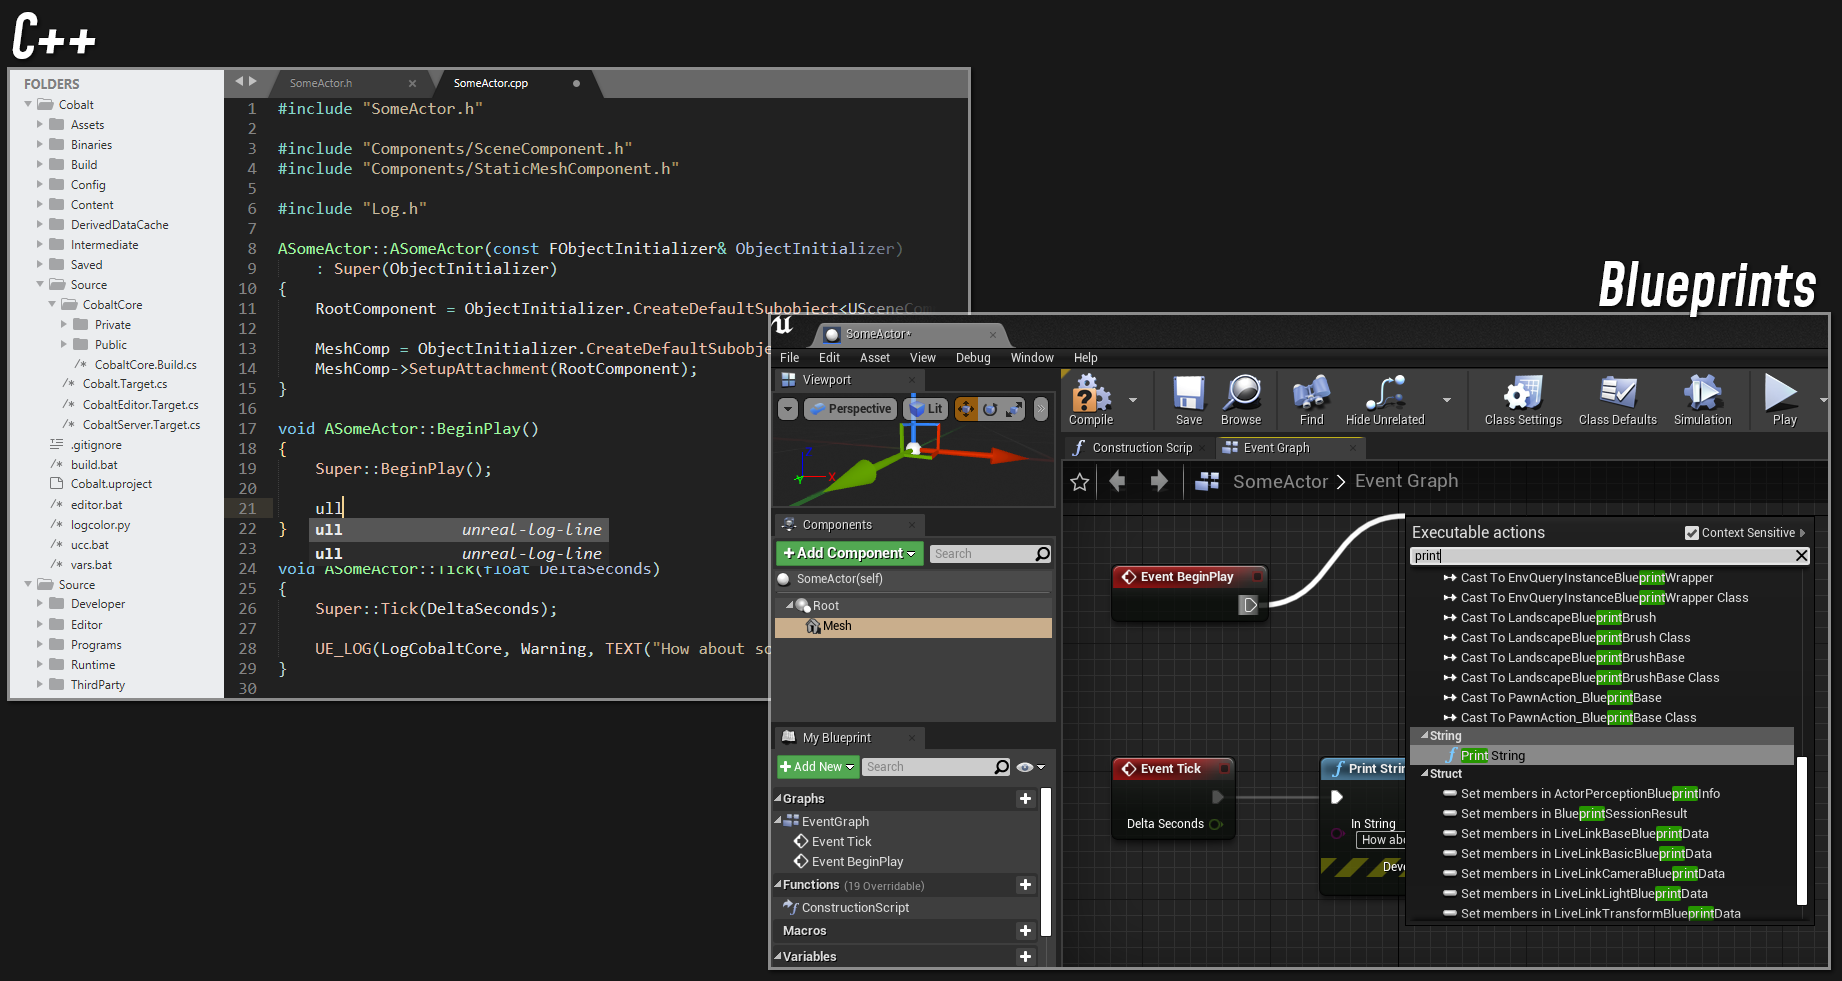
Some of the differences between C++ and Blueprints are pretty self-evident: with C++, you're writing code using a general-purpose, text-based programming language. Blueprints are more visual, and more specifically tailored to higher-level game programming: you write code by stringing together graph nodes that represent events, control structures, and function calls, and you define your data and interfaces through in-editor dialogs, instead of having to write out definitions with precise syntax.
But beyond those obvious differences, there are some more nuanced questions to ask yourself about how to approach making games in Unreal. It's not just: "should I use C++ or should I use Blueprints?" In fact, that's kind of a false premise – Unreal is designed in such a way that C++ and Blueprints are very complementary. So a better question would be: "where does it make sense to use C++, and where does it make sense to use Blueprints?"
That's the question I'd like to examine. Along the way, we'll look under the hood tto get a better understanding of the performance tradeoffs between Blueprint script and native code, and we'll discuss some basic design principles and get a sense of how a project is typically organized to make effective use of both. Finally, we'll wrap up with a look at some of the things that differentiate the two.
But before we get to all that, I'd like to start by talking about some of the things that Blueprints and C++ have in common.
Common Ground
If I have a custom Actor type, and I want it to spawn another Actor when the game starts, here's what that might look like in C++:
void ACoyote::BeginPlay()
{
    Super::BeginPlay();

    if (bSpawnAnvil)
    {
        const FVector SpawnOffset(100.0f, 0.0f, 1500.0f);
        const FVector SpawnLocation = GetActorTransform().TransformPosition(SpawnOffset);
        const FTransform SpawnTransform(FQuat::Identity, SpawnLocation);

        FActorSpawnParameters SpawnInfo;
        SpawnInfo.Owner = this;

        AAnvil* Anvil = GetWorld()->SpawnActor<AAnvil>(AnvilClass, SpawnTransform, SpawnInfo);
        if (Anvil)
        {
            Anvil->BeginFalling();
        }
    }
}
And here's the same thing in Blueprints:
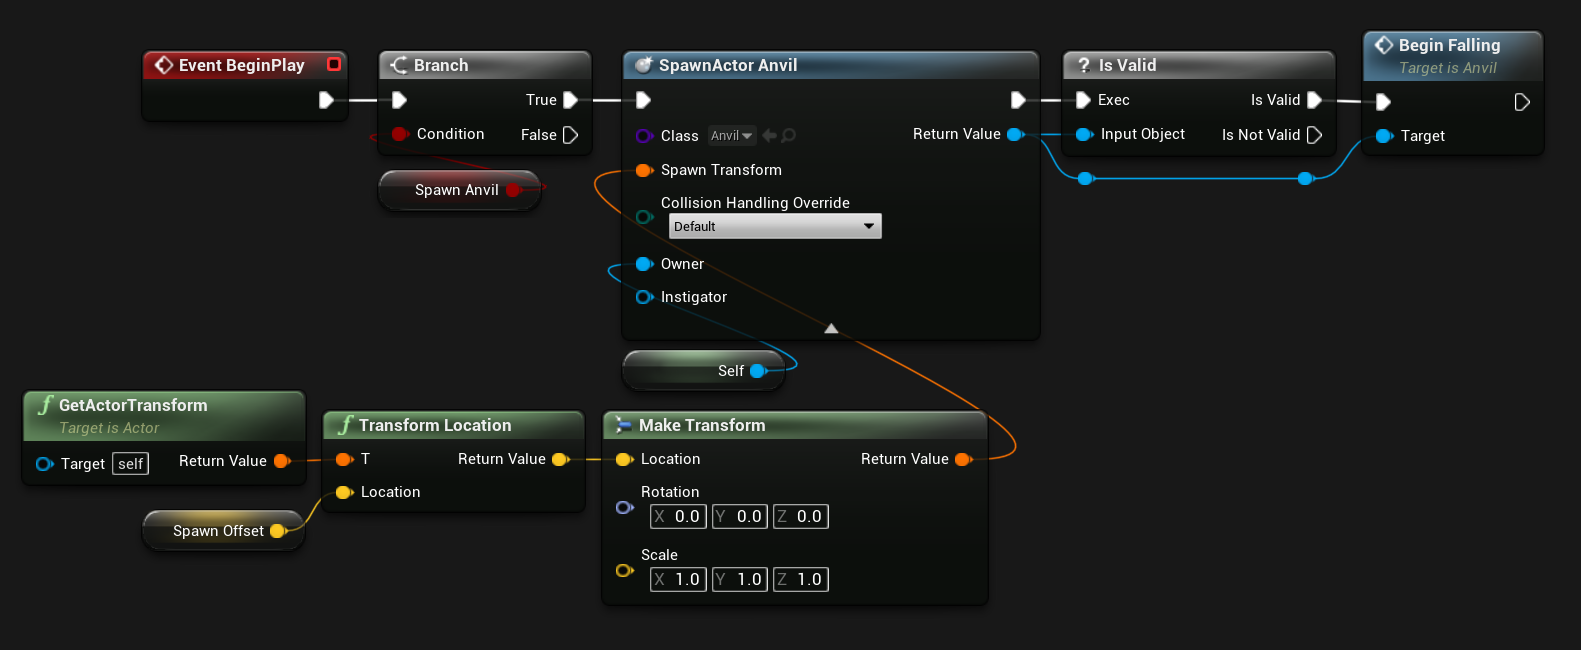
These two snippets might look pretty different, but they give us the exact same result. And that brings us to an important point: you might choose to implement an example like this in C++, or you might use Blueprints. But either way, you're writing code.
You may be writing that code without typing any actual syntax, but you're still dictating how a program is going to behave at runtime. And, almost certainly, you're going to be working within an established software framework, creating new classes, and defining how those classes behave and interact with each other.
In other words, you're going to be dealing with software design.
Design Concepts: High-Level vs. Low-Level
So let's talk a little bit about design.
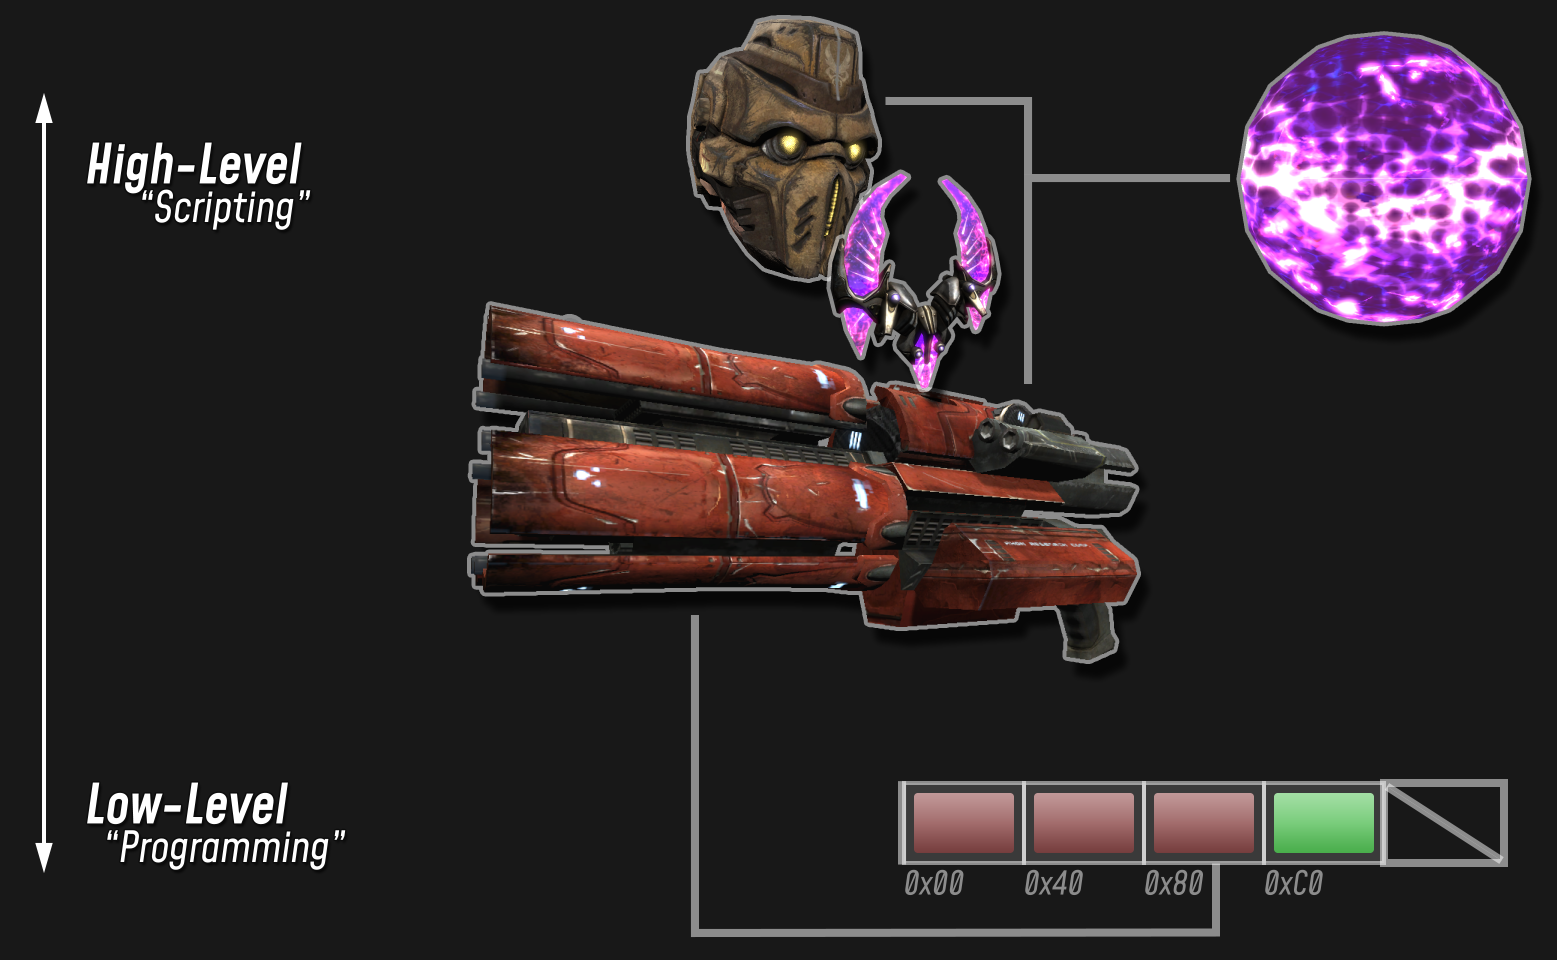
When you're considering a complex piece of software, like a video game, it's helpful to think vertically. Usually, your goal is to implement some complex, high-level functionality. The way you actually accomplish that is by breaking the problem down into more fundamental bits of functionality that can be implemented at a lower level.
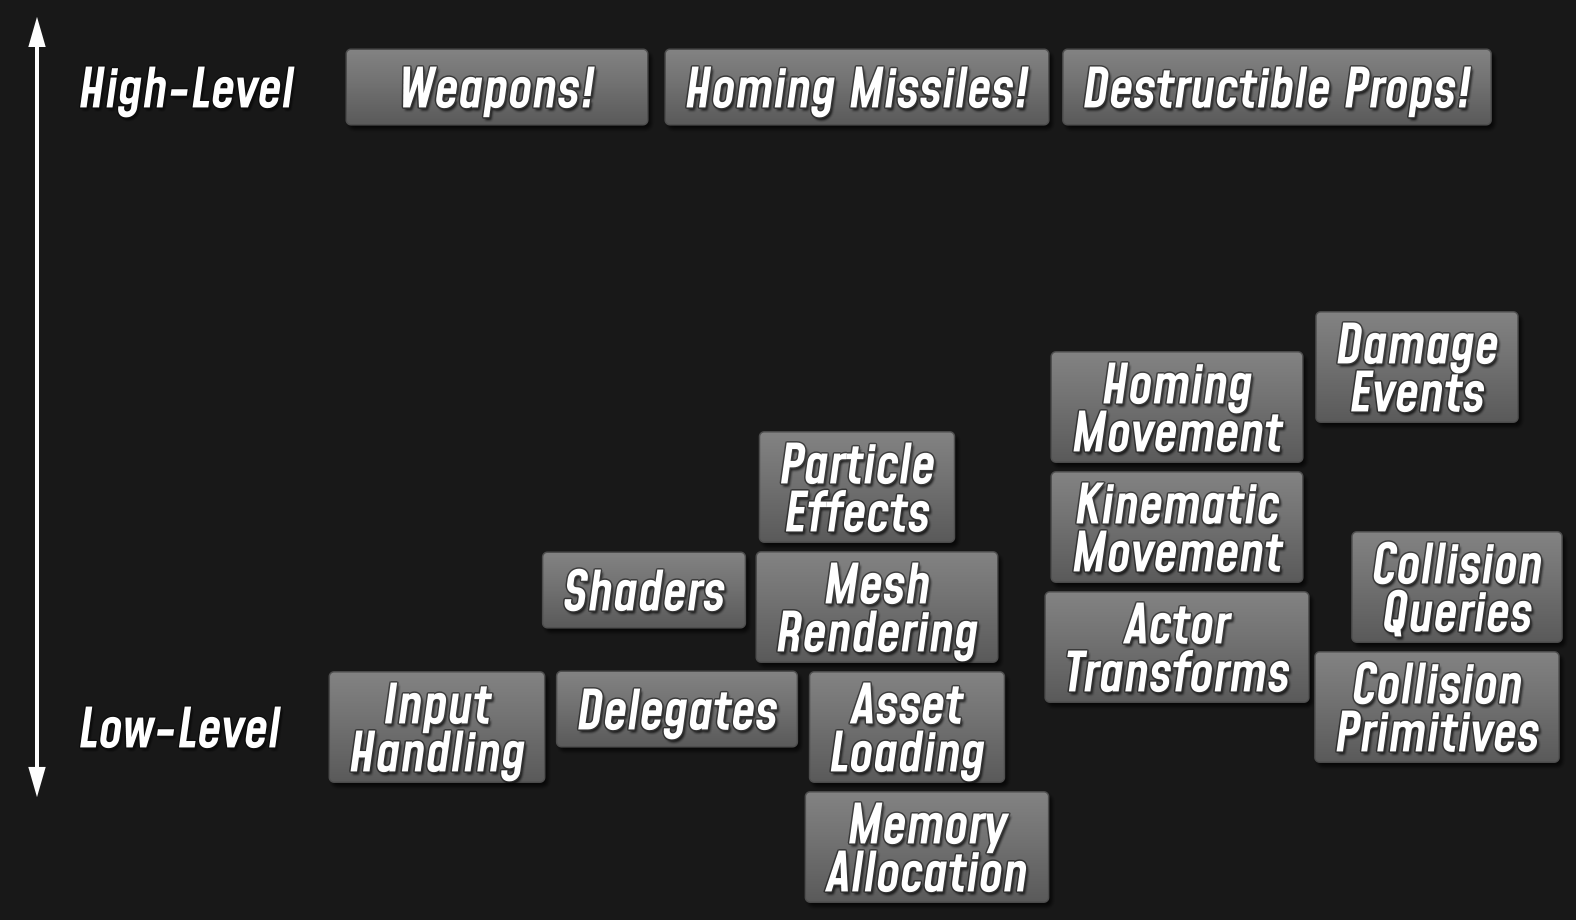
If your game needs to have a super-cool rocket launcher that fires different kinds of projectiles, and those projectiles fly around and hit stuff and cause explosions, that's cool... but you can't just implement that out of nowhere. You have to build up from something.
So your game design gives you a definition for what your high-level functionality needs to look like, and the engine, framework, or libraries that you're using give you a solid low-level foundation to build up from.
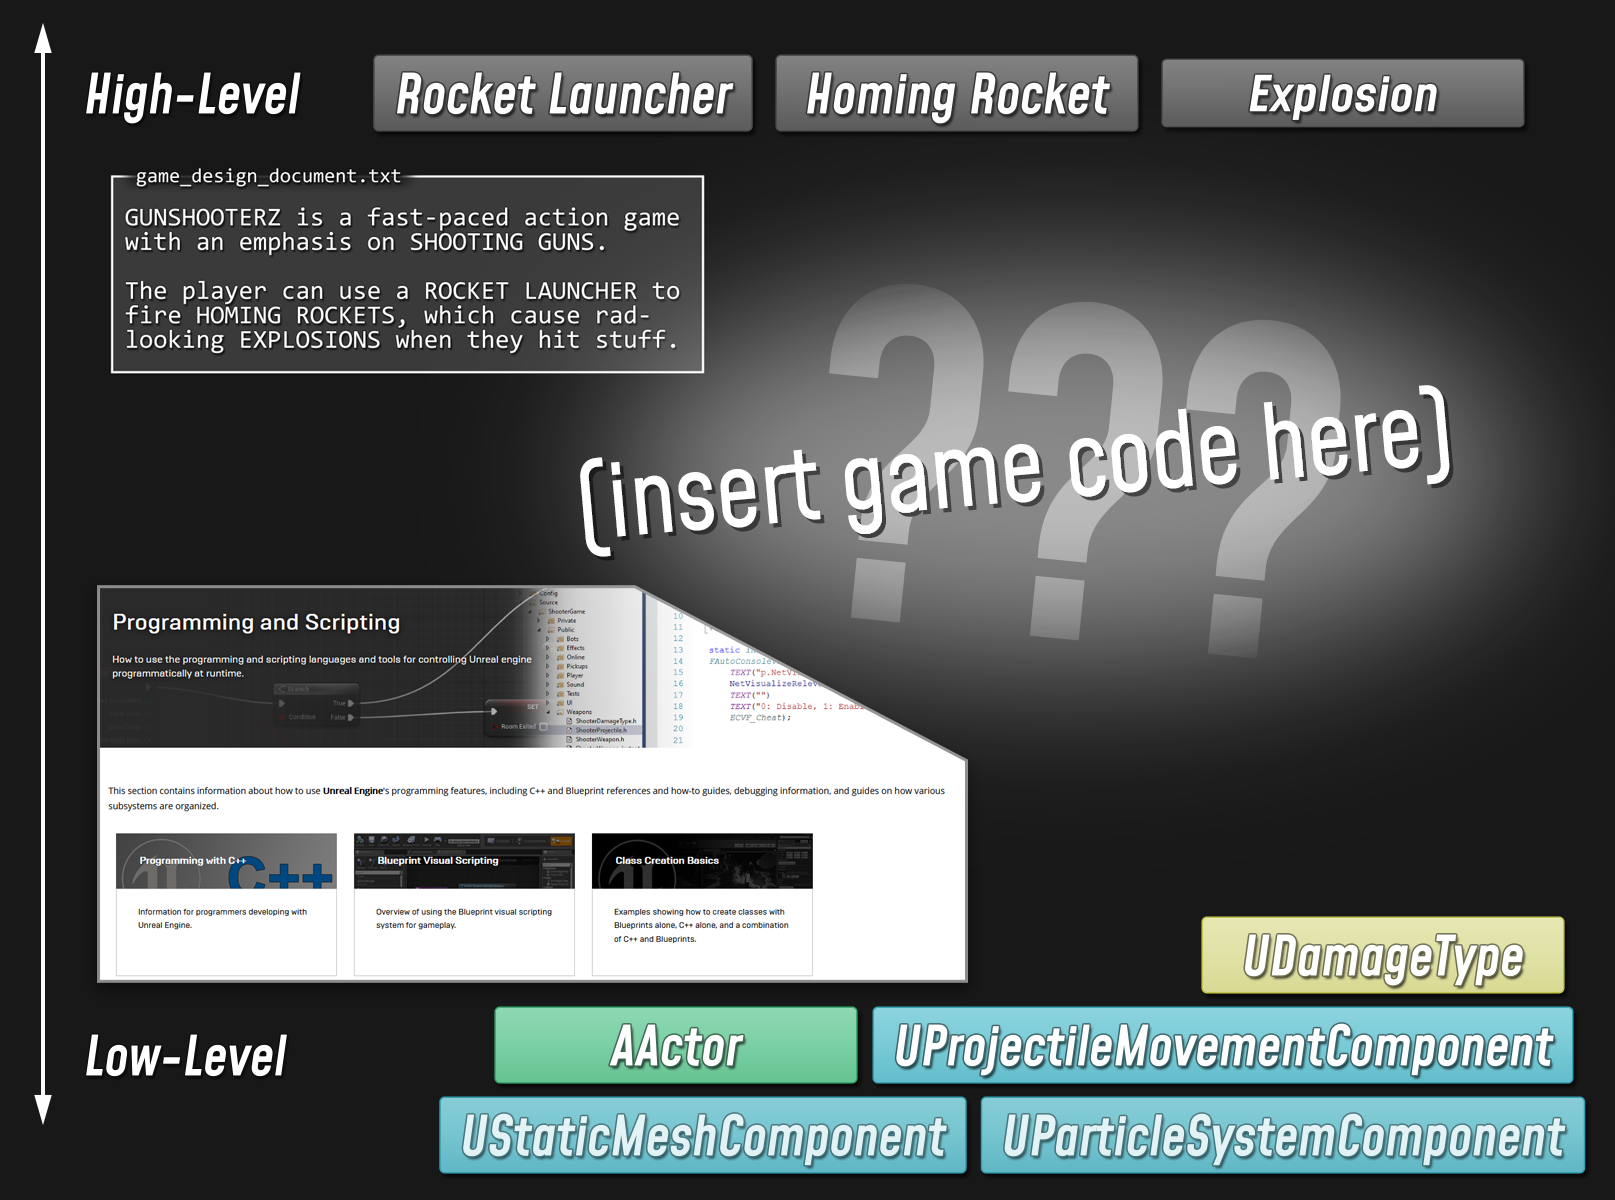
Our design process as programmers, then, is about filling in all the missing details in between.
Design Example: Weapon System
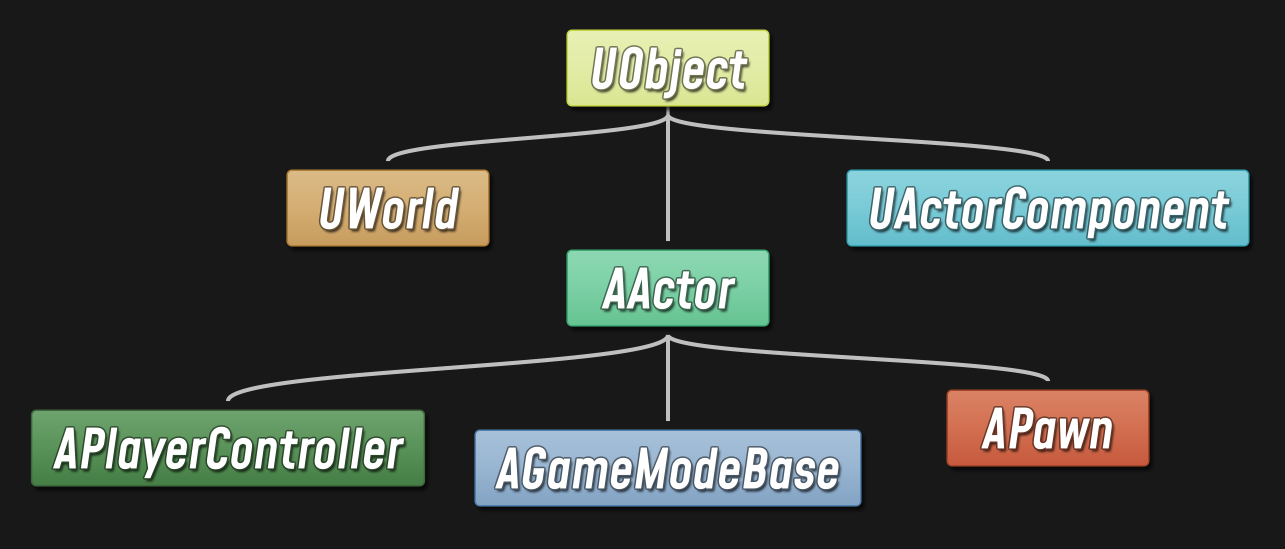
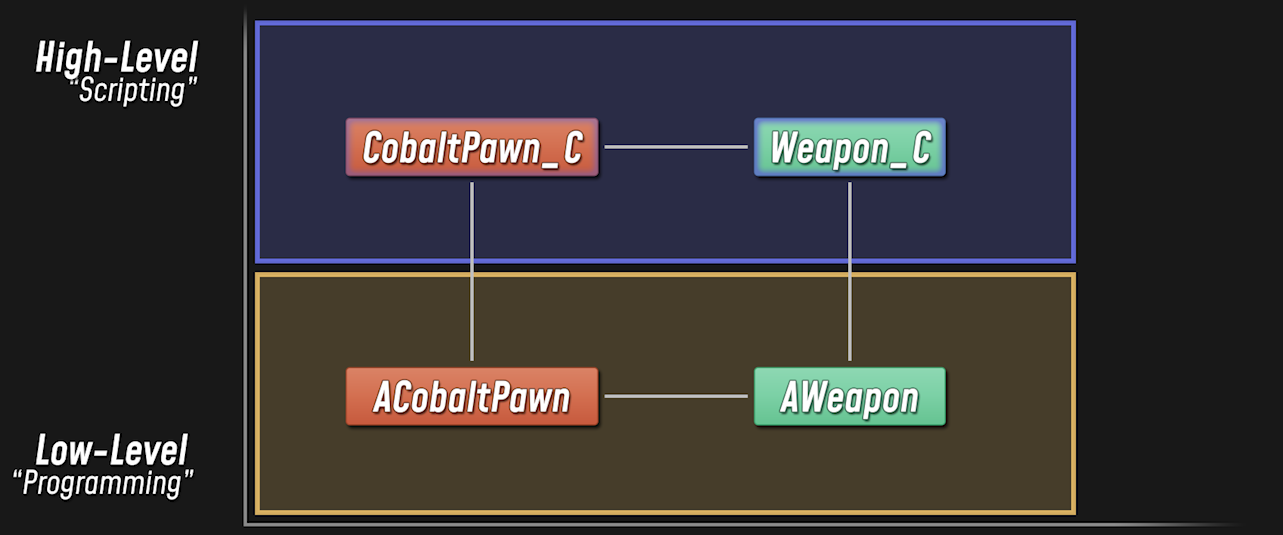
So for a weapon system, we might start by defining a simple inheritance hierarchy to connect our final classes back down to types provided by the Engine. Then we'd want to decide what each of our custom classes should be responsible for, how they need to interact with other objects in our game, and what underlying Engine functionality they should leverage.
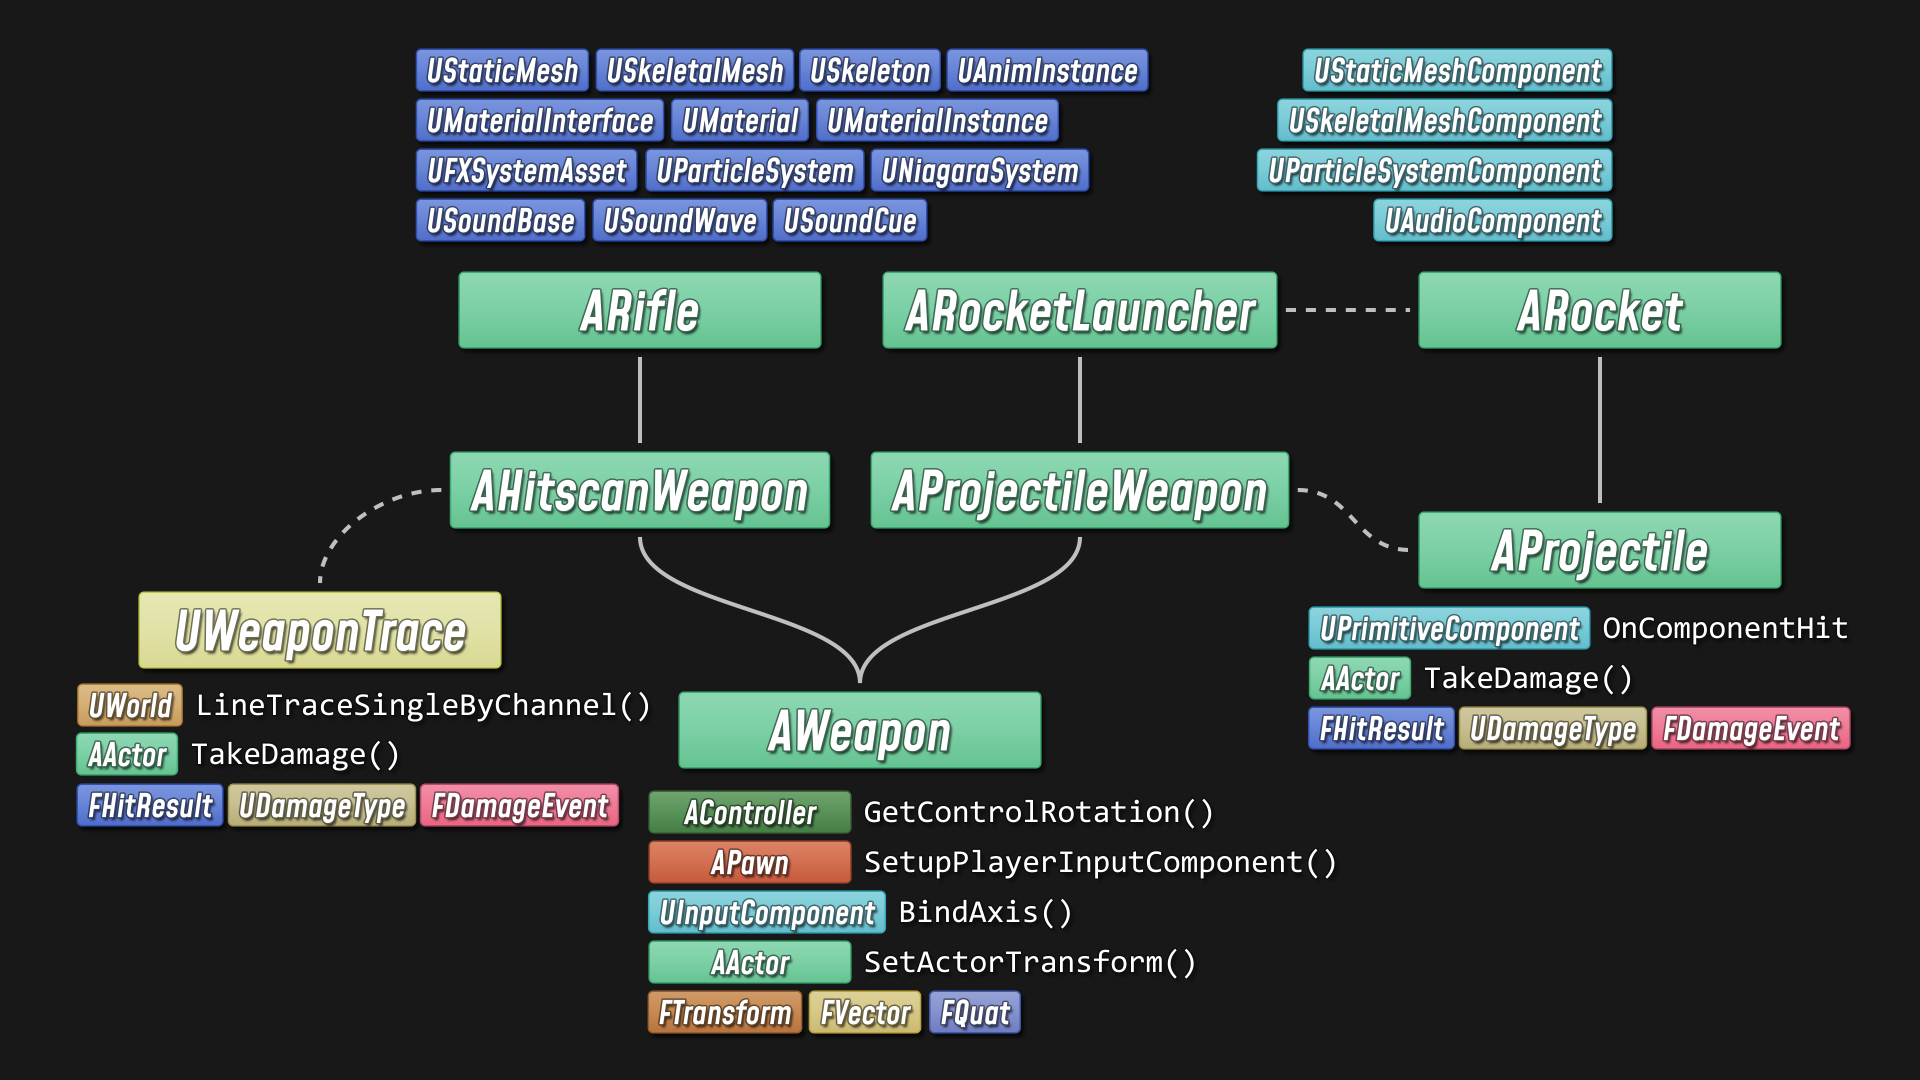
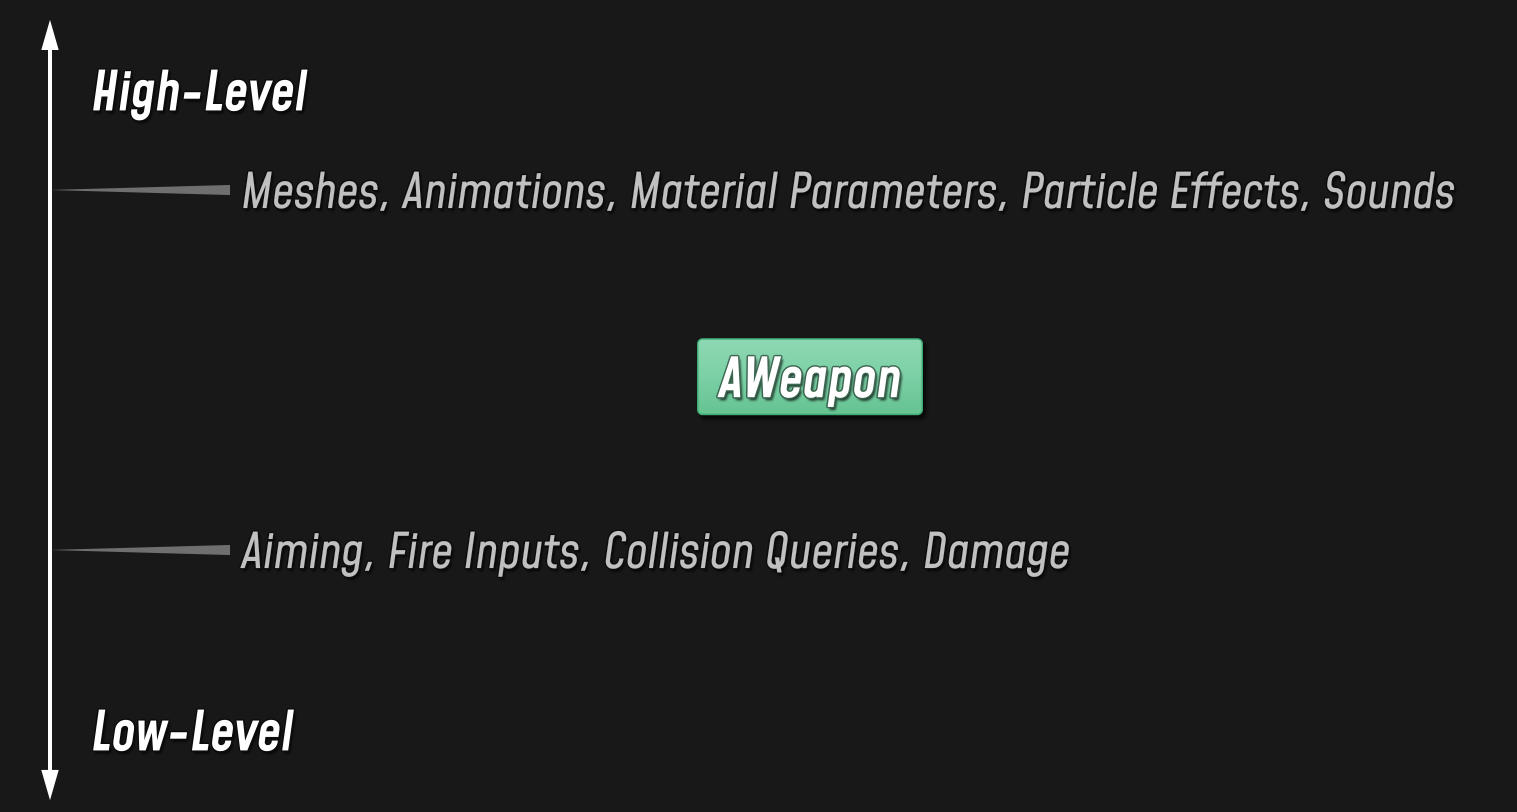
For example: the base Weapon class might handle input from the player, manage ammunition, determine whether to fire, and handle cooldowns.
For running line traces or spawning projectiles, we might use specialized subclasses: one for instant-hit weapons, and one for projectile weapons. Our final, concrete weapon classes would extend from there.
Of course, inheritance isn't our only tool for breaking down problems: we can also use helper objects or spawn new actors, and we can use components to add composable bits of functionality.
At every level, we're going to be using functionality that's implemented in the Engine:
- To aim and fire our weapon, we'll use input and control functionality from the player Pawn.
- For detecting whether we've hit something, we'll run line traces or handle collision events.
- To allow actors to respond when hit, we might use the built-in damage system.
- And at a very high level, we want to control how all these things look and sound, which means we'll be incorporating different assets to take advantage of the Engine's rendering, animation, effects, and audio systems.
With Unreal, we can implement any of these things C++ or in Blueprints. For example, here's how we might implement the Weapon's line trace functionality (i.e., a raycast that checks for collisions in the line of fire) as a C++ function:
void AWeapon::RunWeaponTrace(const FTransform& MuzzleTransform, float TraceDistance)
{
    const FVector TraceStart = MuzzleTransform.GetLocation();
    const FVector TraceEnd = TraceStart + (MuzzleTransform.GetUnitAxis(EAxis::X) * TraceDistance);
    const FCollisionQueryParams QueryParams(TEXT("WeaponTrace"), false, this);

    FHitResult Hit;
    if (GetWorld()->LineTraceSingleByChannel(Hit, TraceStart, TraceEnd, ECC_WeaponFire, QueryParams))
    {
        if (Hit.Actor.IsValid())
        {
            const float DamageAmount = 1.0f;
            const FVector ShotFromDirection = (TraceEnd - TraceStart).GetSafeNormal();
            const TSubclassOf<UDamageType> DamageTypeClass = UDamageType_WeaponFire::StaticClass();
            const FPointDamageEvent DamageEvent(DamageAmount, Hit, ShotFromDirection, DamageTypeClass);
            Hit.Actor->TakeDamage(DamageAmount, DamageEvent, OwningController, this);
        }
    }
}
But we could just as easily implement the exact same function in Blueprints:
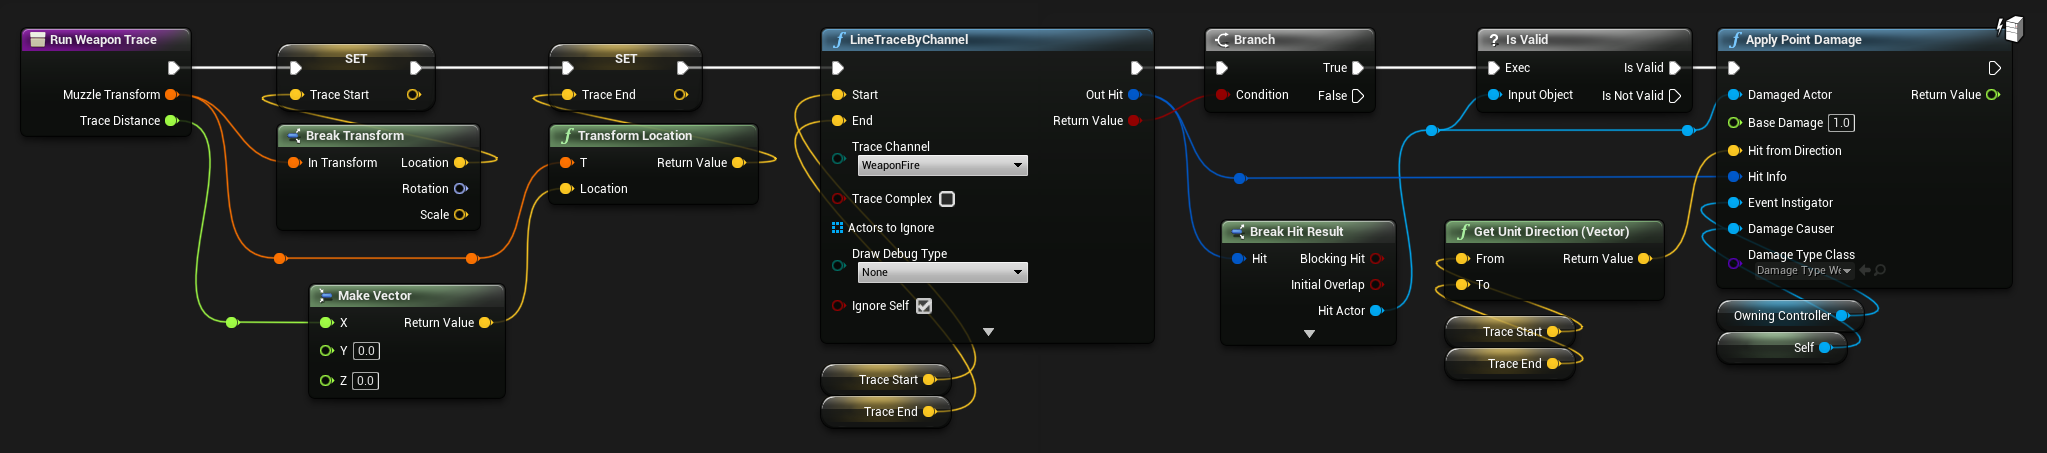
...either way, we're leveraging the same underlying Engine systems in pretty much the same way.
Design Concepts: Scripting vs. Programming
So, for a single feature in our final design, like a weapon, there's a wide range of questions that have to be answered, at different levels of abstraction – from the very low-level, like "how do I get the memory I need to work with," to the very high-level, like "what shade of purple do I glow when the player holding me collects a damage powerup?"
Those low-level problems are typically in the domain of Engine Programming: all the core technology that allows us to build a game, without being too concerned with what kind of game we're making.
When we start building on that core technology to solve problems that are fundamental to the specific game we're making, and building the systems that make our game playable, then we get into Game Programming.
And then there's the work of building upon those systems to flesh out the player's minute-to-minute experience, which we could broadly label as Scripting. Scripting focuses on higher-level problems, like: overall flow and progression of the game; high-level interactions between different game objects; and how specific, concrete game objects look, feel, and behave.
These three broad categories can help us to understand the rough division of labor in a game project, but they are generalizations. In particular, our definition of "scripting" casts a pretty wide net.
Depending on the project and the team, there may be an actual job role called "scripter," or different so-called "scripting" responsibilities might be divided amongst game designers, level designers, programmers, technical artists, and others.
Similarly, what we're calling "game programming" and "engine programming" could involve a number of different subdisciplines and job roles, with plenty of potential overlap.
The important point is that when we're talking about the work that goes into implementing some piece of functionality at some level, we can usually draw a distinction between programming and scripting. Usually, "programming" refers to solving the lower-level problems, whereas "scripting" refers to fleshing out the higher-level details.
C++ and BP as Programming and Scripting Languages
If you're with me so far, then we can get back to talking about C++ and Blueprints in the context of Unreal game programming.
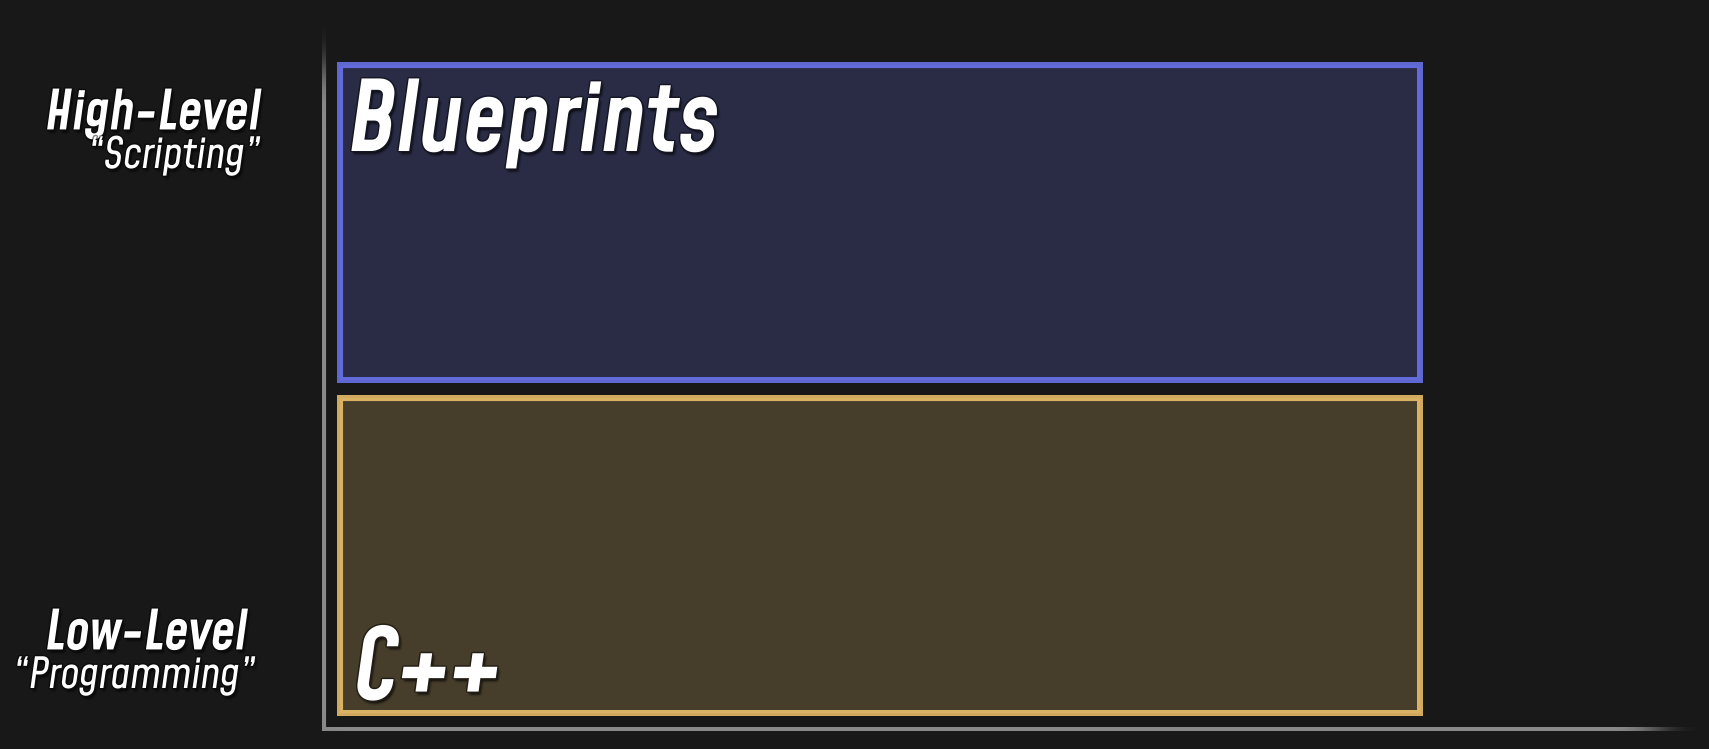
C++ is a programming language, and Blueprints is a scripting system.
C++ is naturally better-suited for implementing low-level game systems, and Blueprints is naturally better-suited for defining high-level behaviors and interactions, and for integrating assets and fine-tuning cosmetic details. For a typical game dev project, with a traditional team, C++ and Blueprints are typically used along those lines.
But one of the most fundamental things you should understand about Blueprints, and about Unreal Engine as a whole, is that Unreal Engine does not draw this line for you. It doesn't pre-ordain that a certain class of problems is in the domain of "programming" (or "scripting") and require you to use C++ (or Blueprints) to solve those problems.
You get to draw that line yourself. You can draw it in different places for different systems. You can lean heavily on Blueprints for prototyping, and then shift the line toward C++ once your design becomes clearer.
If you're a hobbyist, or a student, or you're working with a small team from a non-game-dev background, you can favor Blueprints as you learn the ropes, and gradually branch out to C++ as you learn more about how and when to use it.
Unreal Engine is explicitly designed to offer this kind of flexibility:
- There's no separate "Scripting API" – whether you're using C++ or Blueprints, you're making use of the same underlying engine systems in much the same way.
- C++ and Blueprints are integrated to allow for easy interoperability, so your game can easily jump back and forth between native code and script.
- And Unreal extends C++ with UnrealHeaderTool code generation tied into the UObject system, so it's easier than you might think to move from Blueprints to implementing higher-level functionality in C++.
So, if somebody asks you, "which is better, C++ or Blueprints?" ...hopefully you know why that's kind of a silly question.
Of course, there are substantial differences that might motivate you to go with one or the other depending on what you're working on. So let's talk about some of those differences.
Scope of this Discussion: Where C++ and BP Overlap
Before we go much further, I should make it clear that we're talking about gameplay programming here. In the wider context of developing an Unreal project, there are plenty of cases where Blueprints are not a suitable option, simply because Blueprints are designed primarily for writing game code. The exact boundaries may be a little bit fuzzy, but for example, if you're talking about adding new modes to the editor, developing standalone tools, integrating external libraries, adding custom rendering code, and plenty of other similar things...
...then you're going to be using C++ or another general-purpose language, and typically in a way that's not quite as on-rails as higher-level game code.
The "game code" that we're talking about here, roughly speaking, is anything that deals with UObject classes – basically, anywhere you see UCLASS, UPROPERTY, and UFUNCTION macros being used.
Performance: Comparing Compiled C++ and BP
So, in cases where C++ and Blueprints are both viable options, there are several considerations that might lead you to use one over the other.
One factor that's often cited is performance, and I'd like to start there, because it gives us a chance to look under the hood and see how things really work at runtime.
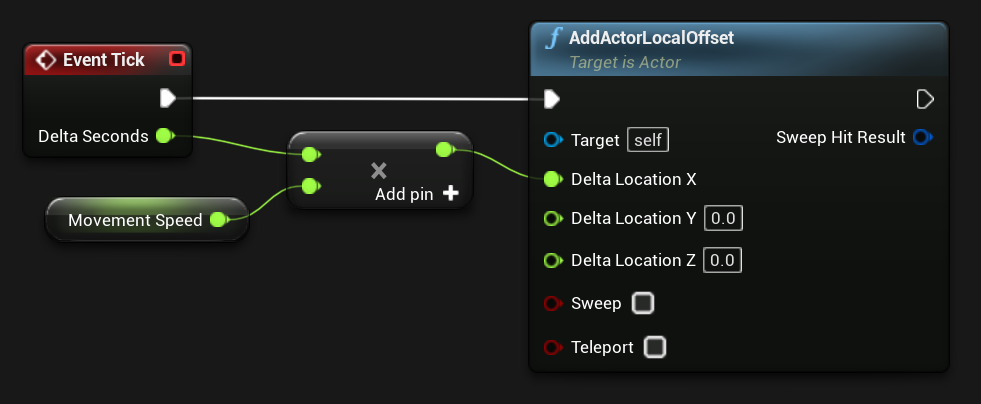
When you write a function in C++, you end up with plain text in a .cpp file.
void AMissile::Tick(float DeltaSeconds)
{
    Super::Tick(DeltaSeconds);

    const float OffsetForward = MovementSpeed * DeltaSeconds;
    const FVector Offset(OffsetForward, 0.0f, 0.0f);
    AddActorLocalOffset(Offset);
}
When you build your project from source, your C++ function gets compiled to machine code. It becomes a flat listing of processor instructions that run directly on the CPU.
  ; AMissile::Tick
    push 40 53
     sub 48 83 EC 60
  movaps 0F 29 74 24 50
     mov 48 8B D9
  movaps 0F 28 F1
            ; AActor::Tick
    call FF 15 F9 9B 00 00
   mulss F3 0F 59 B3 F0 02 00 00
     lea 48 8D 54 24 30
     mov C7 44 24 48 00 00 00 00
     xor 45 33 C9
     mov 8B 44 24 48
   xorps 0F 57 D2
     xor 45 33 C0
     mov 89 44 24 38
  movaps 0F 28 C6
     mov C6 44 24 20 00
unpcklps 0F 14 C2
     mov 48 8B CB
   movsd F2 0F 11 44 24 30
            ; AActor::AddActorLocalOffset
    call FF 15 01 A0 00 00
  movaps 0F 28 74 24 50
     add 48 83 C4 60
     pop 5B
     ret C3
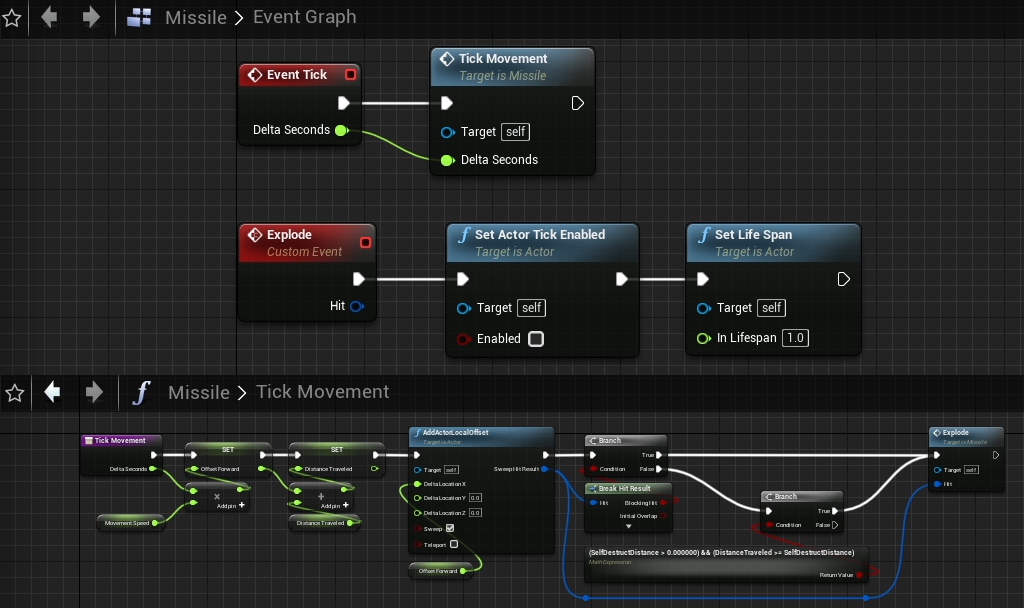
When you write a function in Blueprints, you end up with an event graph, consisting of a bunch of nodes, that's stored in a Blueprint asset.
Your Blueprint function gets compiled too, but not to machine code. Blueprint functions are run through a script compiler, which flattens your two-dimensional graph into a one-dimensional listing of script bytecode.
; ExecuteUbergraph_Missile
    EX_ComputedJump 4E
   EX_LocalVariable 00 C0 51 A3 FA 6A 01 00 00 ; ReceiveTick entry
      EX_Tracepoint 5E
  EX_WireTracepoint 5A
             EX_Let 0F 60 52 A3 FA 6A 01 00 00 ; OffsetForward
   EX_LocalVariable 00 60 52 A3 FA 6A 01 00 00 ; OffsetForward
        EX_CallMath 68 00 57 00 D0 6A 01 00 00 ; UKismetMathLibrary::Multiply_FloatFloat
   EX_LocalVariable 00 80 64 A3 FA 6A 01 00 00 ; - A: DeltaSeconds
EX_InstanceVariable 01 C0 5B A3 FA 6A 01 00 00 ; - B: MovementSpeed
EX_EndFunctionParms 16
             EX_Let 0F E0 63 A3 FA 6A 01 00 00 ; Offset
   EX_LocalVariable 00 E0 63 A3 FA 6A 01 00 00 ; Offset
        EX_CallMath 68 00 D8 02 D0 6A 01 00 00 ; UKismetMathLibrary::MakeVector
   EX_LocalVariable 00 60 52 A3 FA 6A 01 00 00 ; - X: OffsetForward
      EX_FloatConst 1E 00 00 00 00             ; - Y: 0.0
      EX_FloatConst 1E 00 00 00 00             ; - Z: 0.0
EX_EndFunctionParms 16
      EX_Tracepoint 5E
   EX_FinalFunction 1C 00 72 03 CE 6A 01 00 00 ; AActor::K2_AddActorLocalOffset
   EX_LocalVariable 00 E0 63 A3 FA 6A 01 00 00 ; - DeltaLocation: Offset
           EX_False 28                         ; - bSweep: false
   EX_LocalVariable 00 20 65 A3 FA 6A 01 00 00 ; - [out] HitResult
           EX_False 28                         ; - bTeleport: false
EX_EndFunctionParms 16
  EX_WireTracepoint 5A
          EX_Return 04
This is a portable, intermediate form of your function that the engine's Script VM executes at runtime.
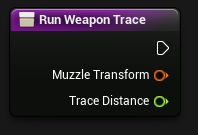
In our earlier Weapon example, we introduced the RunWeaponTrace function. It runs a line trace into the scene, and if it hits an actor, it applies damage to that actor. Let's step through two versions of this function – one compiled from C++ and the other compiled from Blueprints – and see what we see.
The function takes two parameters: a transform that gives us the starting point and direction of the trace, and the maximum distance for the trace.
void AWeapon::RunWeaponTrace(const FTransform& MuzzleTransform, float TraceDistance)
The native code (compiled from C++) has to do a little bit of bookkeeping at the start of the function call, to pull in argument values and get the stack frame and registers into the appropriate state. All the required steps are worked out by the compiler, based on the calling convention: at runtime, the CPU just runs a few quick instructions.
      ; Set up stack frame
    mov 48 8B C4
   push 55
    lea 48 8D A8 28 FE FF FF
    sub 48 81 EC D0 02 00 00
    mov 48 C7 44 24 78 FE FF FF FF
    mov 48 89 58 10
 movaps 0F 29 70 E8
 movaps 0F 29 78 D8
 movaps 44 0F 29 40 C8
 movaps 44 0F 29 48 B8
    mov 48 8B 05 50 18 02 00
    xor 48 33 C4
    mov 48 89 85 80 01 00 00
 movaps 0F 28 FA
    mov 48 8B D9
There's no direct equivalent in our script bytecode – the script VM is responsible for these sorts of details; they don't need to be implemented as instructions in the script itself.
As we get into the body of our function, the first thing we do is figure out the starting location for the trace:
const FVector TraceStart = MuzzleTransform.GetLocation();
And here we see the resulting machine code.
     ; Initialize TraceStart
movups 44 0F 10 4A 10
 movss F3 44 0F 11 4C 24 60 ; TraceStart
movaps 45 0F 28 C1
shufps 45 0F C6 C1 55
 movss F3 44 0F 11 44 24 64
movaps 41 0F 28 F1
shufps 41 0F C6 F1 AA
 movss F3 0F 11 74 24 68
A computer's CPU works by loading data into registers and running instructions that operate on those registers. We write our C++ code using local variables and function calls, but the compiler is free to optimize those details away, so long as it can guarantee the same end result.
So our machine code can look quite alien – here, the CPU loads some data into vector registers based on how it'll need to use those values later.
If we look at the script bytecode generated from our Blueprint function, we can see something that looks a lot more like a direct translation of our original event graph.
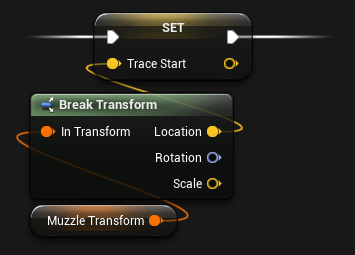
      ; Initialize TraceStart
      EX_Tracepoint 5E
  EX_WireTracepoint 5A
        EX_CallMath 68 00 B6 DD FB 11 02 00 00 ; UKismetMathLibrary::BreakTransform
   EX_LocalVariable 00 60 75 EF 88 11 02 00 00 ; - InTransform
   EX_LocalVariable 00 20 6F EF 88 11 02 00 00 ; - [out] Location
   EX_LocalVariable 00 80 6E EF 88 11 02 00 00 ; - [out] Rotation
   EX_LocalVariable 00 E0 6D EF 88 11 02 00 00 ; - [out] Scale
EX_EndFunctionParms 16
      EX_Tracepoint 5E
             EX_Let 0F 00 71 EF 88 11 02 00 00 ; TraceStart
   EX_LocalVariable 00 00 71 EF 88 11 02 00 00
   EX_LocalVariable 00 20 6F EF 88 11 02 00 00
We can see a better example if we move on to computing the end point for the trace.
const FVector TraceEnd = TraceStart + (MuzzleTransform.GetUnitAxis(EAxis::X) * TraceDistance);
     ; Compute TraceEnd
movaps 0F 28 15 A6 A4 00 00
movups 0F 10 2A
movaps 0F 28 CD
shufps 0F C6 CD FF
movaps 0F 28 DD
shufps 0F C6 DD C9
movaps 0F 28 E2
shufps 0F C6 E2 D2
shufps 0F C6 ED D2
movaps 0F 28 C2
shufps 0F C6 C2 C9
 mulps 0F 59 C5
 mulps 0F 59 E3
 subps 0F 5C E0
 addps 0F 58 E4
movaps 0F 28 C4
 mulps 0F 59 C1
 addps 0F 58 C2
movaps 0F 28 D4
shufps 0F C6 D4 D2
shufps 0F C6 E4 C9
 mulps 0F 59 E5
 mulps 0F 59 D3
 subps 0F 5C D4
 addps 0F 58 D0
movaps 0F 28 CA
shufps 0F C6 CA AA
 mulss F3 0F 59 CF
movaps 0F 28 C2
shufps 0F C6 C2 55
 mulss F3 0F 59 C7
 mulss F3 0F 59 D7
 addss F3 0F 58 F1
 addss F3 44 0F 58 C0
 addss F3 44 0F 58 CA
 movss F3 44 0F 11 4C 24 50 ; TraceEnd
 movss F3 44 0F 11 44 24 54
 movss F3 0F 11 74 24 58
Here, the C++ compiler has inlined all the relevant vector math: in other words, we don't end up calling GetUnitAxis, or the vector multiply or addition functions, which would involve passing arguments and jumping to different parts of the code. When our function gets called, the CPU just does all this math directly, in a single shot.
Our script bytecode isn't quite so low-level.
      ; Compute TraceEnd
  EX_WireTracepoint 5A
             EX_Let 0F C0 6F EF 88 11 02 00 00
   EX_LocalVariable 00 C0 6F EF 88 11 02 00 00
        EX_CallMath 68 00 B5 D2 FB 11 02 00 00 ; UKismetMathLibrary::MakeVector
   EX_LocalVariable 00 C0 74 EF 88 11 02 00 00 ; - X (TraceDistance)
      EX_FloatConst 1E 00 00 00 00             ; - Y (literal 0.0f)
      EX_FloatConst 1E 00 00 00 00             ; - Z (literal 0.0f)
EX_EndFunctionParms 16
             EX_Let 0F 40 6D EF 88 11 02 00 00
   EX_LocalVariable 00 40 6D EF 88 11 02 00 00
        EX_CallMath 68 00 E7 C9 FB 11 02 00 00 ; UKismetMathLibrary::TransformLocation
   EX_LocalVariable 00 60 75 EF 88 11 02 00 00 ; - T
   EX_LocalVariable 00 C0 6F EF 88 11 02 00 00 ; - Location
EX_EndFunctionParms 16
      EX_Tracepoint 5E
             EX_Let 0F 40 72 EF 88 11 02 00 00 ; TraceEnd
   EX_LocalVariable 00 40 72 EF 88 11 02 00 00
   EX_LocalVariable 00 40 6D EF 88 11 02 00 00
The Script VM is sort of like a CPU that's implemented in software, but its job is simply to keep track of script execution, resolve expressions to values, and jump around to execute the right functions with the right arguments.
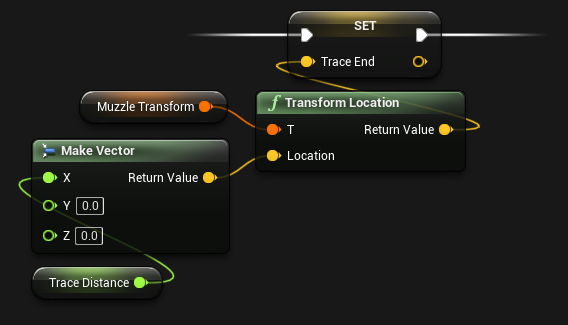
When Blueprints do actual work, they ultimately call down into native functions compiled from C++. So if we need to construct a vector based on our float variable, we put a Make Vector call in our event graph. In the resulting bytecode, the Script VM prepares a local variable to hold the resulting value, and then it calls the MakeVector function. That function takes three values as arguments, so it pushes our TraceDistance value, along with two zeroes, onto the script stack.
MakeVector is implemented in C++, so it gets compiled to a handful of CPU instructions:
   ; UKismetMathLibrary::MakeVector
   movss F3 0F 10 83 F0 02 00 00
   xorps 0F 57 C9
unpcklps 0F 14 C1
     mov C7 44 24 28 00 00 00 00
     mov 8B 44 24 28
   movsd F2 0F 11 83 F8 02 00 00
     mov 89 83 00 03 00 00
But since MakeVector is a blueprint-callable function, UnrealHeaderTool generates an extra function, called execMakeVector, that bridges the gap between the script VM and native code. This is what the Script VM actually jumps to.
DEFINE_FUNCTION(UKismetMathLibrary::execMakeVector)
{
    P_GET_PROPERTY(FFloatProperty,Z_Param_X);
    P_GET_PROPERTY(FFloatProperty,Z_Param_Y);
    P_GET_PROPERTY(FFloatProperty,Z_Param_Z);
    P_FINISH;
    P_NATIVE_BEGIN;
    *(FVector*)Z_Param__Result=UKismetMathLibrary::MakeVector(
        Z_Param_X,Z_Param_Y,Z_Param_Z);
    P_NATIVE_END;
}
If we expand all the macros, we can see that the exec function pops our three argument values off the script stack, and then calls the actual MakeVector implementation and stashes the result at the address provided by the Script VM.
void UKismetMathLibrary::execMakeVector(UObject* Context, FFrame& Stack, void* const Z_Param__Result)
{
    float Z_Param_X = FFloatProperty::GetDefaultPropertyValue();
    float Z_Param_Y = FFloatProperty::GetDefaultPropertyValue();
    float Z_Param_Z = FFloatProperty::GetDefaultPropertyValue();

    Stack.StepCompiledIn<FFloatProperty>(&Z_Param_X);
    Stack.StepCompiledIn<FFloatProperty>(&Z_Param_Y);
    Stack.StepCompiledIn<FFloatProperty>(&Z_Param_Z);

    Stack.Code += !!Stack.Code;

    {
        FBlueprintEventTimer::FScopedNativeTimer NativeCallTimer;

        const FVector Result = UKismetMathLibrary::MakeVector(
            Z_Param_X, Z_Param_Y, Z_Param_Z);
        *((FVector*)(Z_Param__Result)) = Result;
    }
}
We can continue to see this theme as we move through our two implementations of this function. Next, we actually run the line trace, and the native function jumps to UWorld::LineTraceSingleByChannel.
const FCollisionQueryParams QueryParams(TEXT("WeaponTrace"), false, this);
FHitResult Hit;
if (GetWorld()->LineTraceSingleByChannel(Hit, TraceStart, TraceEnd, ECC_WeaponFire, QueryParams))
{
}
    ; Run line trace and check result
  mov 41 B8 01 00 00 00
  lea 48 8D 15 76 DD 00 00 ; string L"WeaponTrace"
  lea 48 8D 4D 80
 call FF 15 3C 82 00 00    ; FName::ctor
movsd F2 0F 10 00
movsd F2 0F 11 44 24 40
  mov 8B 40 08
  mov 89 44 24 48
  mov 4C 8B CB
  xor 45 33 C0
  lea 48 8D 54 24 40
  lea 48 8D 8D F0 00 00 00
 call FF 15 CB 91 00 00    ; FCollisionQueryParams::ctor
  nop 90
  lea 48 8D 4D 90
 call FF 15 A8 91 00 00    ; FHitResult::ctor
  mov 48 8B 03
  mov 48 8B CB
 call FF 90 D0 01 00 00
  mov 48 8B C8
  mov 48 8B 05 C2 91 00 00 ; DefaultResponseParam
  mov 48 89 44 24 30
  lea 48 8D 85 F0 00 00 00
  mov 48 89 44 24 28
  mov C7 44 24 20 0E 00 00 00
  lea 4C 8D 4C 24 50       ; TraceEnd
  lea 4C 8D 44 24 60       ; TraceStart
  lea 48 8D 55 90
 call FF 15 8D 91 00 00    ; UWorld::LineTraceSingleByChannel
 test 84 C0
   je 0F 84 6E 01 00 00
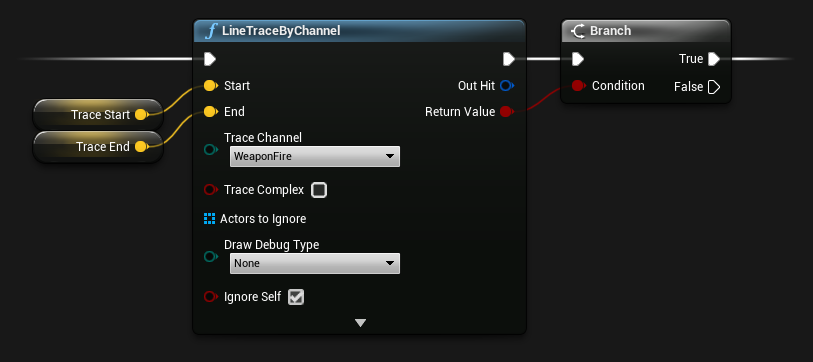
The Blueprint version ends up running the exact same function, but first it has to shuffle a bunch of data through the script VM in order to call a helper function.
      ; Run line trace and check result
  EX_WireTracepoint 5A
      EX_Tracepoint 5E
         EX_LetBool 14
   EX_LocalVariable 00 20 6A EF 88 11 02 00 00
        EX_CallMath 68 00 66 4B EE 11 02 00 00 ; UKismetSystemLibrary::LineTraceSingle
            EX_Self 17                         ; - WorldContextObject
   EX_LocalVariable 00 00 71 EF 88 11 02 00 00 ; - Start
   EX_LocalVariable 00 40 72 EF 88 11 02 00 00 ; - End
       EX_ByteConst 24 02                      ; - TraceChannel
           EX_False 28                         ; - bTraceComplex
   EX_LocalVariable 00 00 6C EF 88 11 02 00 00 ; - ActorsToIgnore
       EX_ByteConst 24 00                      ; - DrawDebugType
   EX_LocalVariable 00 C0 6A EF 88 11 02 00 00 ; - [out] Hit
            EX_True 27                         ; - bIgnoreSelf
     EX_StructConst 2F 60 CC 9A EE 11 02 00 00 ; - TraceColor:
                       10 00 00 00             ; - (struct size)
      EX_FloatConst 1E 00 00 80 3F             ; - R
      EX_FloatConst 1E 00 00 00 00             ; - G
      EX_FloatConst 1E 00 00 00 00             ; - B
      EX_FloatConst 1E 00 00 80 3F             ; - A
  EX_EndStructConst 30
     EX_StructConst 2F 60 CC 9A EE 11 02 00 00 ; - TraceHitColor:
                       10 00 00 00             ; - (struct size)
      EX_FloatConst 1E 00 00 00 00             ; - R
      EX_FloatConst 1E 00 00 80 3F             ; - G
      EX_FloatConst 1E 00 00 00 00             ; - B
      EX_FloatConst 1E 00 00 80 3F             ; - A
  EX_EndStructConst 30
      EX_FloatConst 1E 00 00 A0 40             ; - DrawTime
EX_EndFunctionParms 16
  EX_WireTracepoint 5A
      EX_Tracepoint 5E
  EX_WireTracepoint 5A
       EX_JumpIfNot 07 78 03 00 00             ; Branch
   EX_LocalVariable 00 20 6A EF 88 11 02 00 00 ; - result of LineTraceByChannel
When we check for a valid actor in the hit result, the native function is extremely straightforward.
if (Hit.Actor.IsValid())
{
}
   ; Check for valid actor in hit result
 lea 48 8D 4D FC
call FF 15 6B 83 00 00    ; FWeakObjectPtr::IsValid
test 84 C0
  je 0F 84 5C 01 00 00
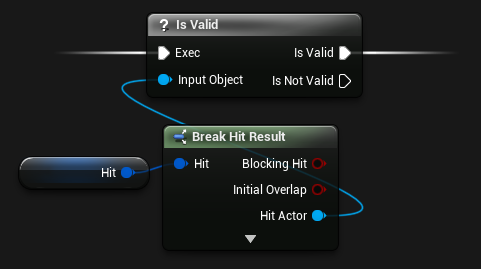
The script function, on the other hand, has to do more work.
      ; Check for valid actor in hit result
  EX_WireTracepoint 5A
      EX_Tracepoint 5E
  EX_WireTracepoint 5A
      EX_Tracepoint 5E
  EX_WireTracepoint 5A
        EX_CallMath 68 00 0E F5 FB 11 02 00 00 ; UGameplayStatics::BreakHitResult
   EX_LocalVariable 00 C0 6A EF 88 11 02 00 00 ; - [out] Hit
   EX_LocalVariable 00 80 69 EF 88 11 02 00 00 ; - [out] bBlockingHit
   EX_LocalVariable 00 E0 68 EF 88 11 02 00 00 ; - [out] bInitialOverlap
   EX_LocalVariable 00 40 68 EF 88 11 02 00 00 ; - [out] Time
   EX_LocalVariable 00 A0 67 EF 88 11 02 00 00 ; - [out] Distance
   EX_LocalVariable 00 00 67 EF 88 11 02 00 00 ; - [out] Location
   EX_LocalVariable 00 60 66 EF 88 11 02 00 00 ; - [out] ImpactPoint
   EX_LocalVariable 00 C0 65 EF 88 11 02 00 00 ; - [out] Normal
   EX_LocalVariable 00 20 65 EF 88 11 02 00 00 ; - [out] ImpactNormal
   EX_LocalVariable 00 80 64 EF 88 11 02 00 00 ; - [out] PhysMat
   EX_LocalVariable 00 E0 63 EF 88 11 02 00 00 ; - [out] HitActor
   EX_LocalVariable 00 40 63 EF 88 11 02 00 00 ; - [out] HitComponent
   EX_LocalVariable 00 A0 62 EF 88 11 02 00 00 ; - [out] HitBoneName
   EX_LocalVariable 00 00 62 EF 88 11 02 00 00 ; - [out] HitItem
   EX_LocalVariable 00 60 61 EF 88 11 02 00 00 ; - [out] FaceIndex
   EX_LocalVariable 00 C0 60 EF 88 11 02 00 00 ; - [out] TraceStart
   EX_LocalVariable 00 20 60 EF 88 11 02 00 00 ; - [out] TraceEnd
EX_EndFunctionParms 16
         EX_LetBool 14
   EX_LocalVariable 00 E0 5E EF 88 11 02 00 00
        EX_CallMath 68 00 53 4F EE 11 02 00 00 ; UKismetSystemLibrary::IsValid
   EX_LocalVariable 00 E0 63 EF 88 11 02 00 00 ; - Object
EX_EndFunctionParms 16
      EX_Tracepoint 5E
  EX_WireTracepoint 5A
       EX_JumpIfNot 07 76 03 00 00             ; Branch
   EX_LocalVariable 00 E0 5E EF 88 11 02 00 00 ; - result of IsValid
When we compute the shot direction, all the vector math is is fully inlined in the native function:
const FVector ShotFromDirection = (TraceEnd - TraceStart).GetSafeNormal();
      ; Compute ShotFromDirection
  movss F3 0F 10 7C 24 58
  subss F3 0F 5C 7C 24 68
  movss F3 44 0F 10 44 24 54
  subss F3 44 0F 5C 44 24 64
  movss F3 0F 10 74 24 50    ; TraceEnd
  subss F3 0F 5C 74 24 60    ; TraceStart
 movaps 0F 28 D6
  mulss F3 0F 59 D6
 movaps 41 0F 28 C0
  mulss F3 41 0F 59 C0
  addss F3 0F 58 D0
 movaps 0F 28 CF
  mulss F3 0F 59 CF
  addss F3 0F 58 D1
  movss F3 44 0F 10 0D F5 A2 00 00
ucomiss 41 0F 2E D1
    jne 75 12
  movss F3 44 0F 11 44 24 44
  movss F3 0F 11 7C 24 48
    jmp E9 98 00 00 00
 comiss 0F 2F 15 86 DC 00 00
    jae 73 1A
    mov 48 8B 05 45 81 00 00
  movsd F2 0F 10 00
  movsd F2 0F 11 44 24 40
    mov 8B 40 08
    mov 89 44 24 48
    jmp EB 7B
  movss F3 0F 10 05 AE A2 00 00
 movaps 0F 28 E0
 movaps 0F 28 C2
 movaps 0F 28 D8
 movaps 0F 28 E8
rsqrtss F3 0F 52 EB
  mulss F3 0F 59 DC
 movaps 0F 28 C5
  mulss F3 0F 59 C5
 movaps 0F 28 D3
  mulss F3 0F 59 D0
 movaps 0F 28 CC
  subss F3 0F 5C CA
 movaps 0F 28 C5
  mulss F3 0F 59 C1
  addss F3 0F 58 E8
 movaps 0F 28 C5
  mulss F3 0F 59 C5
  mulss F3 0F 59 D8
  subss F3 0F 5C E3
 movaps 0F 28 C5
  mulss F3 0F 59 C4
  addss F3 0F 58 E8
 movaps 0F 28 CD
  mulss F3 0F 59 CF
 movaps 0F 28 C5
  mulss F3 41 0F 59 C0
  mulss F3 0F 59 F5
  movss F3 0F 11 44 24 44
  movss F3 0F 11 4C 24 48
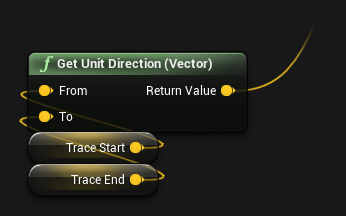
But the script function calls a helper function: we can't avoid the overhead of passing the individual arguments through the script VM.
      ; Compute ShotFromDirection
  EX_WireTracepoint 5A
      EX_Tracepoint 5E
  EX_WireTracepoint 5A
             EX_Let 0F A0 6C EF 88 11 02 00 00
   EX_LocalVariable 00 A0 6C EF 88 11 02 00 00
        EX_CallMath 68 00 14 D8 FB 11 02 00 00 ; UKismetMathLibrary::GetDirectionUnitVector
   EX_LocalVariable 00 00 71 EF 88 11 02 00 00 ; - From
   EX_LocalVariable 00 40 72 EF 88 11 02 00 00 ; - To
EX_EndFunctionParms 16
Keep in mind, though: context matters. In fact, when it comes to optimization, context is everything. Our script function has a little bit of overhead in the Script VM, and then it jumps to execGetDirectionUnitVector, which calls some other functions, and then eventually calls the actual GetDirectionUnitVector.
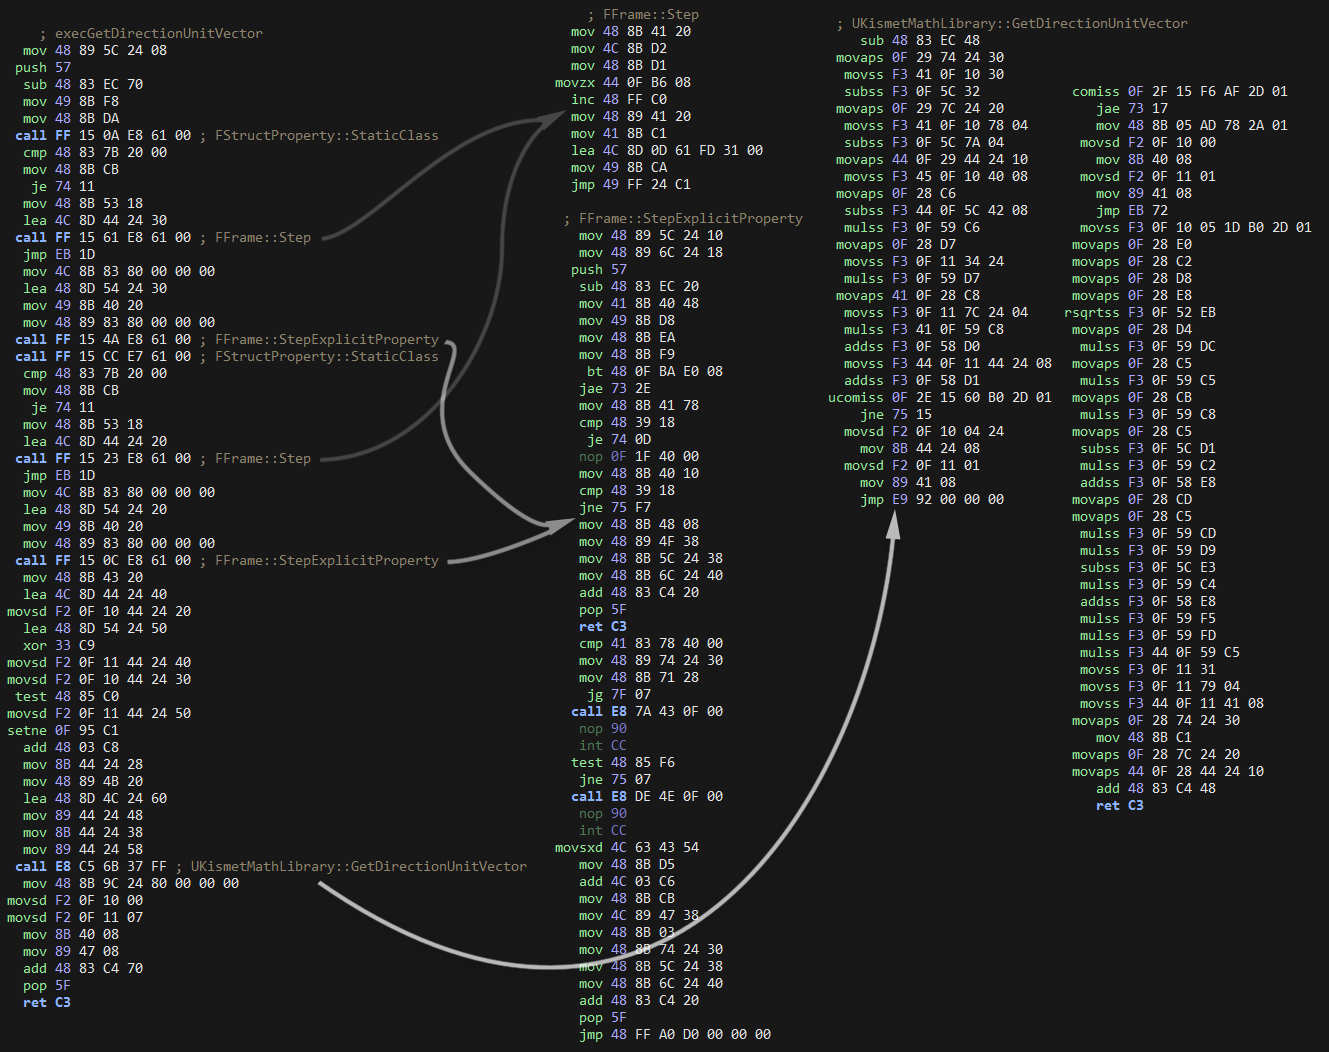
So yes, the Blueprint function results in more CPU instructions being run, and so it takes more time do to the same work, but if this Blueprint code is running once per frame, and you have 16 milliseconds in a frame, then that overhead is absolutely insignificant. But if you had, say, 1000 actors running this code every frame, then the overhead might start to add up. Context matters: you can't look at this example in isolation and draw any useful conclusions.
But more on that in a second.
We finish our function by applying point damage if we've hit an actor:
const float DamageAmount = 1.0f;
const TSubclassOf<UDamageType> DamageTypeClass = UDamageType_WeaponFire::StaticClass();
const FPointDamageEvent DamageEvent(DamageAmount, Hit, ShotFromDirection, DamageTypeClass);
Hit.Actor->TakeDamage(DamageAmount, DamageEvent, OwningController, this);
     ; Call TakeDamage on the actor
 movss F3 0F 11 74 24 40
  call E8 1A 14 00 00       ; UDamageType_WeaponFire::GetPrivateStaticClass
   mov 48 89 44 24 20
   lea 4C 8D 4C 24 40       ; ShotFromDirection
   lea 4C 8D 45 90
movaps 41 0F 28 C9
   lea 48 8D 4D 30
  call FF 15 2E 90 00 00    ; FPointDamageEvent::ctor
   nop 90
   lea 48 8D 4D FC
  call FF 15 EB 81 00 00    ; FWeakObjectPtr::Get
   mov 48 8B 10
   mov 48 89 5C 24 20
   mov 4C 8B 8B F0 02 00 00
   lea 4C 8D 45 30
movaps 41 0F 28 C9
   mov 48 8B C8
  call FF 92 E8 06 00 00    ; AActor::TakeDamage
   nop 90
In Blueprints:

      ; Call TakeDamage on the actor
        EX_CallMath 68 00 0E F5 FB 11 02 00 00 ; UGameplayStatics::BreakHitResult
   EX_LocalVariable 00 C0 6A EF 88 11 02 00 00 ; - [out] Hit
   EX_LocalVariable 00 80 69 EF 88 11 02 00 00 ; - [out] bBlockingHit
   EX_LocalVariable 00 E0 68 EF 88 11 02 00 00 ; - [out] bInitialOverlap
   EX_LocalVariable 00 40 68 EF 88 11 02 00 00 ; - [out] Time
   EX_LocalVariable 00 A0 67 EF 88 11 02 00 00 ; - [out] Distance
   EX_LocalVariable 00 00 67 EF 88 11 02 00 00 ; - [out] Location
   EX_LocalVariable 00 60 66 EF 88 11 02 00 00 ; - [out] ImpactPoint
   EX_LocalVariable 00 C0 65 EF 88 11 02 00 00 ; - [out] Normal
   EX_LocalVariable 00 20 65 EF 88 11 02 00 00 ; - [out] ImpactNormal
   EX_LocalVariable 00 80 64 EF 88 11 02 00 00 ; - [out] PhysMat
   EX_LocalVariable 00 E0 63 EF 88 11 02 00 00 ; - [out] HitActor
   EX_LocalVariable 00 40 63 EF 88 11 02 00 00 ; - [out] HitComponent
   EX_LocalVariable 00 A0 62 EF 88 11 02 00 00 ; - [out] HitBoneName
   EX_LocalVariable 00 00 62 EF 88 11 02 00 00 ; - [out] HitItem
   EX_LocalVariable 00 60 61 EF 88 11 02 00 00 ; - [out] FaceIndex
   EX_LocalVariable 00 C0 60 EF 88 11 02 00 00 ; - [out] TraceStart
   EX_LocalVariable 00 20 60 EF 88 11 02 00 00 ; - [out] TraceEnd
EX_EndFunctionParms 16
      EX_Tracepoint 5E
             EX_Let 0F 80 5F EF 88 11 02 00 00
   EX_LocalVariable 00 80 5F EF 88 11 02 00 00
         EX_Context 19
     EX_ObjectConst 20 90 9F 6D FD 11 02 00 00
                       3D 00 00 00 80 5F EF 88
                       11 02 00 00
   EX_FinalFunction 1C 00 1A F5 FB 11 02 00 00 ; UGameplayStatics::ApplyPointDamage
   EX_LocalVariable 00 E0 63 EF 88 11 02 00 00 ; - DamagedActor
      EX_FloatConst 1E 00 00 80 3F             ; - BaseDamage
   EX_LocalVariable 00 A0 6C EF 88 11 02 00 00 ; - HitFromDirection
   EX_LocalVariable 00 C0 6A EF 88 11 02 00 00 ; - HitInfo
EX_InstanceVariable 01 80 55 CC 88 11 02 00 00 ; - EventInstigator
            EX_Self 17                         ; - DamageCauser
     EX_ObjectConst 20 00 72 92 88 11 02 00 00 ; - DamageTypeClass
EX_EndFunctionParms 16
And finally, we clean up and return. In our native function, this means unwinding whatever compiler-coordinated setup we did at the start of the function.
     ; Clean up stack frame
   lea 48 8D 4D 30
  call FF 15 00 90 00 00    ; FPointDamageEvent::dtor
   nop 90
   lea 48 8D 8D F0 00 00 00
  call FF 15 02 90 00 00    ; FCollisionQueryParams::dtor
   mov 48 8B 8D 80 01 00 00
   xor 48 33 CC
  call E8 BB 46 00 00
   lea 4C 8D 9C 24 D0 02 00 00
   mov 49 8B 5B 18
movaps 41 0F 28 73 F0
movaps 41 0F 28 7B E0
movaps 45 0F 28 43 D0
movaps 45 0F 28 4B C0
   mov 49 8B E3
   pop 5D
   ret C3
In our script function, there's not much to do except return:
      ; Return
  EX_WireTracepoint 5A
            EX_Jump 06 78 03 00 00
      EX_Tracepoint 5E
  EX_WireTracepoint 5A
          EX_Return 04
Performance: Conclusions and Profiling
So what have we learned about performance?
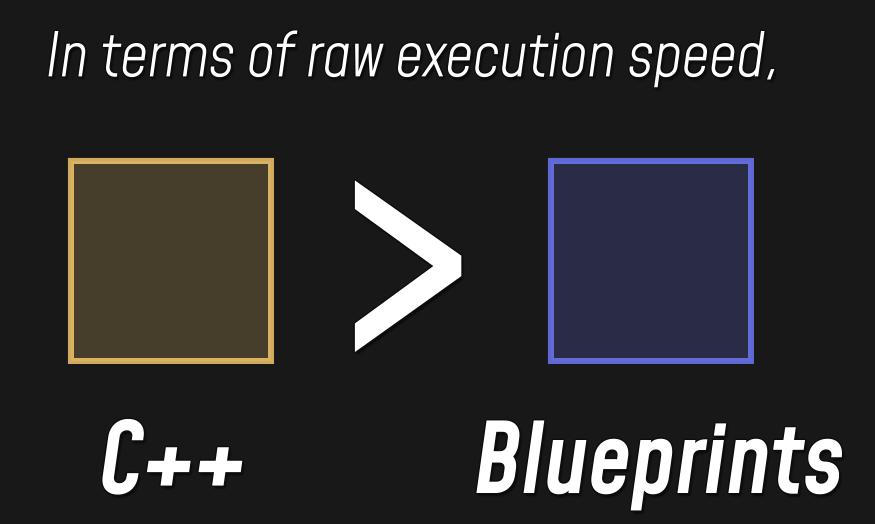
Well, if you have two equivalent functions, one written in C++ and the other written in Blueprints, the C++ function is going to be faster. The C++ function can be fully optimized at the CPU level, and it doesn't incur any overhead from script execution.
Incidentally, avoiding that overhead is what Blueprint Nativization is all about – if you enable nativization, then instead of generating script bytecode, the script compiler will spit out C++ source which can be compiled directly to machine code. That generated source isn't meant to be human-readable or editable:
void AWeapon_C__pf2513711887::bpf__RunWeaponTrace__pf(FTransform bpp__MuzzleTransform__pf, float bpp__TraceDistance__pf)
{
    FVector bpfv__TraceEnd__pf(EForceInit::ForceInit);
    FVector bpfv__TraceStart__pf(EForceInit::ForceInit);
    FVector bpfv__CallFunc_MakeVector_ReturnValue__pf(EForceInit::ForceInit);
    FVector bpfv__CallFunc_BreakTransform_Location__pf(EForceInit::ForceInit);
    FRotator bpfv__CallFunc_BreakTransform_Rotation__pf(EForceInit::ForceInit);
    FVector bpfv__CallFunc_BreakTransform_Scale__pf(EForceInit::ForceInit);
    FVector bpfv__CallFunc_TransformLocation_ReturnValue__pf(EForceInit::ForceInit);
    FVector bpfv__CallFunc_GetDirectionUnitVector_ReturnValue__pf(EForceInit::ForceInit);
    TArray<AActor*> bpfv__Temp_object_Variable__pf{};
    FHitResult bpfv__CallFunc_LineTraceSingle_OutHit__pf{};
    bool bpfv__CallFunc_LineTraceSingle_ReturnValue__pf{};
    bool bpfv__CallFunc_BreakHitResult_bBlockingHit__pf{};
    bool bpfv__CallFunc_BreakHitResult_bInitialOverlap__pf{};
    float bpfv__CallFunc_BreakHitResult_Time__pf{};
    float bpfv__CallFunc_BreakHitResult_Distance__pf{};
    FVector bpfv__CallFunc_BreakHitResult_Location__pf(EForceInit::ForceInit);
    FVector bpfv__CallFunc_BreakHitResult_ImpactPoint__pf(EForceInit::ForceInit);
    FVector bpfv__CallFunc_BreakHitResult_Normal__pf(EForceInit::ForceInit);
    FVector bpfv__CallFunc_BreakHitResult_ImpactNormal__pf(EForceInit::ForceInit);
    UPhysicalMaterial* bpfv__CallFunc_BreakHitResult_PhysMat__pf{};
    AActor* bpfv__CallFunc_BreakHitResult_HitActor__pf{};
    UPrimitiveComponent* bpfv__CallFunc_BreakHitResult_HitComponent__pf{};
    FName bpfv__CallFunc_BreakHitResult_HitBoneName__pf{};
    int32 bpfv__CallFunc_BreakHitResult_HitItem__pf{};
    int32 bpfv__CallFunc_BreakHitResult_FaceIndex__pf{};
    FVector bpfv__CallFunc_BreakHitResult_TraceStart__pf(EForceInit::ForceInit);
    FVector bpfv__CallFunc_BreakHitResult_TraceEnd__pf(EForceInit::ForceInit);
    float bpfv__CallFunc_ApplyPointDamage_ReturnValue__pf{};
    bool bpfv__CallFunc_IsValid_ReturnValue__pf{};
    int32 __CurrentState = 1;
    do
    {
        switch( __CurrentState )
        {
        case 1:
            {
                UKismetMathLibrary::BreakTransform(bpp__MuzzleTransform__pf,
                    /*out*/ bpfv__CallFunc_BreakTransform_Location__pf,
                    /*out*/ bpfv__CallFunc_BreakTransform_Rotation__pf,
                    /*out*/ bpfv__CallFunc_BreakTransform_Scale__pf);
                bpfv__TraceStart__pf = bpfv__CallFunc_BreakTransform_Location__pf;
            }
        case 2:
            {
                bpfv__CallFunc_MakeVector_ReturnValue__pf = UKismetMathLibrary::MakeVector(
                    bpp__TraceDistance__pf, 0.000000, 0.000000);
                bpfv__CallFunc_TransformLocation_ReturnValue__pf = UKismetMathLibrary::TransformLocation(
                    bpp__MuzzleTransform__pf, bpfv__CallFunc_MakeVector_ReturnValue__pf);
                bpfv__TraceEnd__pf = bpfv__CallFunc_TransformLocation_ReturnValue__pf;
            }
        case 3:
            {
                bpfv__CallFunc_LineTraceSingle_ReturnValue__pf = UKismetSystemLibrary::LineTraceSingle(
                    this, bpfv__TraceStart__pf, bpfv__TraceEnd__pf, ETraceTypeQuery::TraceTypeQuery3,
                    false, bpfv__Temp_object_Variable__pf, EDrawDebugTrace::None,
                    /*out*/ bpfv__CallFunc_LineTraceSingle_OutHit__pf, true,
                    FLinearColor(1.000000,0.000000,0.000000,1.000000),
                    FLinearColor(0.000000,1.000000,0.000000,1.000000), 5.000000);
            }
        case 4:
            {
                if (!bpfv__CallFunc_LineTraceSingle_ReturnValue__pf)
                {
                    __CurrentState = -1;
                    break;
                }
            }
        case 5:
            {
                UGameplayStatics::BreakHitResult(bpfv__CallFunc_LineTraceSingle_OutHit__pf,
                    /*out*/ bpfv__CallFunc_BreakHitResult_bBlockingHit__pf,
                    /*out*/ bpfv__CallFunc_BreakHitResult_bInitialOverlap__pf,
                    /*out*/ bpfv__CallFunc_BreakHitResult_Time__pf,
                    /*out*/ bpfv__CallFunc_BreakHitResult_Distance__pf,
                    /*out*/ bpfv__CallFunc_BreakHitResult_Location__pf,
                    /*out*/ bpfv__CallFunc_BreakHitResult_ImpactPoint__pf,
                    /*out*/ bpfv__CallFunc_BreakHitResult_Normal__pf,
                    /*out*/ bpfv__CallFunc_BreakHitResult_ImpactNormal__pf,
                    /*out*/ bpfv__CallFunc_BreakHitResult_PhysMat__pf,
                    /*out*/ bpfv__CallFunc_BreakHitResult_HitActor__pf,
                    /*out*/ bpfv__CallFunc_BreakHitResult_HitComponent__pf,
                    /*out*/ bpfv__CallFunc_BreakHitResult_HitBoneName__pf,
                    /*out*/ bpfv__CallFunc_BreakHitResult_HitItem__pf,
                    /*out*/ bpfv__CallFunc_BreakHitResult_FaceIndex__pf,
                    /*out*/ bpfv__CallFunc_BreakHitResult_TraceStart__pf,
                    /*out*/ bpfv__CallFunc_BreakHitResult_TraceEnd__pf);
                bpfv__CallFunc_IsValid_ReturnValue__pf = UKismetSystemLibrary::IsValid(
                    bpfv__CallFunc_BreakHitResult_HitActor__pf);
                if (!bpfv__CallFunc_IsValid_ReturnValue__pf)
                {
                    __CurrentState = -1;
                    break;
                }
            }
        case 6:
            {
                bpfv__CallFunc_GetDirectionUnitVector_ReturnValue__pf = UKismetMathLibrary::GetDirectionUnitVector(
                    bpfv__TraceStart__pf, bpfv__TraceEnd__pf);
                UGameplayStatics::BreakHitResult(bpfv__CallFunc_LineTraceSingle_OutHit__pf,
                    /*out*/ bpfv__CallFunc_BreakHitResult_bBlockingHit__pf,
                    /*out*/ bpfv__CallFunc_BreakHitResult_bInitialOverlap__pf,
                    /*out*/ bpfv__CallFunc_BreakHitResult_Time__pf,
                    /*out*/ bpfv__CallFunc_BreakHitResult_Distance__pf,
                    /*out*/ bpfv__CallFunc_BreakHitResult_Location__pf,
                    /*out*/ bpfv__CallFunc_BreakHitResult_ImpactPoint__pf,
                    /*out*/ bpfv__CallFunc_BreakHitResult_Normal__pf,
                    /*out*/ bpfv__CallFunc_BreakHitResult_ImpactNormal__pf,
                    /*out*/ bpfv__CallFunc_BreakHitResult_PhysMat__pf,
                    /*out*/ bpfv__CallFunc_BreakHitResult_HitActor__pf,
                    /*out*/ bpfv__CallFunc_BreakHitResult_HitComponent__pf,
                    /*out*/ bpfv__CallFunc_BreakHitResult_HitBoneName__pf,
                    /*out*/ bpfv__CallFunc_BreakHitResult_HitItem__pf,
                    /*out*/ bpfv__CallFunc_BreakHitResult_FaceIndex__pf,
                    /*out*/ bpfv__CallFunc_BreakHitResult_TraceStart__pf,
                    /*out*/ bpfv__CallFunc_BreakHitResult_TraceEnd__pf);
                bpfv__CallFunc_ApplyPointDamage_ReturnValue__pf = UGameplayStatics::ApplyPointDamage(
                    bpfv__CallFunc_BreakHitResult_HitActor__pf, 1.000000,
                    bpfv__CallFunc_GetDirectionUnitVector_ReturnValue__pf,
                    bpfv__CallFunc_LineTraceSingle_OutHit__pf, bpv__OwningController__pf, this,
                    CastChecked<UClass>(
                        CastChecked<UDynamicClass>(AWeapon_C__pf2513711887::StaticClass())->UsedAssets[0],
                        ECastCheckedType::NullAllowed));
                __CurrentState = -1;
                break;
            }
        default:
            break;
        }
    } while( __CurrentState != -1 );
}
...but it results in all the same native function calls without needing to run on the script VM.
So if we're creating a game, we can make reasonable predictions about where script overhead is most likely to be a problem, and lean toward C++ in those areas.
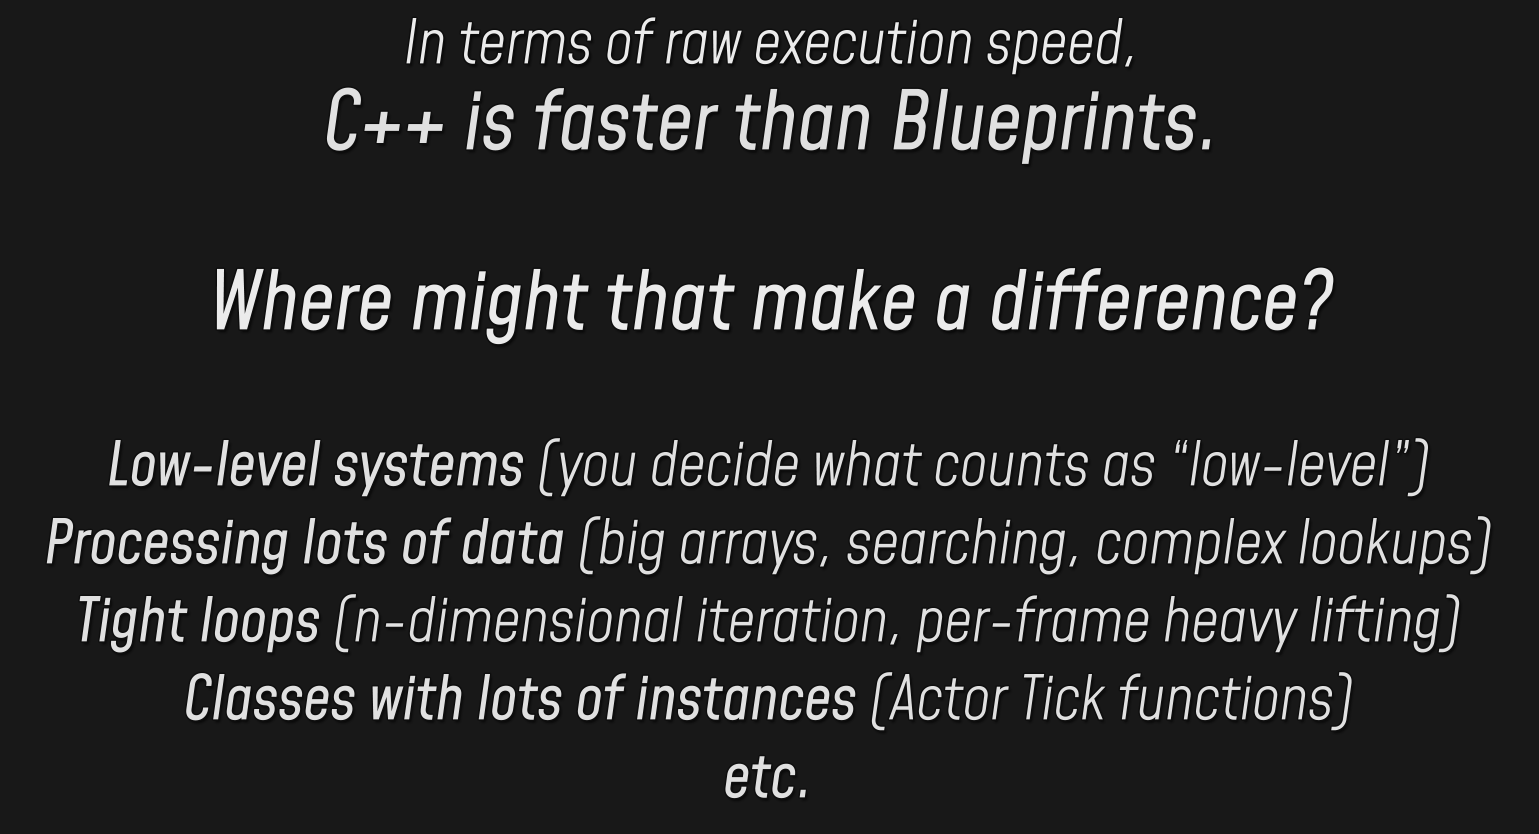
That might include all sorts of low-level systems, anything that manipulates data on a large scale, anything that does lots of work in tight loops, and anything that scales to a large number of actors.
But if you find yourself weighing performance tradeoffs, remember that the 80/20 rule applies to software optimization: 80% of execution time is spent running 20% of the code. You can use a profiler to see where every millisecond of the frame is going, and your decisions about what to optimize should be informed by that data.
If you have a system that's implemented in Blueprints, and you spend a week rewriting the whole thing in C++ to realize a twenty-fold performance increase, but the original Blueprint system only used up a tiny portion of your overall CPU budget, then you haven't really accomplished much.
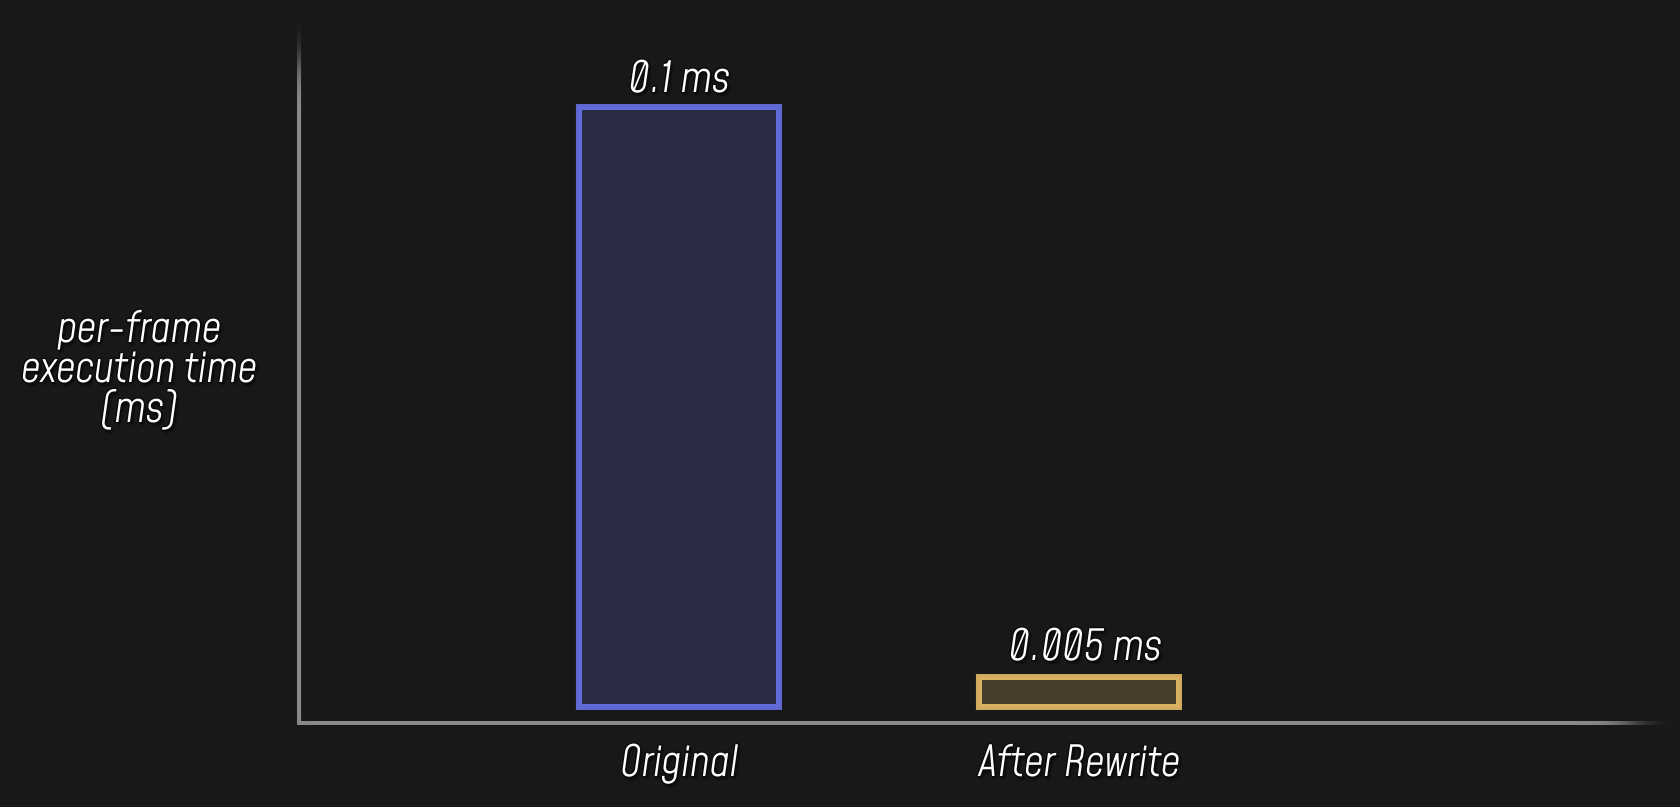
Or, maybe the original implementation did take up a hefty portion of the frame, but you could have achieved the same savings by simply rewriting a single function in C++, instead of the whole system.
So C++ is faster, but whether that speed difference is significant depends on context, and if there's any doubt, you should measure performance with a profiler and make decisions based on that data.
But of course, there are reasons beyond just execution speed that you might want to write some part of a system in C++. So let's dive into those.
Project Organization: Class Design
Game programming involves more than just writing function implementations.
void AMissile::Tick(float DeltaSeconds)
{
    Super::Tick(DeltaSeconds);

    const float OffsetForward = MovementSpeed * DeltaSeconds;
    const FVector Offset(OffsetForward, 0.0f, 0.0f);
    AddActorLocalOffset(Offset);
}
With an object-oriented framework like Unreal's, you're usually writing those functions as part of a class, so before you start implementing a class's functions, you need to define the class in the first place.
/** Flies forward from where it's spawned, exploding on contact. */
UCLASS()
class AMissile : public AActor
{
    GENERATED_BODY()

    // Declare member variables and member functions here
};
Defining a class means establishing what it should be responsible for, and then figuring out what properties and functions it needs in order to handle precisely that responsibility: no more, and no less. It also involves figuring out which of those properties and functions should be visible to other code, as part of the class's public interface, and which can be hidden away as private implementation details.
In C++, your class definition is written in a header file:
/** Flies forward from where it's spawned, exploding on contact. */
UCLASS()
class AMissile : public AActor
{
    GENERATED_BODY()

public:
    /** Root collision sphere. */
    UPROPERTY(VisibleAnywhere, BlueprintReadOnly, Category="Components")
    class USphereComponent* SomeComponent;

public:
    /** How fast we should move forward, in centimeters per second. */
    UPROPERTY(EditAnywhere, BlueprintReadWrite, Category="Missile")
    float MovementSpeed;

    /** If we fly this far without hitting anything, we'll explode. */
    UPROPERTY(EditAnywhere, BlueprintReadWrite, Category="Missile")
    float SelfDestructDistance;

private:
    /** How far we've flown since spawning. */
    UPROPERTY(VisibleAnywhere, Category="Missile|State")
    float DistanceTraveled;

public:
    AMissile(const FObjectInitializer& ObjectInitializer);
    virtual void Tick(float DeltaSeconds) override;

private:
    void Explode(const FHitResult& Hit);
};
And there's usually a corresponding .cpp file where you write the function implementations:
AMissile::AMissile(const FObjectInitializer& ObjectInitializer)
    : Super(ObjectInitializer)
{
    PrimaryActorTick.bCanEverTick = true;
    PrimaryActorTick.bStartWithTickEnabled = true;

    CollisionComponent = ObjectInitializer.CreateDefaultSubobject<USphereComponent>(this, TEXT("CollisionComponent"));
    CollisionComponent->SetCollisionProfileName(UCollisionProfile::BlockAllDynamic_ProfileName);
    RootComponent = CollisionComponent;

    MovementSpeed = 500.0f;
}

void AMissile::Tick(float DeltaSeconds)
{
    Super::Tick(DeltaSeconds);

    const float OffsetForward = MovementSpeed * DeltaSeconds;
    const FVector Offset(OffsetForward, 0.0f, 0.0f);
    DistanceTraveled += OffsetForward;

    FHitResult Hit;
    AddActorLocalOffset(Offset, true, &Hit);
    if (Hit.bBlockingHit || SelfDestructDistance > 0.0f && DistanceTraveled >= SelfDestructDistance)
    {
        Explode(Hit);
    }
}

void AMissile::Explode(const FHitResult& Hit)
{
    SetActorTickEnabled(false);
    SetLifeSpan(1.0f);
}
A Blueprint asset is roughly equivalent to both of these files. The Blueprint's parent class, along with its list of components, properties, and functions, form the class definition.

The event graphs (and other function graphs) contain the function implementations.
At this level, C++ and Blueprints are roughly equivalent in terms of how they allow you to define and implement new classes and other types. The difference arises when we start talking about dependencies between types.
Design Concepts: Types and Dependencies
Every time you create a class, or a struct, or an enumeration, whether in C++ or in the Editor, you're defining a new type.
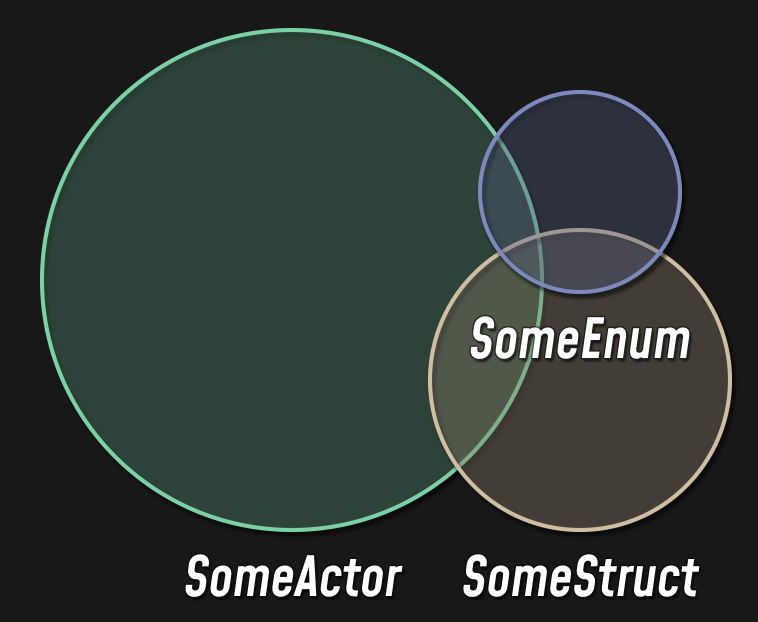
At any point where one type needs to know something about a different type, that's a dependency in your codebase.
Wherever possible, it's best to make sure that dependencies are only one-way. For example, if you have a weapon that fires a missile, that implies a one-way dependency: the weapon has to know about the missile in order to spawn it, but the missile doesn't have to know anything about the weapon that fired it.
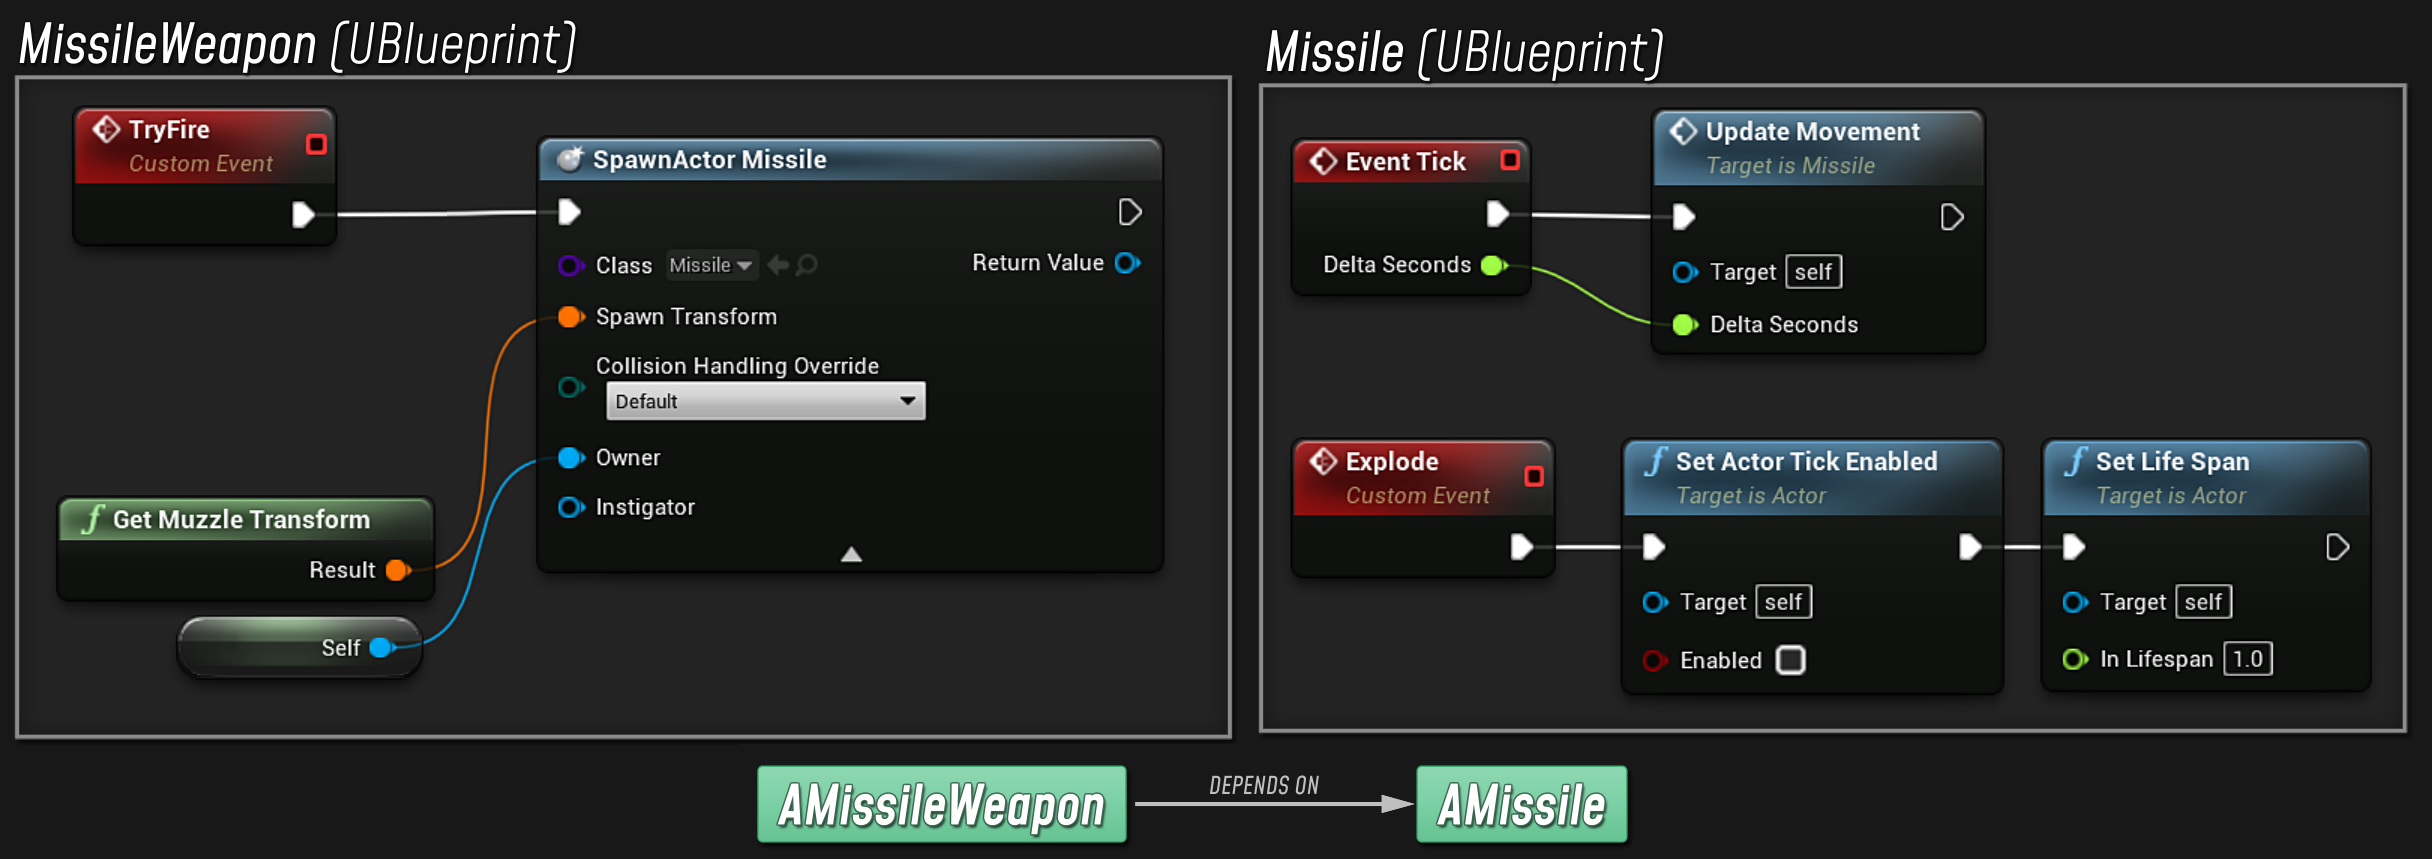
Now let's say the weapon is only allowed to have one missile in flight at any given time: we have to wait until the existing missile explodes before we can fire a new one. We could implement that behavior by having the missile call a function on the weapon to let it know that it can fire again.

But that would complicate our design by creating a two-way dependency for no good reason. The missile shouldn't have to know anything about the rules that govern the weapon: whether the weapon should be able to fire is the weapon's concern. The missile's only job is to explode.
So to keep this dependency one-way, we can instead give the missile a delegate that's fired when it explodes – in Blueprints, delegates are also known as "event broadcasters." The missile only has to fire the delegate, without caring what happens as a result, and the weapon can bind a callback to that delegate to update its own internal state.
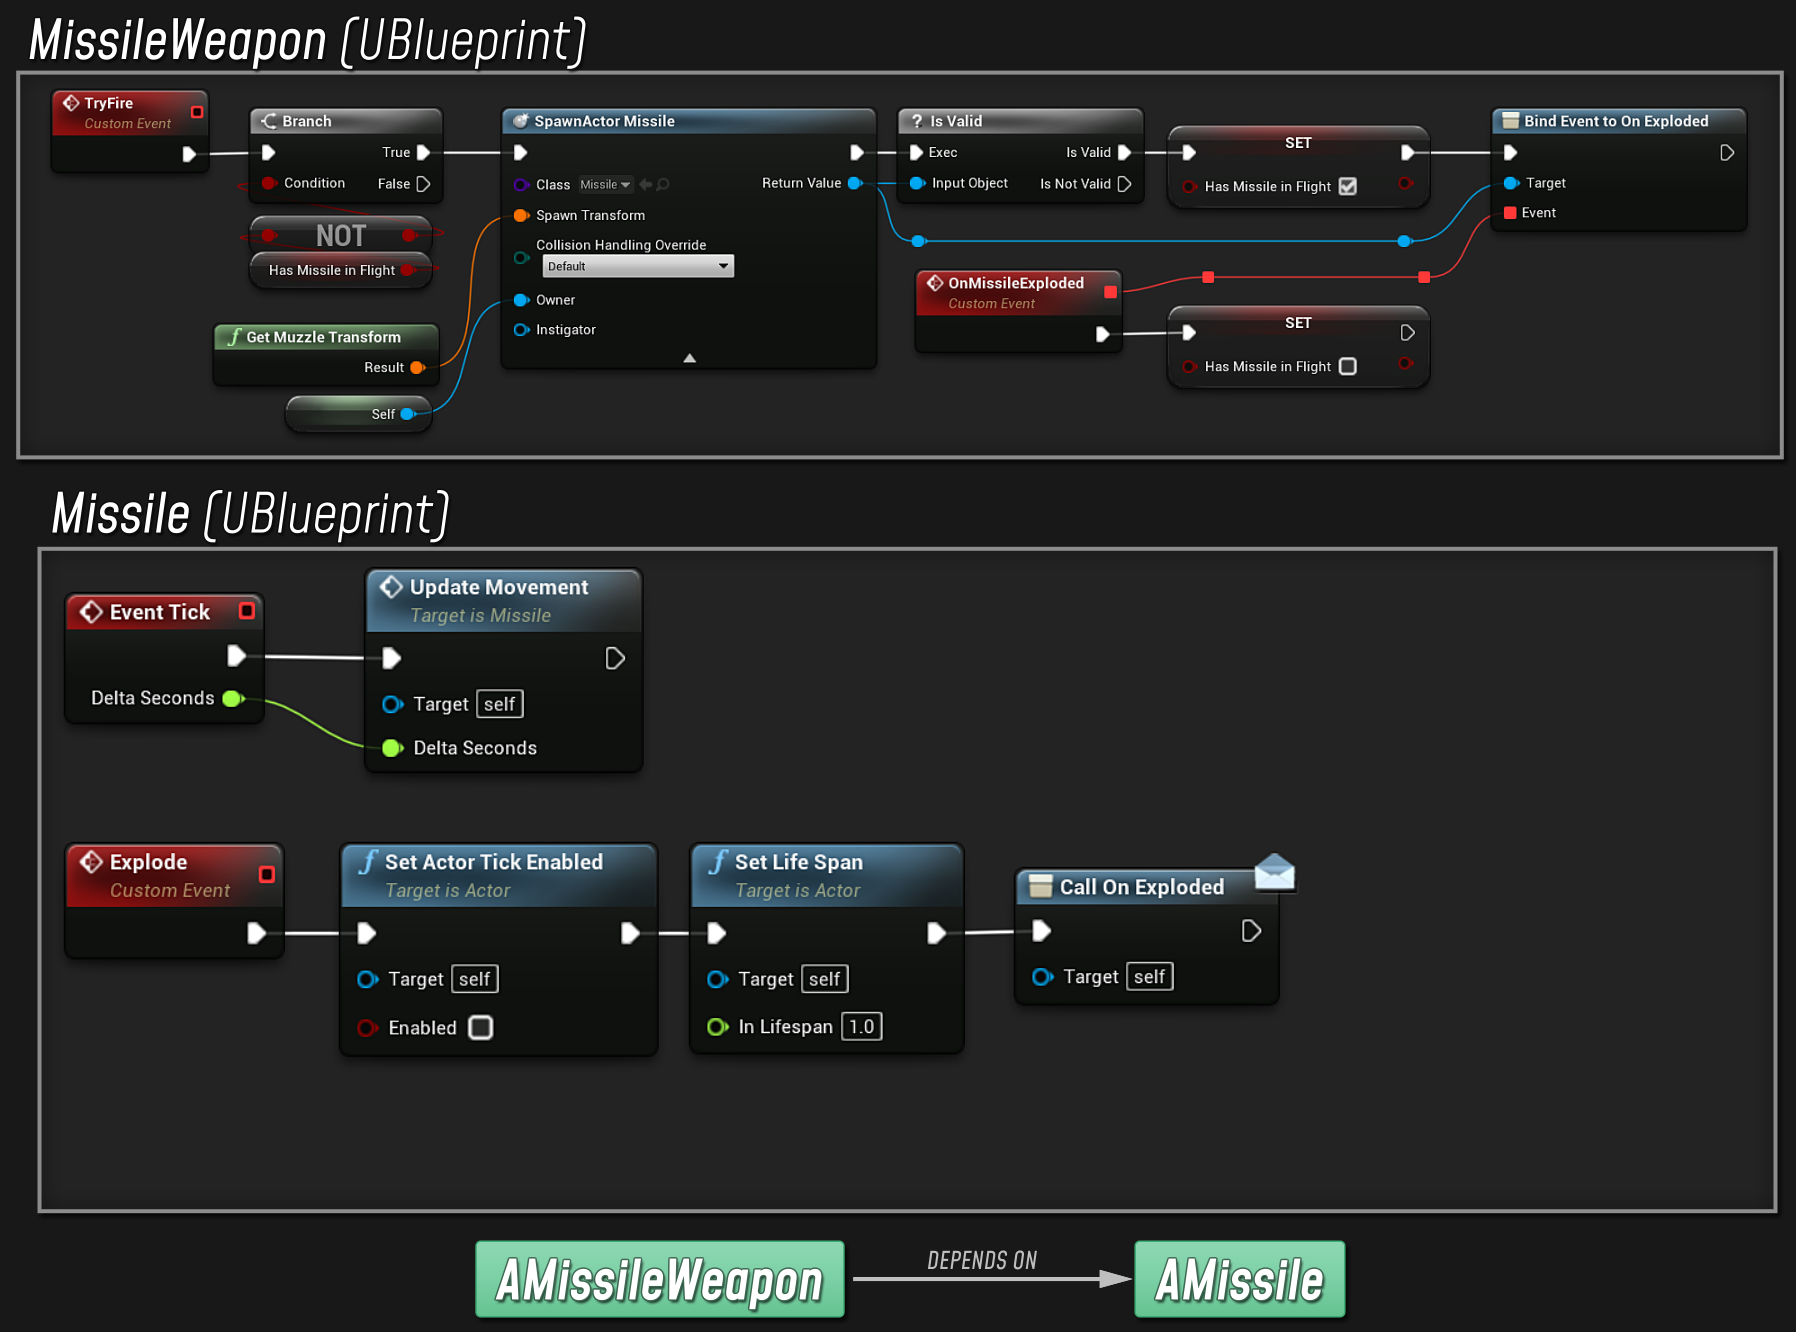
This way, the weapon and the missile stay out of each other's business, and we keep the shared surface area between the two classes as small as possible.
As a project grows bigger and more complex, it becomes more and more important to manage these dependencies, to make sure that the boundaries between different parts of the codebase are clearly defined.
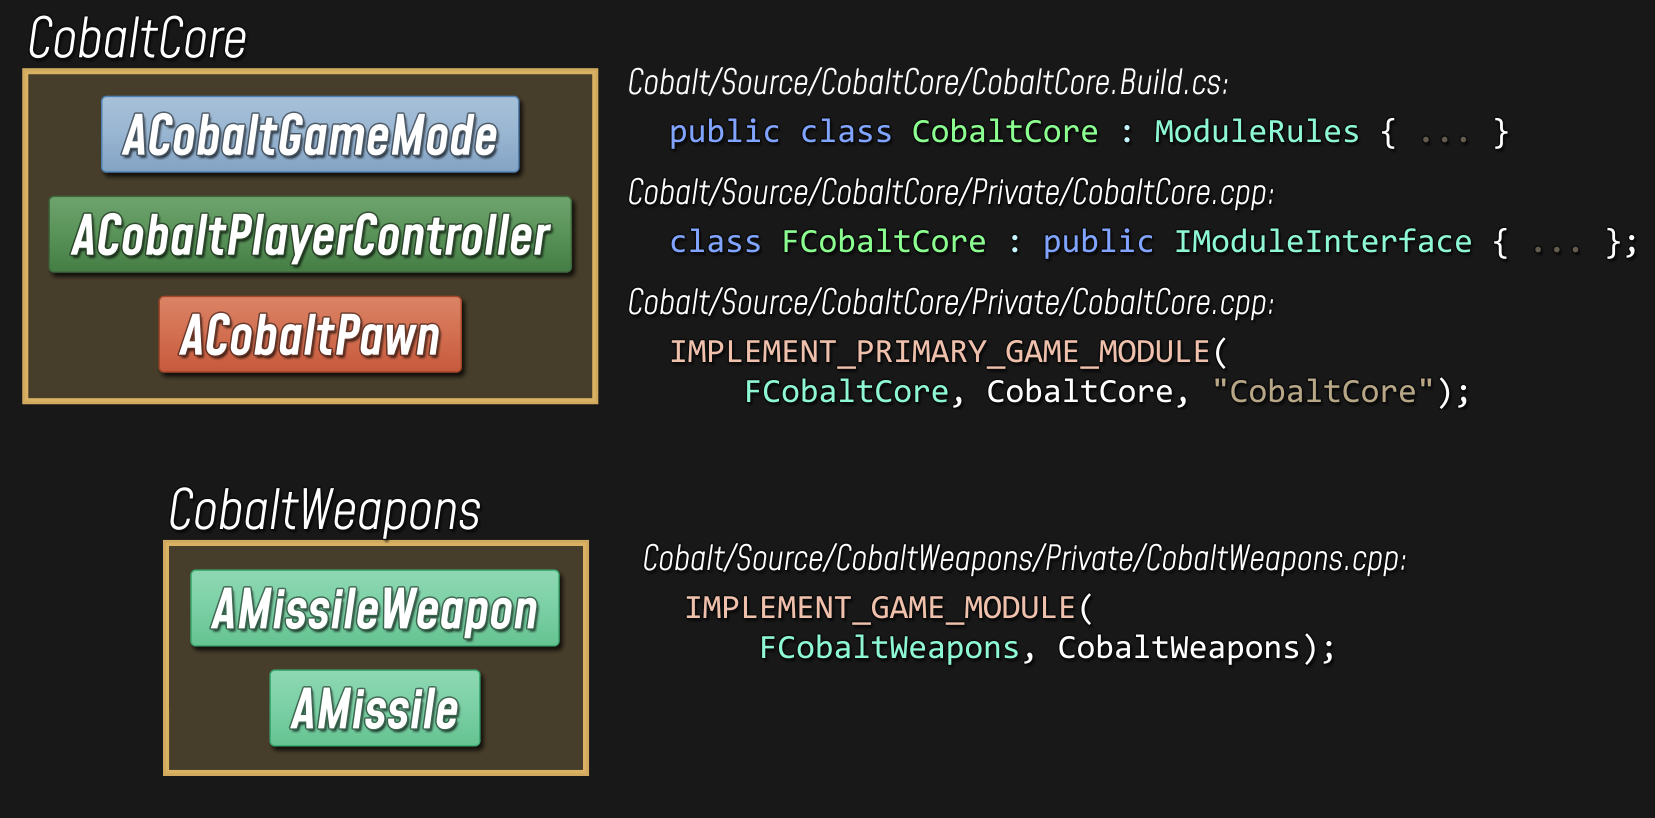
Project Organization: C++ Modules
One way of accomplishing that separation in C++ is to use modules. You typically have a single primary game module that contains the core gameplay classes, like the GameMode, PlayerController, and Pawn. As your project grows in complexity, you might split off different features and systems into their own separate modules.
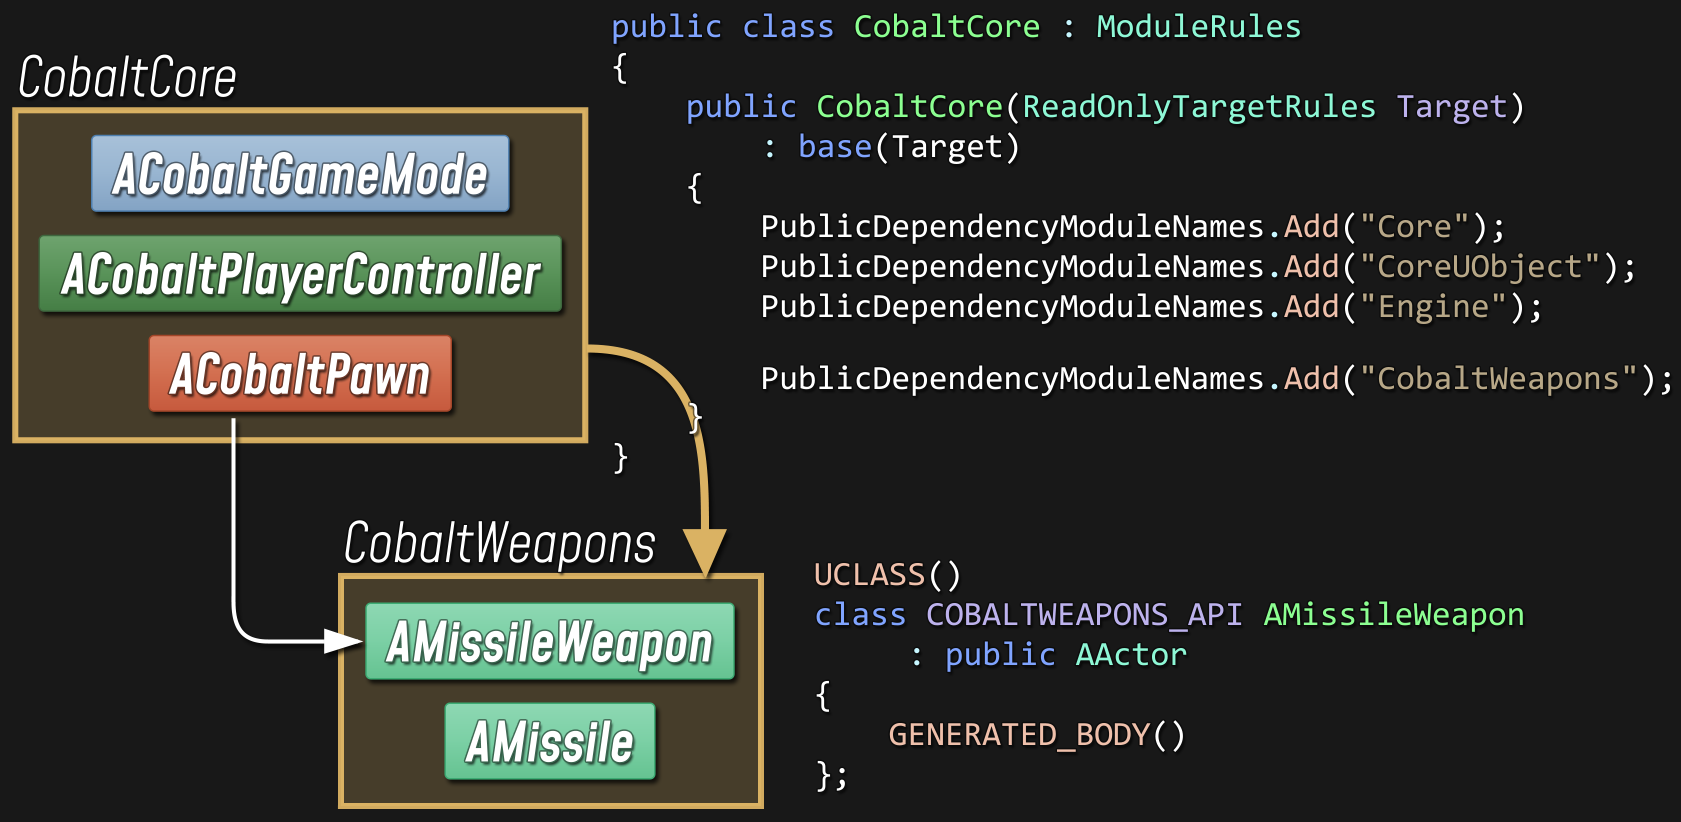
In order for a class in one module to reference a class in another module, there needs to be an explicit dependency between the two modules, and the class or function being referenced needs to be exported as part of the module's public API.
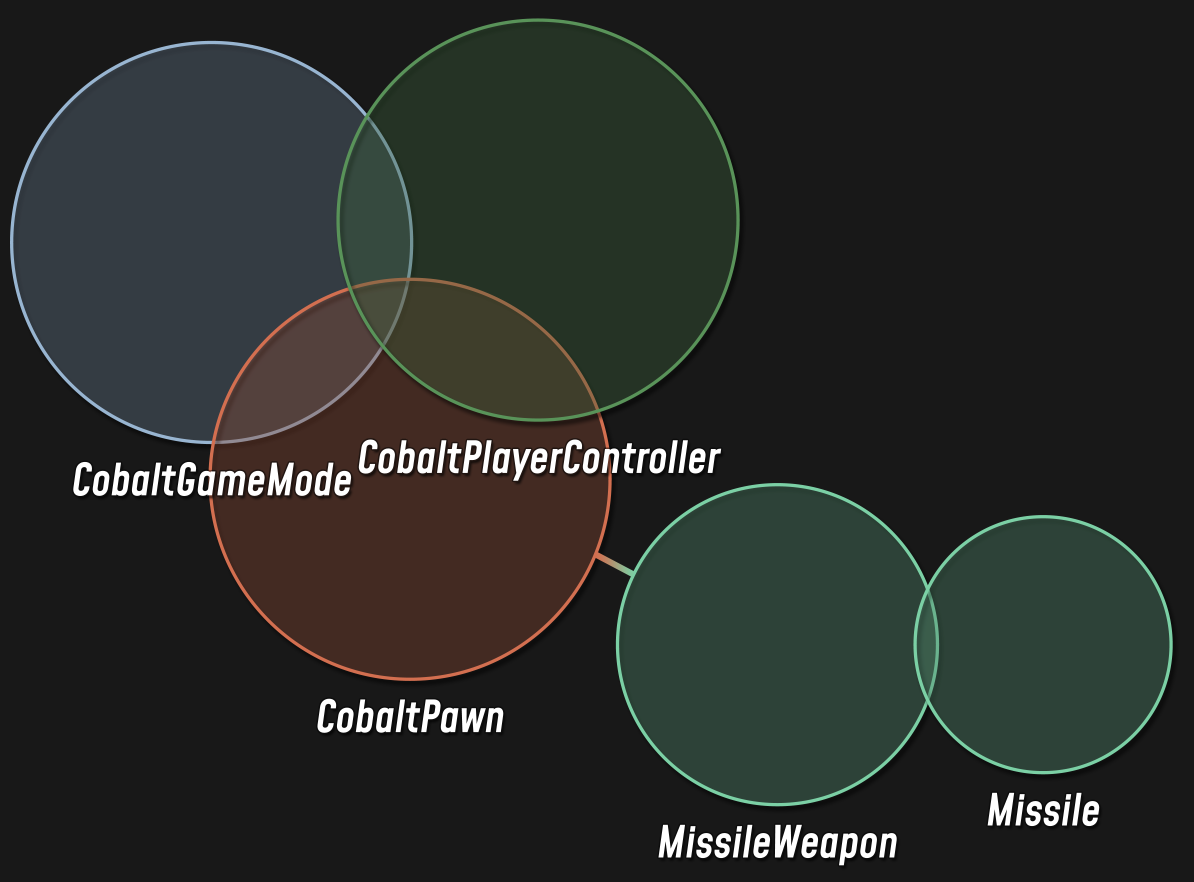
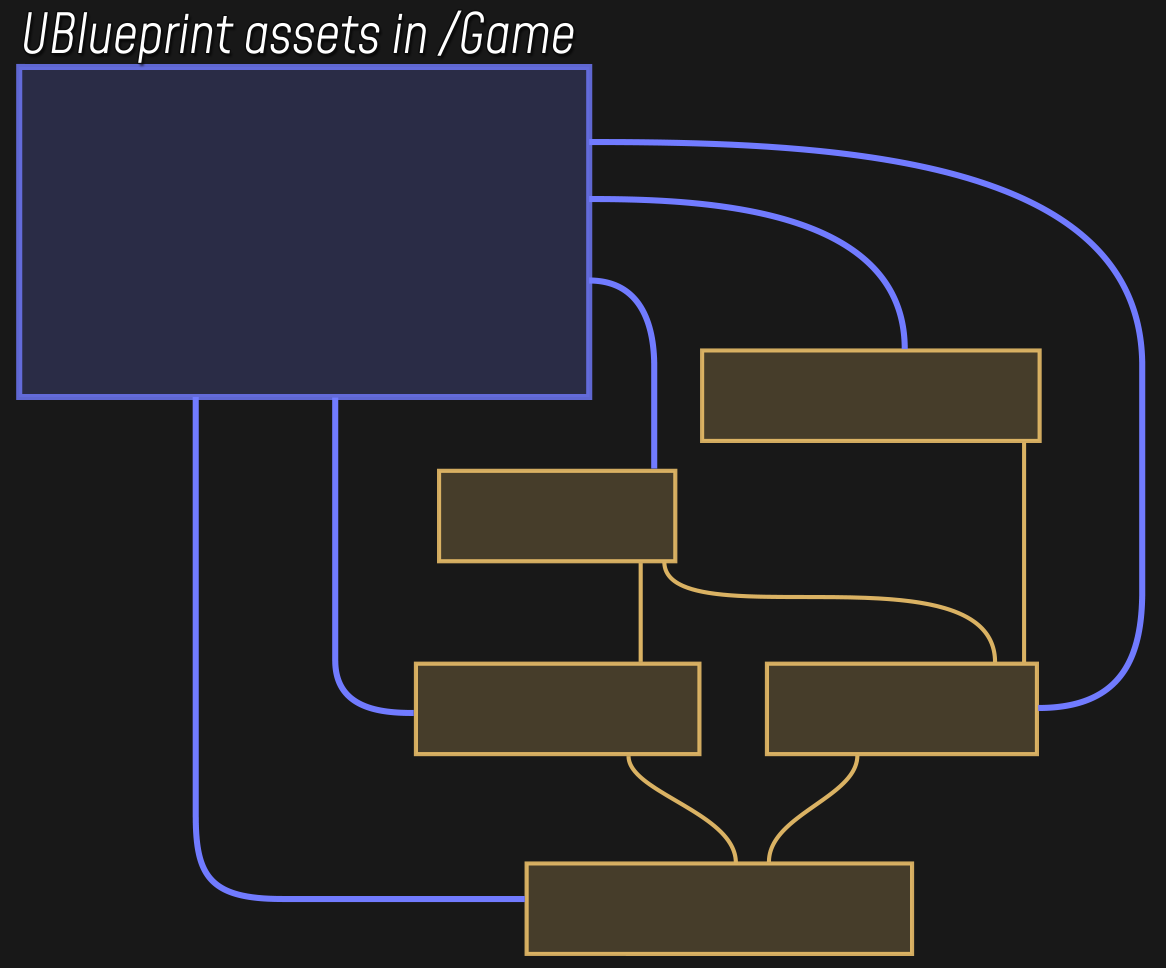
Since module dependencies should generally always be strictly one-way, this leads to a sort of layered architecture:

In this example, our Weapons module sits below our Core game module.
So we could have our Pawn spawn a Weapon, and the Pawn could call functions and access data from the Weapon class, but the Weapon would never be allowed to know anything about the Pawn class. That's a restriction that we're imposing on ourselves: we're saying that by design, the types in the Weapons module should never depend on the types in the Core module.
If we try to write code that violates that established design, then the build system won't allow it: we'll get a linker error that indicates we're trying to use code from a module that's not an explicit dependency.
// Compile error on #include:
// (Module has not been added as a dependency)

    [1/4] Missile.cpp
    E:\Cobalt\Source\CobaltWeapons\Private\Missile.cpp(7):
      fatal error C1083:
        Cannot open include file: 'CobaltPlayerController.h':
          No such file or directory /* [in the include path for this module] */

// Linker error on use of class:
// (Module is a dependency, but class is not exported)

    [1/2] UE4Editor-CobaltWeapons.dll
    Missile.cpp.obj : error LNK2019:
      unresolved external symbol
        "private: static class UClass * __cdecl
         ACobaltPlayerController::GetPrivateStaticClass(void)"
           (?GetPrivateStaticClass@ACobaltPlayerController@@CAPEAVUClass@@XZ)
      referenced in function
        "private: void __cdecl
         AMissile::Explode(struct FHitResult const &)"
           (?Explode@AMissile@@AEAAXABUFHitResult@@@Z)
While we might be tempted to just create that new dependency, this is usually a sign that we need to think more carefully about what we're doing, and either change our code to better suit the established design, or else reevaluate those initial design constraints.
There are a number of concrete benefits to the prudent use of modules:
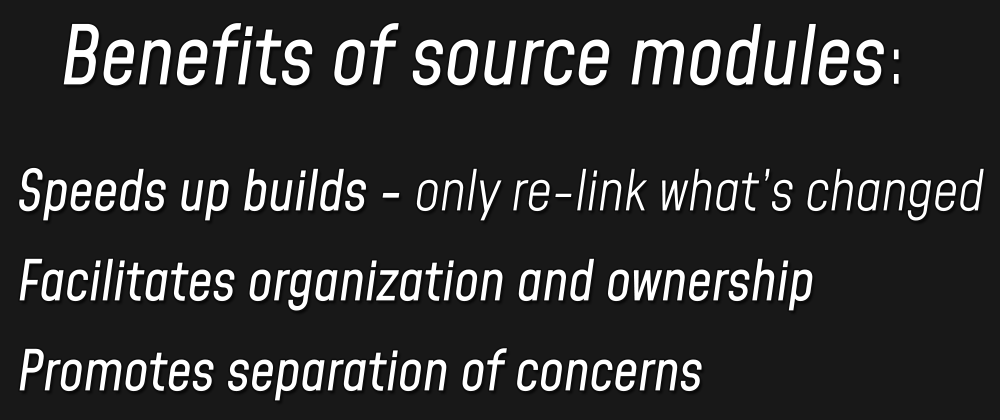
Using modules keeps build times under control, within a team it makes it easier to establish which team members have ownership over different parts of the codebase, and in theory, it lightens your cognitive load: if you're doing work inside of a single module, then you can safely forget about all the code in all the other modules, except where you need to bring in explicit, deliberate dependencies.
Of course, module boundaries are a double-edged sword. The key benefit of splitting your codebase into separate modules is that it forces you to think about your design when you add new types or dependencies.

The key drawback of splitting your codebase into separate modules is that it forces you to think about your design when you add new types or dependencies.
But when modules are used wisely, they're a great tool for keeping larger projects organized. The overarching design of your project's codebase can be writ large in your module boundaries, and you can be confident that if your project successfully builds from source, then those boundaries are not being violated.
Project Organization: BP-to-C++ Dependencies
There are no such boundaries in Blueprints. You can think of all the Blueprints in your project as forming a single conceptual module that sits above every actual C++ module.
Any Blueprint that you create can freely reference any type declared in any source module, so long as it's a BlueprintType.
For high-level, in-editor scripting work, it's hard to imagine these sorts of boundaries being anything but an unnecessary hindrance, so this isn't much of a downside. But, if you're writing core game systems in Blueprints, it's no less important than in C++ that you establish a good design with a clear separation of concerns. And with fewer tools to enforce the boundaries dictated by your design, you may have to be a little more vigilant to keep your codebase from becoming too tightly coupled.
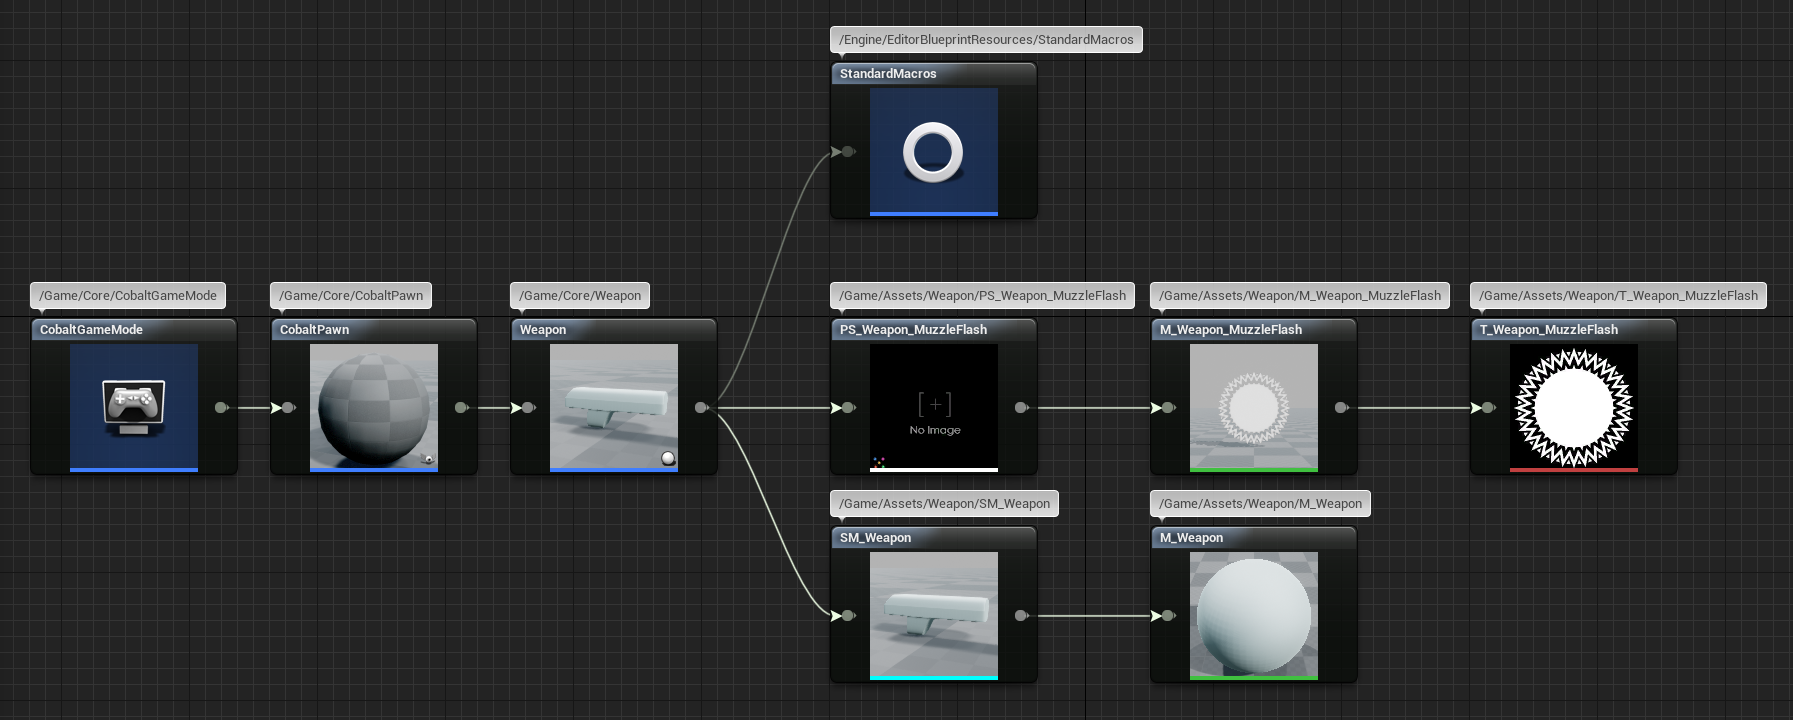
Blueprints are assets, so how you organize your Blueprints is a matter of asset organization, which varies by project and by team. It's worth pointing out that you can use the editor's reference viewer to get some very useful at-a-glance information about the dependencies between your Blueprint types.
So, module boundaries aren't a thing in Blueprints, and splitting your project's C++ source into multiple modules is entirely optional. But it's still important to be aware that there's a conceptual module boundary between C++ and Blueprints.
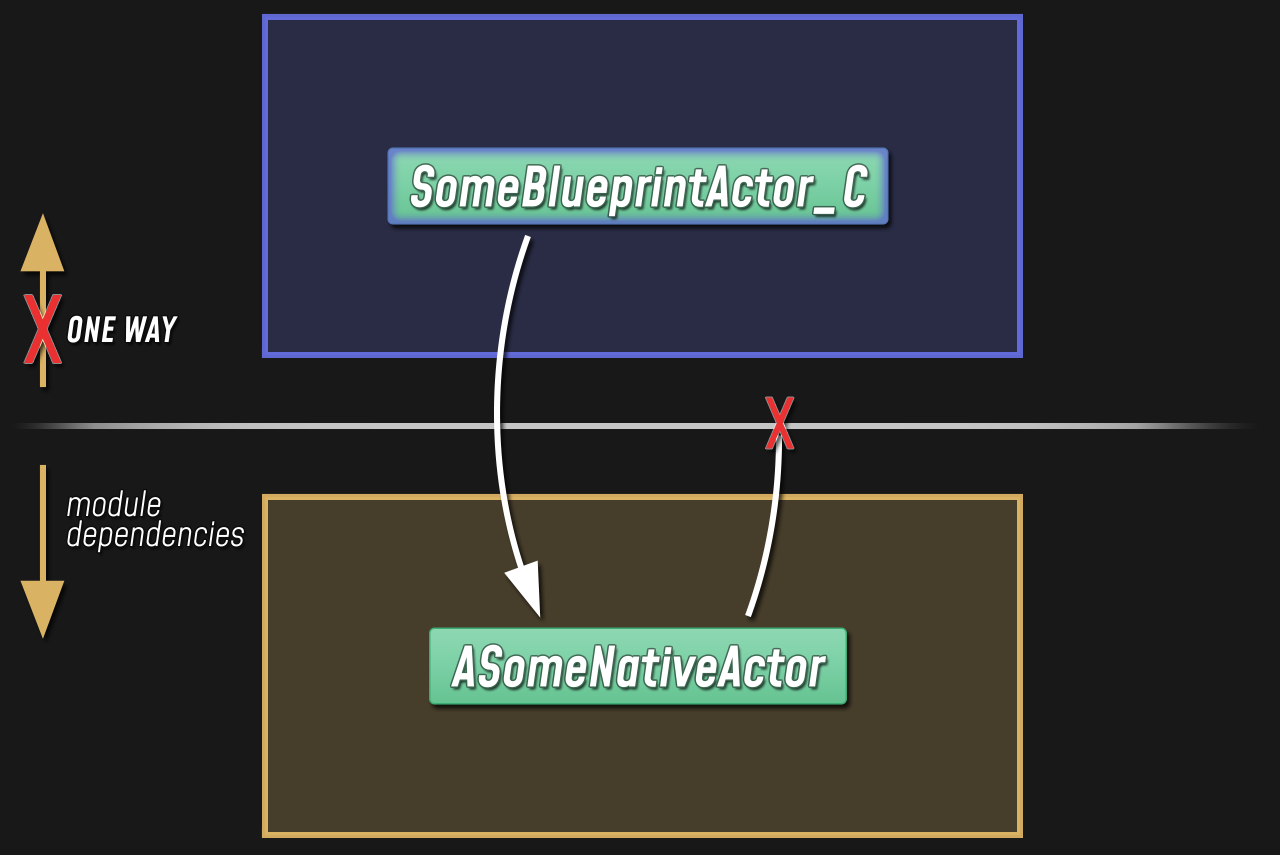
And, critically, it forms a one-way dependency: your Blueprint types can depend on C++ types, but your C++ types can't know anything about Blueprint types.
Design Example: Refactoring from BP to C++
Let's say we've been working purely in Blueprints, and we have a custom Pawn class and a Weapon class.
There's a simple one-way interaction that we need to facilitate between these two classes: the Pawn spawns a Weapon on BeginPlay, and if the player presses the fire button, then the Pawn calls the Fire function on the Weapon.
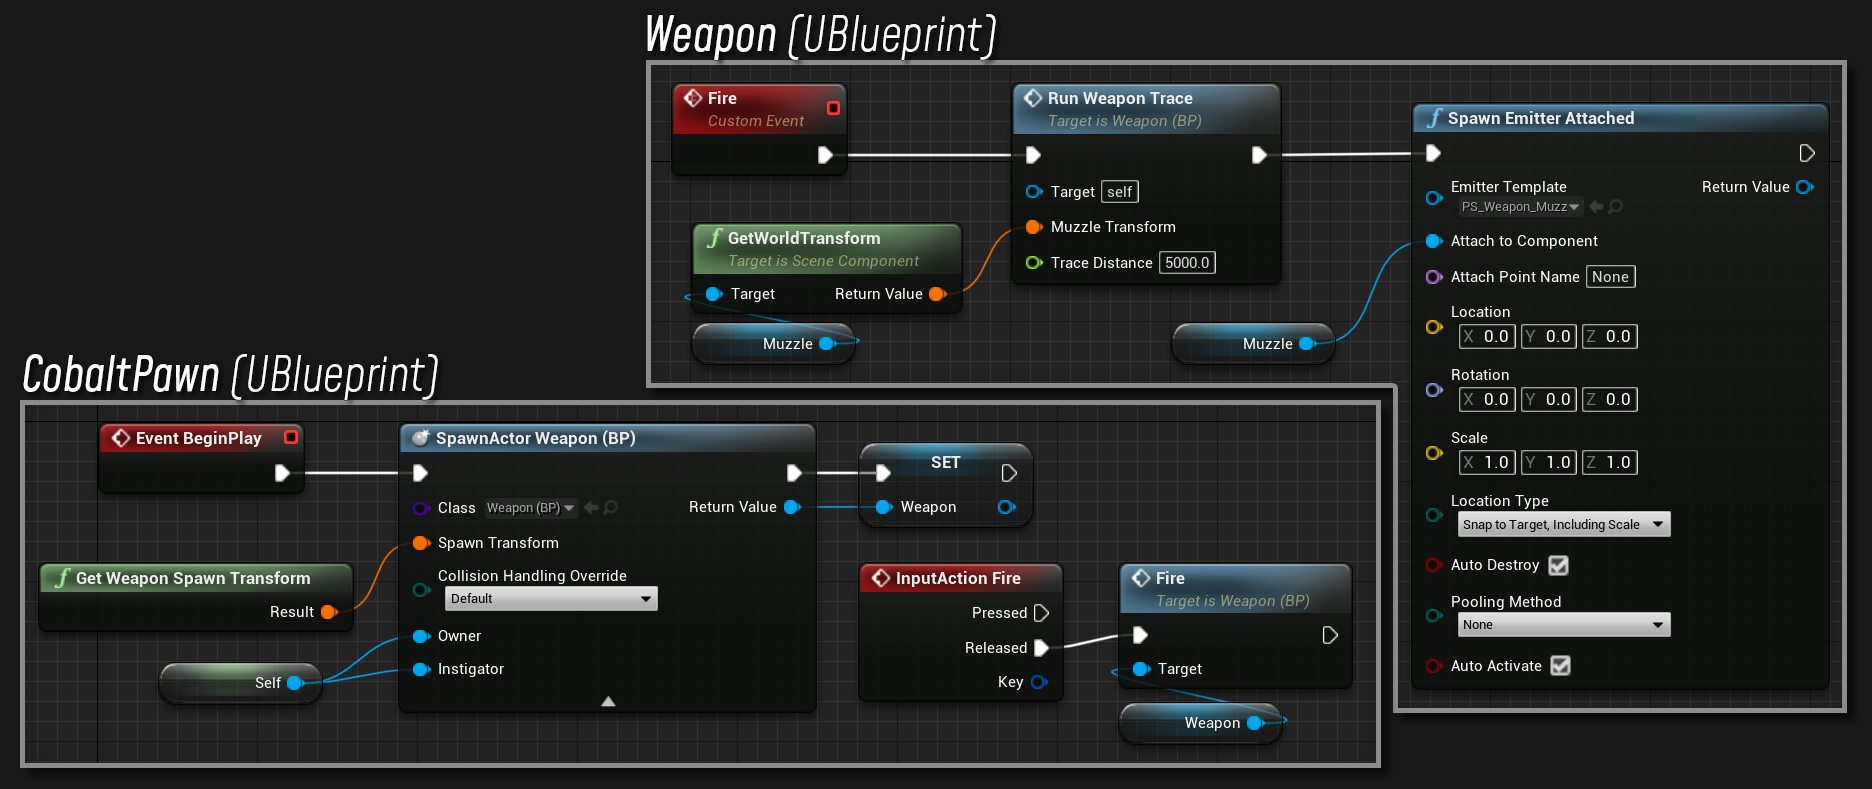
We have our Weapon Blueprint set up so that when we fire, we run a line trace and then spawn some particle effects.
Now suppose we want to start refactoring some of our core classes into C++, and we start with the Pawn.
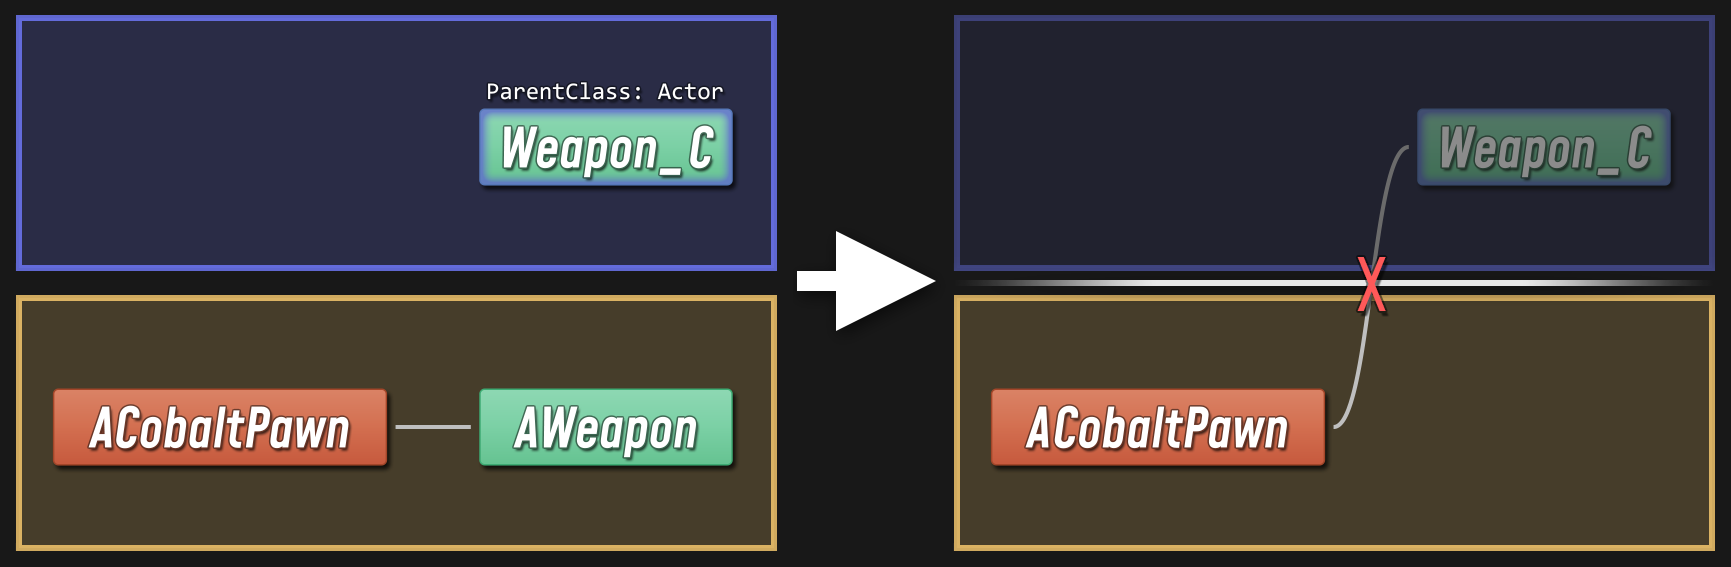
If we move our Pawn class into C++ but leave our Weapon class defined in Blueprints, then we have to contend with the fact that at the level of our C++ module, Weapons don't exist yet.
We can still spawn a Weapon, thanks to Unreal's reflection system: any UObject class, regardless of where it's defined, has a UClass object associated with it.
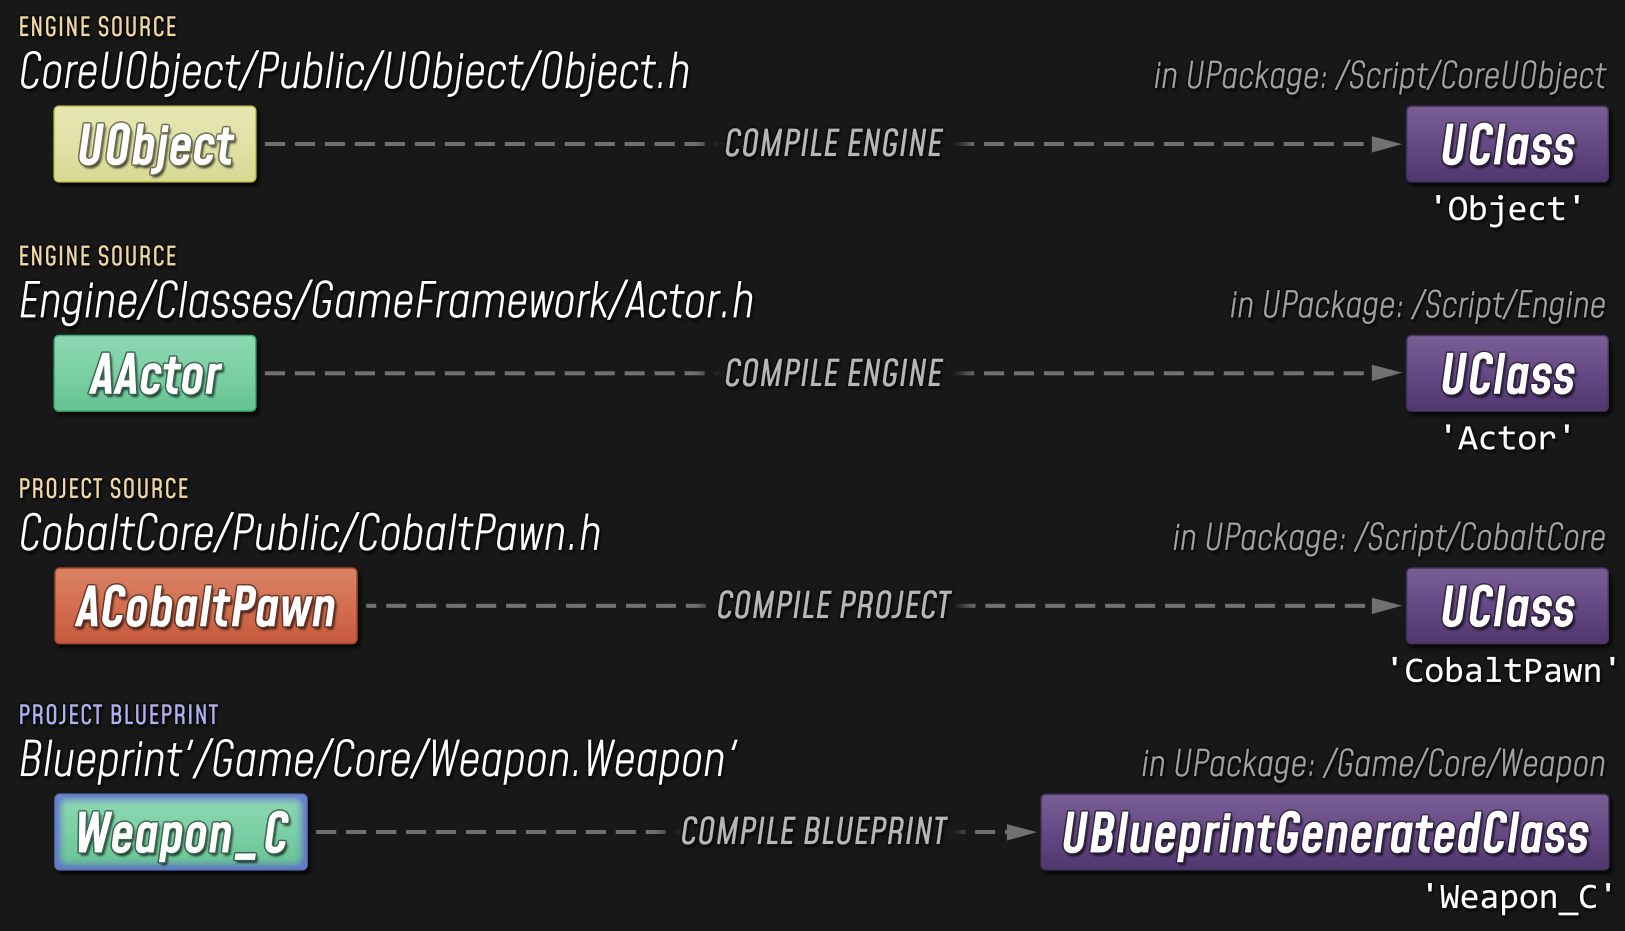
As long as we can get a reference to the Weapon's UClass, we can spawn an Actor of that class.
Here's our first pass at declaring our Pawn class in CobaltPawn.h:
#pragma once

#include "CoreMinimal.h"
#include "GameFramework/DefaultPawn.h"

#include "CobaltPawn.generated.h"

UCLASS()
class ACobaltPawn : public ADefaultPawn
{
    GENERATED_BODY()

public:
    UPROPERTY()
    TSubclassOf<AActor> WeaponClass;

    UPROPERTY(VisibleAnywhere, BlueprintReadOnly, Category="Cobalt")
    AActor* Weapon;

public:
    ACobaltPawn(const FObjectInitializer& ObjectInitializer);

protected:
    virtual void BeginPlay() override;
    virtual void SetupPlayerInputComponent(UInputComponent* PlayerInputComponent) override;

private:
    UFUNCTION() void OnFirePressed();
};
We've given our Pawn two properties: WeaponClass is the class that we want to spawn an instance of, and Weapon will hold a reference to that actor itself.
Let's look at our first iteration of CobaltPawn.cpp, starting from the top of the file:
#include "CobaltPawn.h"

#include "UObject/ConstructorHelpers.h"
#include "Components/InputComponent.h"

ACobaltPawn::ACobaltPawn(const FObjectInitializer& ObjectInitializer)
    : Super(ObjectInitializer)
{
    static ConstructorHelpers::FClassFinder<AActor> WeaponClassFinder(TEXT("/Game/Core/Weapon"));
    WeaponClass = WeaponClassFinder.Class;
}
In our constructor, we can resolve a reference to the class that's generated from our Weapon Blueprint. Directly referencing a Blueprint asset from C++ like this is a somewhat brittle approach, but we'll see some alternatives in a minute. For now, we initialize our WeaponClass property to hold a reference to our Blueprint-generated class.
Then, in BeginPlay, we can spawn an instance of that class.
void ACobaltPawn::BeginPlay()
{
    Super::BeginPlay();

    if (WeaponClass != nullptr)
    {
        FActorSpawnParameters SpawnInfo;
        SpawnInfo.Owner = this;
        SpawnInfo.Instigator = this;

        const FTransform SpawnOffset(FQuat::Identity, FVector(0.0f, 15.0f, -15.0f));
        const FTransform SpawnTransform = GetActorTransform() * SpawnOffset;
        Weapon = GetWorld()->SpawnActor<AActor>(WeaponClass, SpawnTransform, SpawnInfo);
    }
}
But notice: our Weapon property's type is just AActor*. The Weapon type is defined in Blueprints, so our C++ Pawn has no notion of what a Weapon is, other than the fact that it's some kind of Actor. This presents a bit of a problem when we try to handle the Fire input event:
void ACobaltPawn::SetupPlayerInputComponent(UInputComponent* PlayerInputComponent)
{
    Super::SetupPlayerInputComponent(PlayerInputComponent);

    PlayerInputComponent->BindAction(TEXT("Fire"), IE_Pressed, this, &ACobaltPawn::OnFirePressed);
}

void ACobaltPawn::OnFirePressed()
{
    if (Weapon)
    {
        // Manually call a Blueprint function from C++: this is dumb and you shouldn't do it
        UFunction* FireFunction = Weapon->FindFunction(TEXT("Fire"));
        if (FireFunction)
        {
            Weapon->ProcessEvent(FireFunction, nullptr);
        }
    }
}
We can't call the Weapon's Fire function, since that function is defined in a Blueprint asset. We could technically look up the function by name and invoke it dynamically, as demonstrated above – but that would be a pretty questionable thing to do, to say the least.
The real solution is to properly refactor our Weapon class into C++. But our Weapon, as we've currently implemented it, spawns particle effects, too – that's not something that our C++ Pawn implementation really needs to care about, and we'd prefer to keep those cosmetic effects implemented in Blueprints. So we end up with a base Weapon class defined in C++, and we further specialize that class with a Weapon Blueprint.
In our C++ Weapon class, we implement the functionality that's relevant at this level: basically just the Fire function, along with whatever other data or helper functions it needs. Here's Weapon.h:
#pragma once

#include "CoreMinimal.h"
#include "GameFramework/Actor.h"

#include "Weapon.generated.h"

UCLASS()
class AWeapon : public AActor
{
    GENERATED_BODY()

public:
    /** Placed at the end of the weapon, +X pointing out in the direction of fire. */
    UPROPERTY(VisibleAnywhere, BlueprintReadOnly, Category="Components")
    class USceneComponent* MuzzleComponent;

public:
    AWeapon(const FObjectInitializer& ObjectInitializer);
    void Fire();

private:
    void RunWeaponTrace(const FTransform& MuzzleTransform, float TraceDistance);
};
And here's the implementation in Weapon.cpp:
#include "Weapon.h"

#include "Components/SceneComponent.h"
#include "Engine/World.h"

#include "DamageType_WeaponFire.h"

static const ECollisionChannel ECC_WeaponFire = ECC_GameTraceChannel1;

AWeapon::AWeapon(const FObjectInitializer& ObjectInitializer)
    : Super(ObjectInitializer)
{
    RootComponent = ObjectInitializer.CreateDefaultSubobject<USceneComponent>(this, TEXT("RootComponent"));

    MuzzleComponent = ObjectInitializer.CreateDefaultSubobject<USceneComponent>(this, TEXT("MuzzleComponent"));
    MuzzleComponent->SetupAttachment(RootComponent);
    MuzzleComponent->SetRelativeLocation(FVector(100.0f, 0.0f, 0.0f));
}

void AWeapon::Fire()
{
    const FTransform MuzzleTransform = MuzzleComponent->GetComponentTransform();
    RunWeaponTrace(MuzzleTransform, 5000.0f);
}

void AWeapon::RunWeaponTrace(const FTransform& MuzzleTransform, float TraceDistance)
{
    const FVector TraceStart = MuzzleTransform.GetLocation();
    const FVector TraceEnd = TraceStart + (MuzzleTransform.GetUnitAxis(EAxis::X) * TraceDistance);
    const FCollisionQueryParams QueryParams(TEXT("WeaponTrace"), false, this);

    FHitResult Hit;
    if (GetWorld()->LineTraceSingleByChannel(Hit, TraceStart, TraceEnd, ECC_WeaponFire, QueryParams))
    {
        if (Hit.Actor.IsValid())
        {
            const float DamageAmount = 1.0f;
            const FVector ShotFromDirection = (TraceEnd - TraceStart).GetSafeNormal();
            const TSubclassOf<UDamageType> DamageTypeClass = UDamageType_WeaponFire::StaticClass();
            const FPointDamageEvent DamageEvent(DamageAmount, Hit, ShotFromDirection, DamageTypeClass);
            Hit.Actor->TakeDamage(DamageAmount, DamageEvent, GetInstigatorController(), this);
        }
    }
}
Then we can make a few changes to our Pawn.
We now have a Weapon class defined in C++, so we can use that specialized type instead of Actor. We also want to make the WeaponClass property editable, so it can be overridden in Blueprints.
public:
    UPROPERTY(EditAnywhere, BlueprintReadWrite, Category="Cobalt")
    TSubclassOf<class AWeapon> WeaponClass;

    UPROPERTY(VisibleAnywhere, BlueprintReadOnly, Category="Cobalt")
    class AWeapon* Weapon;
In the .cpp file, we no longer need to reference the Blueprint directly. As a default value, we'll just initialize WeaponClass to our base (C++) AWeapon class.
#include "Weapon.h"

ACobaltPawn::ACobaltPawn(const FObjectInitializer& ObjectInitializer)
    : Super(ObjectInitializer)
{
    WeaponClass = AWeapon::StaticClass();
}
The spawning is no different, except that we now know a more precise type for the resulting actor.
Weapon = GetWorld()->SpawnActor<AWeapon>(WeaponClass, SpawnTransform, SpawnInfo);
And finally, in our input binding, we can just call the Fire function normally.
void ACobaltPawn::OnFirePressed()
{
    if (Weapon)
    {
        Weapon->Fire();
    }
}
Design Example: Doing Everything in C++
We now have a working C++ implementation that gives us a fireable Weapon, by way of the Pawn. But that's just the essential functionality, with no visual feedback for the player: so how do we bring our original mesh and particle effects assets back in?
The answer is to reparent our original Blueprint to the new C++ AWeapon class, which will give us a chance to look at basic interop between a C++ base class and a Blueprint subclass. But before we do that, let's look at an alternative approach that keeps everything in C++.
For just a moment, let's convince ourselves that "real" programmers do everything in C++. We don't want to sully ourselves with Blueprints, because we're "real" programmers.
...OK, so we need to add a mesh component to our C++ Weapon class, and we need to store a reference to the ParticleSystem asset for our muzzle flash.
public:
    /** Placed at the end of the weapon, +X pointing out in the direction of fire. */
    UPROPERTY(VisibleAnywhere, BlueprintReadOnly, Category="Components")
    class USceneComponent* MuzzleComponent;

    UPROPERTY(VisibleAnywhere, BlueprintReadOnly, Category="Components")
    class UStaticMeshComponent* MeshComponent;

public:
    UPROPERTY(EditAnywhere, BlueprintReadWrite, Category="Weapon")
    class UParticleSystem* MuzzleFlashParticleSystem;
In Weapon.cpp, we're going to include some more Engine includes, since we'll be using some more component and asset types in our code.
#include "Weapon.h"

#include "UObject/ConstructorHelpers.h"
#include "Components/SceneComponent.h"
#include "Components/StaticMeshComponent.h"
#include "Engine/CollisionProfile.h"
#include "Engine/World.h"
#include "Engine/StaticMesh.h"
#include "Particles/ParticleSystem.h"
#include "Kismet/GameplayStatics.h"

#include "DamageType_WeaponFire.h"
Then, in the constructor, we need to get references to the assets for our weapon. We can use a static FObjectFinder to ensure that this asset lookup only happens once, when the game first boots up. For each asset, we'll need to paste in its exact path, which we can get by locating the asset in the Content Browser and choosing "Copy Reference."
AWeapon::AWeapon(const FObjectInitializer& ObjectInitializer)
    : Super(ObjectInitializer)
{
    static ConstructorHelpers::FObjectFinder<UStaticMesh> WeaponMeshFinder(
        TEXT("StaticMesh'/Game/Assets/Weapon/SM_Weapon.SM_Weapon'"));
    static ConstructorHelpers::FObjectFinder<UParticleSystem> MuzzleFlashParticleSystemFinder(
        TEXT("ParticleSystem'/Game/Assets/Weapon/PS_Weapon_MuzzleFlash.PS_Weapon_MuzzleFlash'"));

    RootComponent = ObjectInitializer.CreateDefaultSubobject<USceneComponent>(this, TEXT("RootComponent"));

    MuzzleComponent = ObjectInitializer.CreateDefaultSubobject<USceneComponent>(this, TEXT("MuzzleComponent"));
    MuzzleComponent->SetupAttachment(RootComponent);
    MuzzleComponent->SetRelativeLocation(FVector(48.0f, 0.0f, 0.0f));

    MeshComponent = ObjectInitializer.CreateDefaultSubobject<UStaticMeshComponent>(this, TEXT("MeshComponent"));
    MeshComponent->SetupAttachment(RootComponent);
    MeshComponent->SetStaticMesh(WeaponMeshFinder.Object);
    MeshComponent->SetCollisionProfileName(UCollisionProfile::NoCollision_ProfileName);
    MeshComponent->SetRelativeLocation(FVector(20.0f, 0.0f, 0.0f));

    MuzzleFlashParticleSystem = MuzzleFlashParticleSystemFinder.Object;
}
We'll also create and configure a UStaticMeshComponent, making sure that we manually enter the right offsets to match what we previously configured in the editor, and then we can spawn our muzzle flash particle effect when the weapon is fired, using the exact same function that we called from Blueprints.
void AWeapon::Fire()
{
    const FTransform MuzzleTransform = MuzzleComponent->GetComponentTransform();
    RunWeaponTrace(MuzzleTransform, 5000.0f);

    if (MuzzleFlashParticleSystem)
    {
        UGameplayStatics::SpawnEmitterAttached(MuzzleFlashParticleSystem, MuzzleComponent);
    }
}
With this pure-C++ version of our final Weapon actor, we now we have our asset references hardcoded directly into our source. There are some cases where this is fine – particularly for editor-only asset references, or for plugin or engine-level functionality where a specific asset really is integral. But for game objects like this, hardcoded asset references are typically best avoided.
For one, this approach creates a hard reference between our C++ Weapon class and any assets it uses. This means that as soon as our game starts up and registers the AWeapon class, it immediately has to load those assets, and those assets stay in memory permanently.
But also, this is just a questionable choice in terms of how we're organizing our project. The question of which assets we're using is a very high-level concern, and our base C++ class is designed to handle slightly lower-level functionality.
If we make our C++ class responsible for handling assets and cosmetic effects in addition to the job it already has, we may be giving it too many responsibilities and muddying our design.
If we handle assets in Blueprints, then we get a much more natural user experience with immediate visual feedback for tweaking and fine-tuning, and our asset references are managed for us in a way that allows assets to be streamed in and out, and we end up with a cleaner design, where the logic that dictates our actor's look and feel is separate from the logic that dictates its direct impact on the game world.
Design Example: Basic C++ / BP Interop
So let's see how we can make use of Blueprints for these cosmetic details.
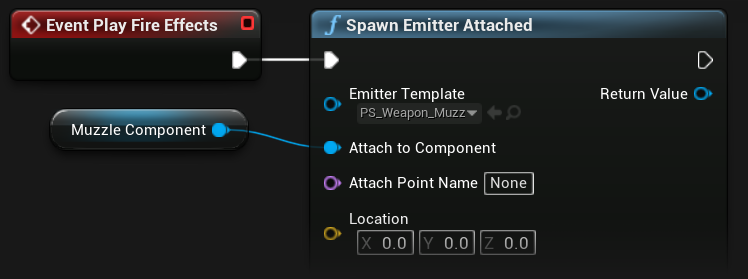
First, let's handle the particle effect. We don't want our C++ class to be concerned with specific visual effects; we just want it to be able to dictate that effects should be spawned. So we can declare a function called PlayFireEffects, and add the BlueprintImplementableEvent specifier. That gives us an Event that Blueprint subclasses can respond to, and all we have to do in C++ is call the function to fire that event.
UFUNCTION(BlueprintImplementableEvent, Category="Weapon")
void PlayFireEffects();
Next, let's look at the mesh component. If our C++ code needed to have control over the mesh – for example, to turn collision on or off at runtime – then it would be perfectly reasonable to declare this component as part of our C++ class. We could just leave out the asset reference and let the Blueprint subclass take care of fully customizing the mesh component. But in this case, the mesh is purely for show, so we'll leave it out of the base class entirely.
Here's our new Weapon.h, with our extra components removed and our PlayFireEffects event added:
#pragma once

#include "CoreMinimal.h"
#include "GameFramework/Actor.h"

#include "Weapon.generated.h"

UCLASS()
class AWeapon : public AActor
{
    GENERATED_BODY()

public:
    /** Placed at the end of the weapon, +X pointing out in the direction of fire. */
    UPROPERTY(VisibleAnywhere, BlueprintReadOnly, Category="Components")
    class USceneComponent* MuzzleComponent;

public:
    AWeapon(const FObjectInitializer& ObjectInitializer);
    void Fire();

    UFUNCTION(BlueprintImplementableEvent, Category="Weapon")
    void PlayFireEffects();

private:
    void RunWeaponTrace(const FTransform& MuzzleTransform, float TraceDistance);
};
And here's Weapon.cpp, where we've stripped out the higher-level, cosmetic functionality and added a call to PlayFireEffects:
#include "Weapon.h"

#include "Components/SceneComponent.h"
#include "Engine/World.h"

#include "DamageType_WeaponFire.h"

static const ECollisionChannel ECC_WeaponFire = ECC_GameTraceChannel1;

AWeapon::AWeapon(const FObjectInitializer& ObjectInitializer)
    : Super(ObjectInitializer)
{
    RootComponent = ObjectInitializer.CreateDefaultSubobject<USceneComponent>(this, TEXT("RootComponent"));

    MuzzleComponent = ObjectInitializer.CreateDefaultSubobject<USceneComponent>(this, TEXT("MuzzleComponent"));
    MuzzleComponent->SetupAttachment(RootComponent);
    MuzzleComponent->SetRelativeLocation(FVector(100.0f, 0.0f, 0.0f));
}

void AWeapon::Fire()
{
    const FTransform MuzzleTransform = MuzzleComponent->GetComponentTransform();
    RunWeaponTrace(MuzzleTransform, 5000.0f);

    PlayFireEffects();
}

void AWeapon::RunWeaponTrace(const FTransform& MuzzleTransform, float TraceDistance)
{
    const FVector TraceStart = MuzzleTransform.GetLocation();
    const FVector TraceEnd = TraceStart + (MuzzleTransform.GetUnitAxis(EAxis::X) * TraceDistance);
    const FCollisionQueryParams QueryParams(TEXT("WeaponTrace"), false, this);

    FHitResult Hit;
    if (GetWorld()->LineTraceSingleByChannel(Hit, TraceStart, TraceEnd, ECC_WeaponFire, QueryParams))
    {
        if (Hit.Actor.IsValid())
        {
            const float DamageAmount = 1.0f;
            const FVector ShotFromDirection = (TraceEnd - TraceStart).GetSafeNormal();
            const TSubclassOf<UDamageType> DamageTypeClass = UDamageType_WeaponFire::StaticClass();
            const FPointDamageEvent DamageEvent(DamageAmount, Hit, ShotFromDirection, DamageTypeClass);
            Hit.Actor->TakeDamage(DamageAmount, DamageEvent, GetInstigatorController(), this);
        }
    }
}
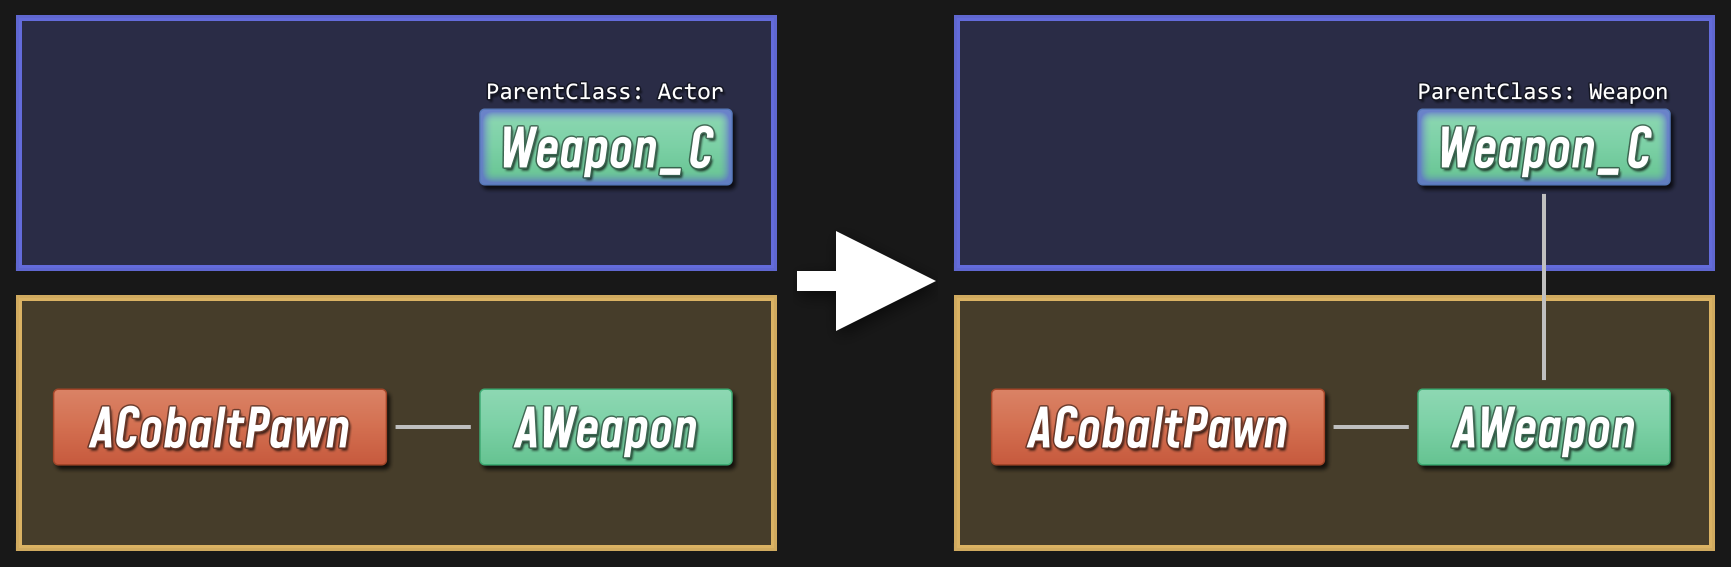
So now, if we head into the editor, we can open up our original Weapon blueprint, which is still just an Actor blueprint. We can delete the data and functionality that we've refactored into C++, just leaving us with our particle effects and our mesh component, and then we can reparent the Blueprint to make it a subclass of our new C++ Weapon class.

All we have to do is hook the PlayFireEffects event up to our particle effects, and our Weapon is done. So now we have a Blueprint that extends our C++ Weapon class. When that Blueprint is compiled, we end up with a new class of Weapon that's generated from our Blueprint.
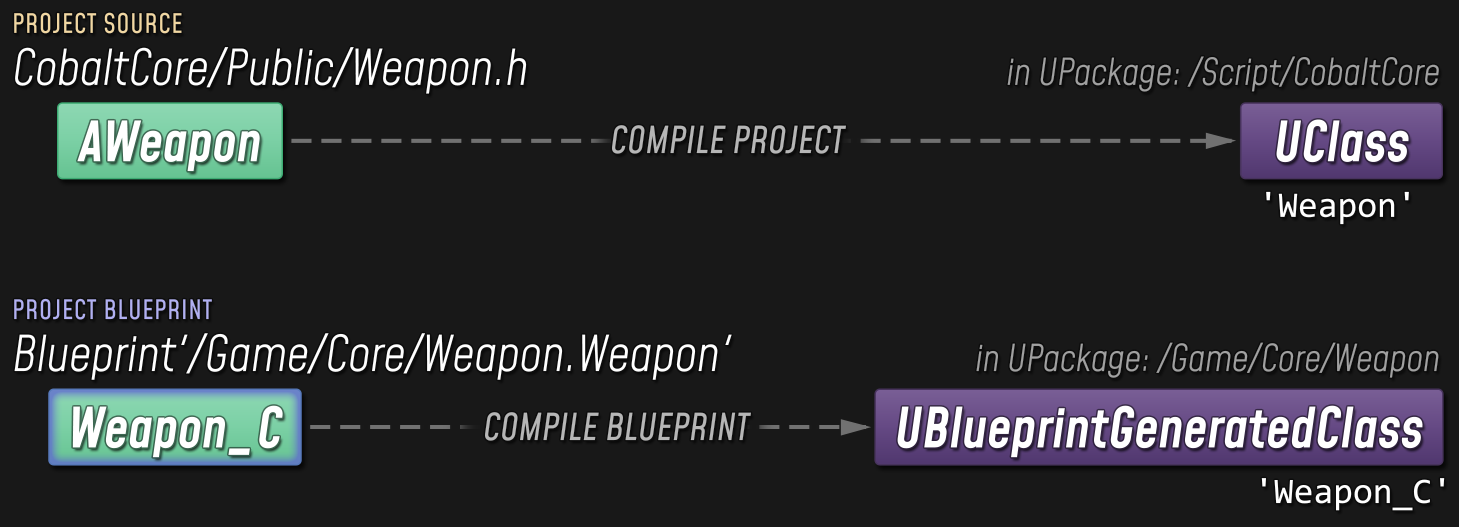
The only question now is: how do we use our new UBlueprintGeneratedClass instead of the base class that we specified in C++?
All we have to do is make a Blueprint subclass of our Pawn, and change the default value for the WeaponClass property. And then we can use that new Pawn class as the default for our game mode.
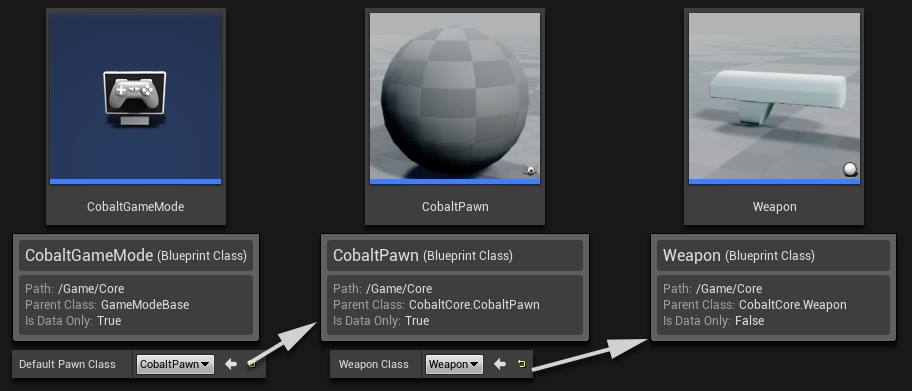
This way, we maintain a clean design where the dependencies only flow in one direction.
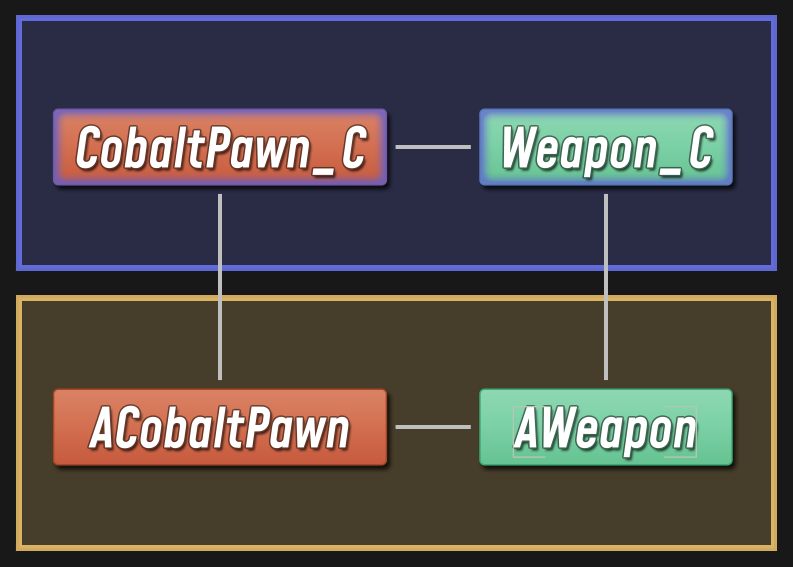
We have a higher-level Blueprint layer that's built on top of a lower-level C++ layer, and each layer handles a clearly-defined set of responsibilities with minimal overlap between layers.
The Traditional Programming / Scripting Split
This is a very simple example, but I hope it demonstrates the principle. This pattern right here – this approach of using Blueprints and C++ in a structured, complementary way... this is the conventional approach that I alluded to earlier, with the line drawn right down the middle.
This is the traditional, classical model, and for a team with the requisite skills making a moderately complex game, this tends to be the optimal approach.
As we've already discussed, though, Unreal gives you plenty of flexibility, so if you're making something on a smaller scale or if you're lacking in C++ experience, you're not sunk.
Design Example: Blueprint Function Libraries in C++
For instance, we don't necessarily have to pull entire types down into C++ if we don't want to. If you make a class that extends UBlueprintFunctionLibrary, you can add static, BlueprintCallable functions that let you take full advantage of native code from anywhere in your project.
So we also could have kept our Pawn and Weapon classes in Blueprints, and just refactored individual functions into C++ where needed.
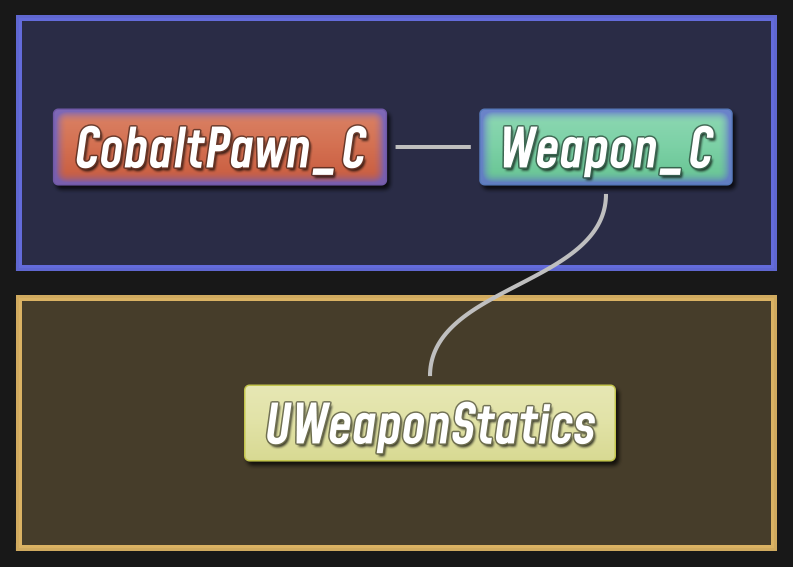
As an example, here's how we might have declared the line trace function in WeaponStatics.h:
#pragma once

#include "CoreMinimal.h"
#include "Kismet/BlueprintFunctionLibrary.h"

#include "WeaponStatics.generated.h"

UCLASS()
class UWeaponStatics : public UBlueprintFunctionLibrary
{
    GENERATED_BODY()

public:
    UFUNCTION(BlueprintCallable, Category="Cobalt|Weapon", meta=(WorldContext="WorldContextObject"))
    static bool RunWeaponTrace(
        UObject* WorldContextObject, const FTransform& MuzzleTransform, float TraceDistance, FHitResult& OutHit);
};
And, here's the accompanying implementation in WeaponStatics.cpp:
#include "WeaponStatics.h"

#include "Engine/Engine.h"
#include "Engine/World.h"
#include "GameFramework/Actor.h"

#include "DamageType_WeaponFire.h"

static const ECollisionChannel ECC_WeaponFire = ECC_GameTraceChannel1;

bool UWeaponStatics::RunWeaponTrace(UObject* WorldContextObject, const FTransform& MuzzleTransform, float TraceDistance, FHitResult& OutHit)
{
    UWorld* World = GEngine->GetWorldFromContextObject(WorldContextObject, EGetWorldErrorMode::LogAndReturnNull);
    AActor* Actor = Cast<AActor>(WorldContextObject);
    if (World && Actor)
    {
        const FVector TraceStart = MuzzleTransform.GetLocation();
        const FVector TraceEnd = TraceStart + (MuzzleTransform.GetUnitAxis(EAxis::X) * TraceDistance);
        const FCollisionQueryParams QueryParams(TEXT("WeaponTrace"), false, Actor);

        if (World->LineTraceSingleByChannel(OutHit, TraceStart, TraceEnd, ECC_WeaponFire, QueryParams))
        {
            if (OutHit.Actor.IsValid())
            {
                const float DamageAmount = 1.0f;
                const FVector ShotFromDirection = (TraceEnd - TraceStart).GetSafeNormal();
                const TSubclassOf<UDamageType> DamageTypeClass = UDamageType_WeaponFire::StaticClass();
                const FPointDamageEvent DamageEvent(DamageAmount, OutHit, ShotFromDirection, DamageTypeClass);
                OutHit.Actor->TakeDamage(DamageAmount, DamageEvent, Actor->GetInstigatorController(), Actor);
            }
            return true;
        }
    }
    return false;
}
The world context object is a special parameter that allows static, Blueprint-callable functions to resolve a reference to the world. When we call the function from a Blueprint, a reference to Self (i.e. the instance of our Blueprint-generated class that's calling the function) gets passed implicitly.
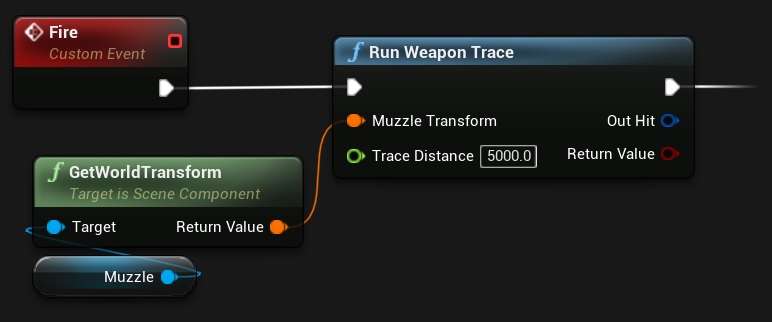
The Main Event: C++ vs. Blueprints
So, we've gone into some detail with these examples. I appreciate you bearing with me, and I hope you've gained a better understanding into: what happens under the hood when your code is compiled and run; how real-world projects are typically organized to ensure a clean and maintainable design; as well as the implications that C++ and Blueprints bring to both performance and project organization.
Now that we're on the same page about those more nuanced questions, let's wrap up by looking at some of the more cut-and-dried differences between C++ and Blueprints: the cases where one is – dare I say it – better than the other.
BP Advantages: Assets, Visuals, Scripted Events
Blueprints are better for dealing with assets and visual effects.
Your C++ source can only blindly speculate about what assets will be present at runtime, whereas Blueprints are assets. When you're editing a Blueprint, you can see all the assets in your project right in front of you. You can use them in a Blueprint and see exactly how they make things look and sound, immediately, and tweak them as needed.
When your C++ code directly references asset, that creates a dependency between your compiled game module and the asset. If the asset changes, you need to go all the way back to the start of the build pipeline, manually update your source, and recompile.
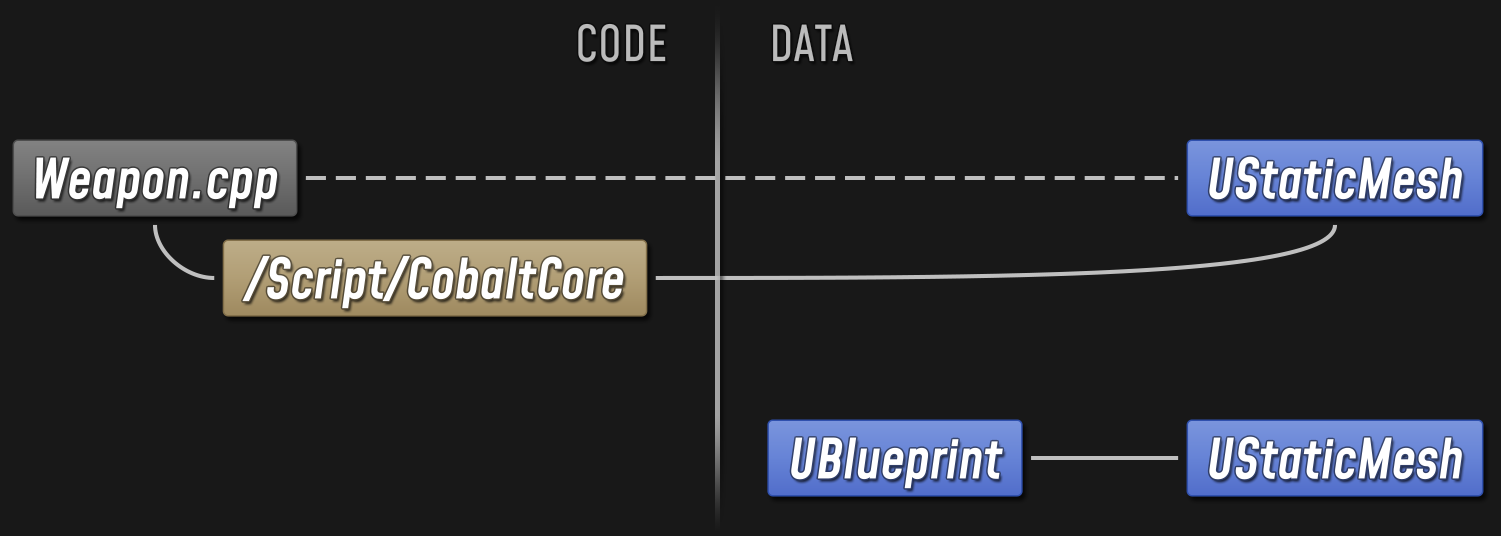
When your Blueprint references an asset, that just creates an asset-to-asset dependency, which the Engine can handle quite naturally.
Blueprints also have a clear advantage when it comes to scripted sequences.
If you're working in an Event Graph, as opposed to a Function Graph, you can take full advantage of events and latent functions in order to write asynchronous code in a way that's incredibly straightforward and intuitive.
If I want a character to move to a certain spot, then wait 3 seconds, then wait for a door to open, checking every half second, then shoot at an enemy until it's dead, then continue through the door...
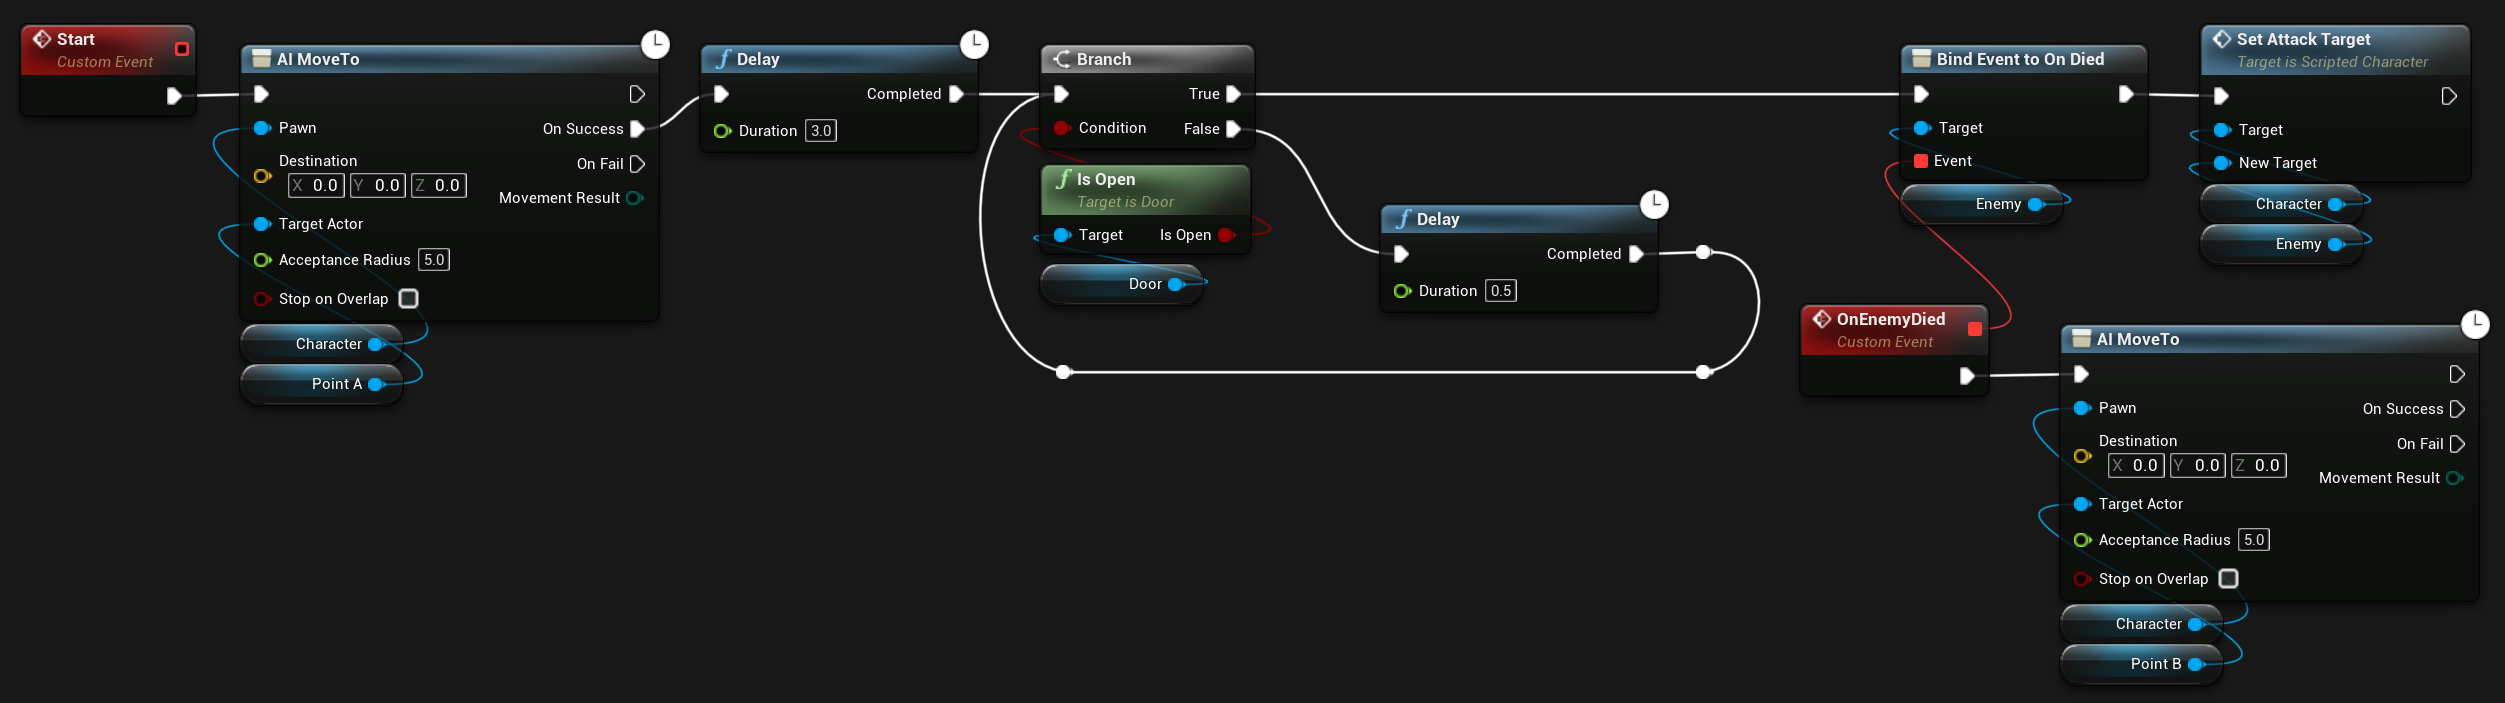
void ATestSequence::Start()
{
    AAIController* Controller = Character ? Character->GetController<AAIController>() : nullptr;
    if (Controller && PointA)
    {
        Controller->ReceiveMoveCompleted.AddDynamic(this, &ATestSequence::OnFinishedMove);
        if (Controller->MoveToActor(PointA, 5.0f) == EPathFollowingRequestResult::RequestSuccessful)
        {
            MoveToPointARequestID = Controller->GetCurrentMoveRequestID();
        }
    }
}

void ATestSequence::OnFinishedMove(FAIRequestID RequestID, EPathFollowingResult::Type Result)
{
    if (RequestID == MoveToPointARequestID)
    {
        GetWorldTimerManager().SetTimer(CheckDoorTimer, this, &ATestSequence::CheckDoor, 3.0f);
    }
}

void ATestSequence::CheckDoor()
{
    if (Door && Door->IsOpen())
    {
        if (Character && Enemy)
        {
            Enemy->Died.AddUObject(this, &ATestSequence::OnEnemyDied);
            Character->SetAttackTarget(Enemy);
        }
    }
    else
    {
        GetWorldTimerManager().SetTimer(CheckDoorTimer, this, &ATestSequence::CheckDoor, 0.5f);
    }
}

void ATestSequence::OnEnemyDied()
{
    AAIController* Controller = Character ? Character->GetController<AAIController>() : nullptr;
    if (Controller && PointB)
    {
        Controller->MoveToActor(PointB, 5.0f);
    }
}
While this works just the same, it's much less expressive, and it's obviously much harder to tweak and iterate on.
Scripted events like this are often implemented using Sequencer, which allows you to use Event tracks for easy integration with your Level Blueprint and with Blueprint-callable functions on your Actors.
Event Graphs also allow you to use Timeline components, which are a very handy way of animating properties or effects over time. You can do similar things in C++, but that typically involves either referencing and sampling curve assets... or else figuring out an equation that allows you to express your animation directly in code.
BP Advantages: Ease of Use
Blueprints allow you to test and iterate very quickly.
The entire Blueprint authoring experience takes place at runtime, in the editor, with no need for an offline build process. You can see how something runs, make a quick change, and go straight back to play-in-editor. You can poke around your Event Graphs while the game is running to inspect values and debug your script execution. You can pause the game while it's running and tweak properties to your heart's content.
Blueprints are accessible to a wider user base.
Jumping into the editor and playing around with Blueprints serves as a great starting point for people with limited C++ experience. And even if you're a C++ wizard yourself, not everyone is. When artists and designers and other team members can safely and easily contribute work toward a wider set of problems, your project and your development cycle will be better for it.
You still need skill and quality control either way – just as you can write good or bad C++, you can also write good or bad Blueprints. But buggy C++ code tends to do more damage to your workflow than buggy Blueprints. Blueprints typically don't cause outright crashes.
And Blueprints are discoverable.
Everything is integrated: all the types and functions you can use are laid out for you in the Blueprint Editor, so you can get a sense of what's there for you to leverage, before you ever start reading documentation.
And the quick iteration and visual feedback makes it easy to test things out and figure out how they work interactively.
If you're a newcomer to Unreal, even if you have C++ experience, it's not a bad idea to start by playing around in Blueprints. The things you learn using Blueprints tend to be directly transferable to C++.
So what about C++?
C++ Advantages: Performance, Fundamental Code
As we've seen, C++ can give you maximal runtime performance.
Your C++ code can be fully optimized at compile-time for the platform it's going to run on. By the time your source is compiled to machine code in a fully optimized release build, it's down to the bare metal, with nothing superfluous about it: no overhead.
And even though Blueprint Nativization can make a significant difference in some cases, it still adds some fairly wonky complexity to your project's build process, and that's a cost you have to weigh.
And anyway, C++ is the best place for code that's truly fundamental to your project.
Any types that need to be referenced in both C++ and Blueprints should be declared in an appropriate C++ module.
And C++ is also just... solid. Your C++ source is just plain text: it's simple, and straightforward. It doesn't depend on anything besides other, more fundamental C++ code and libraries. It's written in a highly standardized, extremely well-supported, general-purpose language. It's unambiguous. Its meaning or behavior or correctness will not change for any reason except an upgrade to your Engine version or compiler version.
So C++ is the ideal place for any code that's fundamental to your project: anything that you need to be rock-solid, and easy to read, understand, extend, and maintain.
C++ Advantages: Engine Functionality Not Exposed to BP
C++ also exposes a wider range of Engine functionality – the sort of stuff that tends to be useful for that kind of fundamental code.
You can make full use of the logging system to instrument your code with useful diagnostic output:
// Log.h
#include "Logging/LogMacros.h"

// Log.cpp
#include "Log.h"
DEFINE_LOG_CATEGORY(LogCobaltCore);

// DefaultEngine.ini
[Core.Log]
LogCobaltCore=VeryVerbose

// Log a critical error message and halt execution
UE_LOG(LogCobaltCore, Fatal, TEXT("Oh no!"));

// Log an error (red) or warning (yellow), with printf-style formatting
UE_LOG(LogCobaltCore, Error, TEXT("Error: %d"), SomeIntValue);
UE_LOG(LogCobaltCore, Warning, TEXT("Warning: '%s'"), *SomeStringValue);

// Log normal messages which may or many not be shown depending on the verbosity level
UE_LOG(LogCobaltCore, Display, TEXT("Something any developer should see"));
UE_LOG(LogCobaltCore, Log, TEXT("Feedback about routine operation"));
UE_LOG(LogCobaltCore, Verbose, TEXT("Diagnostic info to aid debugging"));
UE_LOG(LogCobaltCore, VeryVerbose, TEXT("Spammy diagnostic info"));
You can add assertions to enforce invariants and ensure that your code is running under the conditions you expect, with helpful error messaging when things go wrong.
You can define custom console variables that let you control your game's behavior in real-time, at runtime, by tweaking values in the console:
// At the top of a .cpp file:
static TAutoConsoleVariable<float> CVarControllerInterpSpeed(
    TEXT("CobaltCore.Controller.InterpSpeed"),
    8.0f,
    TEXT("Speed for smoothing out controller transforms,\n")
    TEXT(" or 0 to disable interpolation entirely")
);

// Within function bodies in the same .cpp file:
const float InterpSpeed = CVarControllerInterpSpeed.GetValueOnGameThread();

// At runtime, open the console with (~) and run:
// - `CobaltCore.Controller.InterpSpeed` to get the current value
// - `CobaltCore.Controller.InterpSpeed [new-value]` to update the value
You can add custom stat categories to capture detailed profiling information that lets you measure the performance impact of individual systems and features within your game.
You can exercise more control over how your types and interfaces are exposed, to other parts of your C++ codebase, to Blueprint script, and to users in the editor:
class FSomeClass
{
public:
  // Accessible to all other code

protected:
  // Accessible to subclasses

private:
  // Internal to this class alone
};

// Not exposed to Blueprints at all:
   UCLASS(NotBlueprintType, NotBlueprintable)
// Can be referenced but not extended:
   UCLASS(BlueprintType, NotBlueprintable)
// Can be extended in Blueprints (default for AActor):
   UCLASS(BlueprintType, Blueprintable)

// Read-only to both users and Blueprints:
   UPROPERTY(VisibleAnywhere, BlueprintReadOnly)
// Can't be modified per-instance, but a new default value can be set per-Blueprint:
   UPROPERTY(EditDefaultsOnly, BlueprintReadWrite)
// Can be modified in the Details panel and by Blueprints:
   UPROPERTY(EditAnywhere, BlueprintReadWrite)
You can control network replication more precisely, with custom rules for priority and relevancy, and you can make use of advanced features like the replication graph system.
You can create raw TCP and UDP sockets to send and receive data at a lower level, and you can use the Http and Json modules to communicate with web APIs.
You can define rules for serialization to dictate how structs and other types are written to disk or compressed for replication, and you can hook into lower-level events that occur during saving and loading, allowing you to manipulate data on load and facilitate backward compatibility:
/** Example struct with custom serialization */
USTRUCT(BlueprintType)
struct FBoardCell
{
    GENERATED_BODY()

    UPROPERTY(EditAnywhere, BlueprintReadOnly)
    float Height;

    UPROPERTY(EditAnywhere, BlueprintReadOnly)
    int32 Flags;

    UPROPERTY(EditAnywhere, BlueprintReadOnly)
    int32 PlaneIndex;

    bool Serialize(FArchive& Ar);
};

template<>
struct TStructOpsTypeTraits<FBoardCell> : public TStructOpsTypeTraitsBase2<FBoardCell>
{
    enum
    {
        WithSerializer = true,
    }
};

bool FBoardCell::Serialize(FArchive& Ar)
{
    Ar.UsingCustomVersion(FBoardCustomVersion::GUID);

    if (Ar.IsLoading() || Ar.IsSaving())
    {
        const int32 BoardVer = Ar.CustomVer(FBoardCustomVersion::GUID);
        if (BoardVer < FBoardCustomVersion::SerializeRawCellValues)
        {
            UScriptStruct* Struct = FBoardCell::StaticClass();
            Struct->SerializeTaggedProperties(Ar, (uint8*)this, Struct, nullptr);
        }
        else
        {
            Ar << Height;
            if (BoardVer < FBoardCustomVersion::StoreCellTransformInPlane)
            {
                FVector_NetQuantize Normal = FVector::ZeroVector;
                Ar << Normal;
            }
            Ar << Flags;
            Ar << PlaneIndex;
        }
    }

    return true;
}
You can add editor-only code and data that's specific to the editor or the cooking process, and that gets compiled out of non-editor builds:
UCLASS()
class ASomeActor : public AActor
{
    GENERATED_BODY()

public:
#if WITH_EDITORONLY_DATA
    UPROPERTY(VisibleAnywhere, BlueprintReadOnly, Category="Components")
    class UArrowComponent* ArrowComponent;
#endif

public:
    ASomeActor(const FObjectInitializer& ObjectInitializer);
    virtual void OnConstruction(const FTransform& Transform) override;
};

ASomeActor::ASomeActor(const FObjectInitializer& ObjectInitializer)
    : Super(ObjectInitializer)
{
    RootComponent = ObjectInitializer.CreateDefaultSubobject<USceneComponent>(this, TEXT("Root"));

#if WITH_EDITORONLY_DATA
    ArrowComponent = ObjectInitializer.CreateEditorOnlyDefaultSubobject<UArrowComponent>(this, TEXT("Arrow"));
    if (ArrowComponent)
    {
        ArrowComponent->SetupAttachment(RootComponent);
    }
#endif
}

void ASomeActor::OnConstruction(const FTransform& Transform)
{
    Super::OnConstruction(Transform);

#if WITH_EDITORONLY_DATA
    if (ArrowComponent)
    {
        ArrowComponent->SetRelativeTransform(FTransform::Identity);
    }
#endif
}
You can add Editor modules that allow you to extend the editor with new UI elements, new asset editor windows and importers, and new editor modes and viewport tools.
You can hook into a wide range of Engine and Editor delegates to run custom code when different events occur.
C++ Advantages: External Libraries
And, from a C++ module, either as part of your project or in a plugin, you can integrate third-party libraries.
If there's a C or C++ library that you want to incorporate into your game, you can build it as a static or shared library for your supported platforms, update your module build rules to include it and link against it, and then use that code in your project or plugin.
using System.IO;
using UnrealBuildTool;

public class MyModule : ModuleRules
{
    public MyModule(ReadOnlyTargetRules Target) : base(Target)
    {
        PCHUsage = PCHUsageMode.UseExplicitOrSharedPCHs;
        bEnforceIWYU = true;
        PublicDependencyModuleNames.AddRange(new string[] { "Core", "CoreUObject", "Engine"});

        // Let's say we have a library in MyModule/ThirdParty/somelib:
        // - somelib/include/somelib.h defines library functions
        // - somelib/lib/x64/somelib.lib has been built for our target platform
        // (This example assumes a single supported platform)
        string ModuleThirdPartyDir = Path.Combine(ModuleDirectory, "ThirdParty");
        string LibraryIncludeDir = Path.Combine(ModuleThirdPartyDir, "somelib/include");
        string LibraryStaticLibPath = Path.Combine(ModuleThirdPartyDir, "somelib/lib/x64/somelib.lib");

        // Code in MyModule can now #include "somelib.h" and call functions
        // whose implementations are compiled as part of somelib.lib
        PublicIncludePaths.Add(LibraryIncludeDir);
        PublicAdditionalLibraries.Add(LibraryStaticLibPath);
    }
}
This is one of the most obvious advantages of C++, but also one of the most powerful: literally anything that a computer can be made to do, you can have your game do.
C++ Advantages: Diffing and Merging
Lastly, from a workflow perspective: C++, unlike Blueprints, can be diffed and merged very easily.
This may not be a huge concern for smaller projects, but on a larger team this becomes pretty important.
Before you submit a change to your project's version control system, you want to be able to diff the files you've modified, so that you can review exactly what you're changing. Or you might find yourself looking over the change history to see how a system has taken shape and changed over time, or to track down a bug. In those cases, you want to be able to quickly see how a file has changed at each revision.
Ordinary source code is plain text, which is trivial to diff. There are plenty of tools that can present you with a line-by-line breakdown of the differences between two different versions of a text file.
Merging is another key benefit of plain text. Two people can work on the same source file simultaneously, and the version control system can automatically merge their changes together. There can be merge conflicts, where something can't be resolved automatically and a human has to step in, but the majority of changes to C++ source can be automatically merged.
But Blueprints are binary files, and critically, they're dependent on your project's Editor build. That is, in order to view them, or edit them, or make any sense of them at all, you have to boot up the editor and load your project. That makes it substantially more difficult to diff and merge Blueprints.
Luckily, the Editor includes a built-in tool for diffing Blueprints, and it works pretty well in simple cases. If you just want to review your changes before you submit, you can do that very easily from the editor.
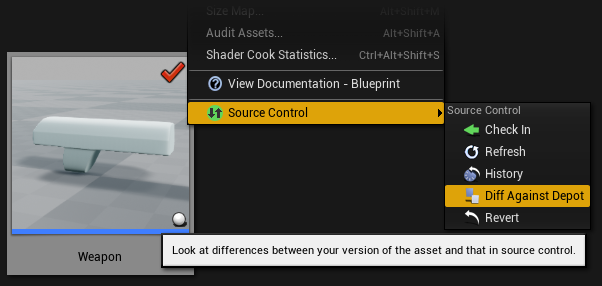
You can run into trouble, though, if you're diffing against old revisions that depend on types that no longer exist in the current build.
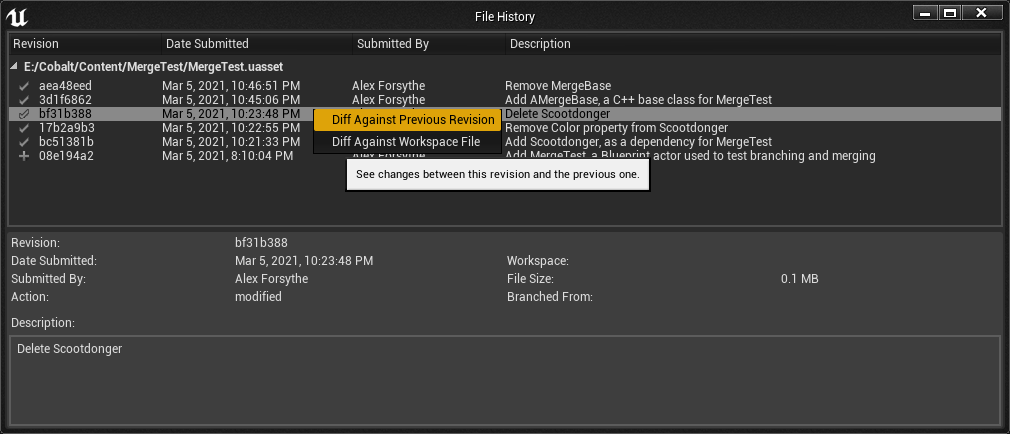
Doing code reviews on Blueprints is technically possible, but it's a much more cumbersome process compared to looking over source changes.
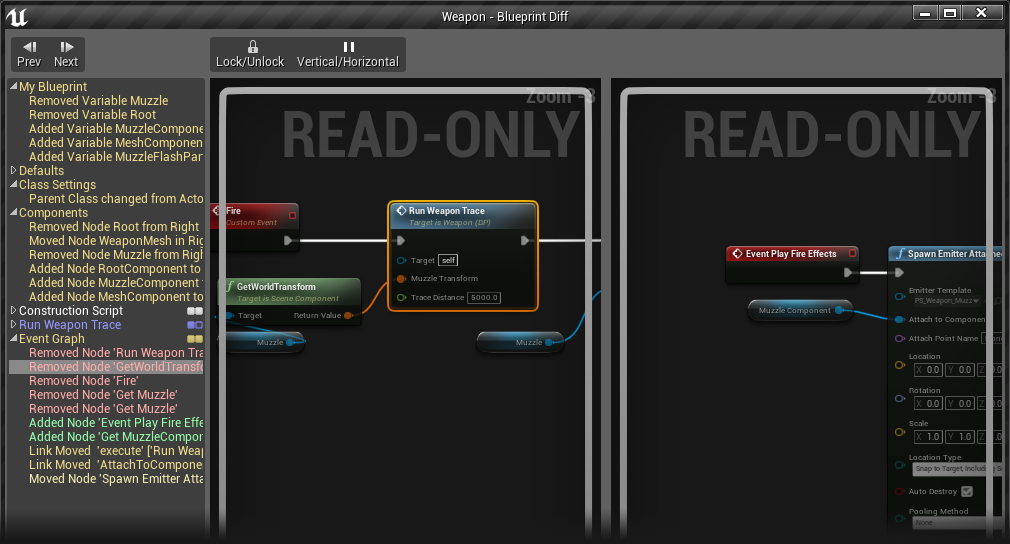
For merging: Blueprints aren't really mergeable – there is a built-in Merge Tool that comes in handy when you need to resolve conflicting changes to a Blueprint, but any merge on a Blueprint asset always requires human intervention, even when there are no conflicting changes. The Merge Tool is fairly limited: it basically shows you the relevant changes, and lets you pick one version or the other to accept – beyond that, you need to fix things up manually.
So conventional wisdom is that you should treat Blueprints like any other asset, where checking out the file means you're locking it for your exclusive use.
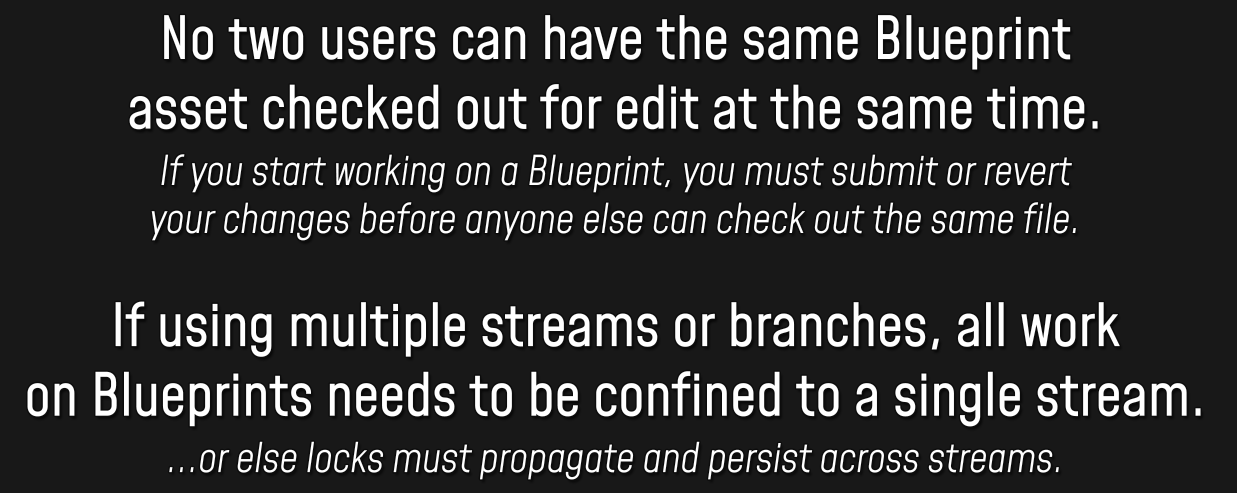
Ultimately these are acceptable tradeoffs, but given how powerful and useful Blueprints are, I do think it's a shame that they carry these caveats when it comes to how they can be used in a collaborative workflow. For me, this is the one thing that I really unambiguously dislike about the move from UnrealScript to Blueprints in UE4.
Personal Preferences
And finally, that brings us to one last factor: personal preference. It's OK to have preferences. I think Blueprints are great, but sometimes I still miss UnrealScript, because having to write code by dragging little lines around with a mouse can start to feel very cumbersome when you already know exactly what you want to type.
It's OK to dislike some kinds of work and enjoy others. We all have preferences. But we have to maintain some sense of self-awareness to make sure that we're not letting our personal preferences cloud our judgment.
The work that goes into making a game is complex, and it's a team effort. When you're making decisions that affect the whole project and the whole team – like how to balance C++ and Blueprints – you have to weigh a host of more important factors:
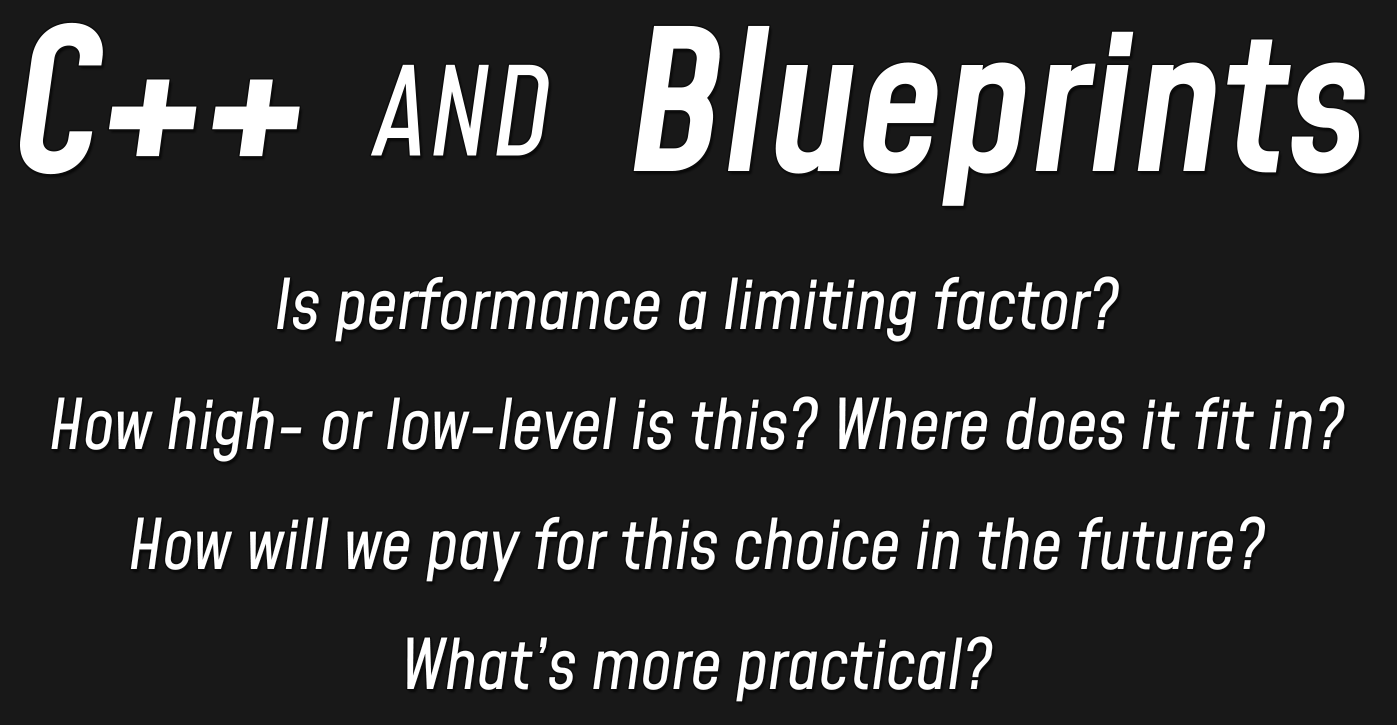
- What's best for performance?
- What fits best with the overall design of the project?
- What's going to be the most maintainable?
- What's going to let us get the job done given our schedule and budget constraints, and based on the makeup of our team?
Usually, you'll arrive at an answer well before "I don't like typing well-formed C++" or "I don't like hooking nodes together" becomes a relevant factor. But if all else is equal and either option is valid – or if you're just making games as a hobby – then by all means, you should take whatever approach you find more enjoyable.
After all, people tend to do better work if they're having a little bit of fun.
Conclusion
But no matter your background or experience level, I'd encourage you to try and get your feet wet with both C++ and Blueprints. If you take your time with them and get an understanding of where their respective strengths lie, I think you'll find them both very fun.
So there you have it – my manifesto on Blueprints and C++ in Unreal. Thanks for sticking with me, and I hope you learned something new.